

diemai
-
Posts
3,867 -
Joined
-
Last visited
-
Days Won
23
Content Type
Profiles
Articles
TU Classifieds
Glossary
Website Links
Forums
Gallery
Store
Everything posted by diemai
-
@ GT hunter Here is another thread named"Mausblinker" on that German site displaying a few pictures of spoons plated with tin solder to add weight at particular locations of the lure . http://buse.alfahosting.org/V1/index.php?option=com_fireboard&Itemid=131&func=view&id=4875&catid=29&limit=6&limitstart=0 Seems , that these links do work out , at least for myself as a registered member of that site . greetz , diemai
-
@ GT hunter If you'd decide to still go for spoons , here is a link to a German site with elaborately pictured instructions , that I've once put up in there........but I don't know , whether straight linking is possible there , ...the site is named My link , the particular thread is named " Blinkerherstellung in der heimischen Werkstatt"(spoonmaking in the workshop at home) . Here is the link : http://buse.alfahosting.org/V1/index.php?option=com_fireboard&Itemid=131&func=view&id=3073&catid=29&limit=6&limitstart=0 good luck for your lure projects , ..........greetz , diemai
-
 @ Jio So this is the "Westin's Tjocke" , that some guys say , that it doesn't swim well , as you've told me before ! Haven't seen one before , ........hope , that your pretty paintjob won't be wasted then ! Greetz , Dieter
 -
 @ Jio ....some very welldone baits again , Janne , ...............I like this "Clown Color" second from top ! Greetz , Dieter
 -
@ GT hunter You could buy hobby polishing tools in every toolmart ,........ these consist of a few different wheels(steel bristle , brass bristle , cord , felt and linnen , plus some polishing paste) . These wheels are about 6" in diameter and have a shaft to fix in the chuck of a drill . The drawback is , that most common drills are too slow , one needs quite a few thousands of rpm to achieve a good result , ........I am using these hobby tools , but I chuck them into a souped up electric motor on my lathe , that turns somewhat faster than an ordinary drill . The polishing does work with a drill at about 2500 rpm , but its harder and the results are not that good , as if done at double speed ! You might as well decorate your spoons with adhesive foil , scale foil or even simple aluminium tape , also painting or glitter flake plating is possible , but make sure to either polish or at least clean off the tarnish and buff them before , ...depending on which method you'd prefer . To get a little idea , you may check my gallery uploads a way back , I've uploaded quite a few of my spoons in there . And if you're not geared up that well , I'd advise to go for copper sheet , that is the easiest to work on , also the heaviest , ...unfortunately also the most expensive , I guess . good luck , diemai
-
@ GT hunter I have been making casting spoons for almost two decades now , ..........and metal work is not easy to achieve with just hobby tools(did a lot of cutting and shaping at my work in the metal industry) . I have no idea , which kinda spoon you have in mind other that in should be big , heavy and saltwatwer proof ! Is your planned design rather a thin sheet-metal type of lure for casting/trolling or a rather more 3-dimensional one for jigging ? Stainless steel sheet 0f 0,5mm thickness can still be cut with ordinary shears ,..........1,0mm is already impossible to cut it and requires bench shears or a metal bladed band saw for the raw cut out . Stainless steel sheet thicker than 2,0mm thickness can't be hammered into a cupped shape anymore just by hand and ballpeen hammer anymore , would require some kinda press and stamping/shaping tools . After the initial cut-out the final shaping and smoothening the outline edges would have to be done with an industrial grade grinding wheel , .......you could clamb the spoon blank in a vise as well and file to shape , but this takes A LOT of elbow grease and time ! Other sheet metals suitable are copper and brass , though I think , that they would require added protection(topcoat) against saltwater . These metals are easier to work with than stainless steel , f. e. one can still cut 1,5mm thicknesses of these with ordinary hand shears , copper for instance is very soft to beat it to shape in a hardwood cupping template . They are also easier to file down with large coarse files compared to stainless steel , but still time consuming compared to carving wood lures . For heavier spoons you might use thinner brass sheet 1,0 mm or copper sheet 1,0 to 2,0 mm and plate them with tin solder(flux containing) . If you want rather more a jigging spoon , you need to cast them from lead or special lead alloys , thus requiring a mold , heat source , etc . Over here in Germany a few readily made molds for such lures both of aluminium or heat resistant silicone are avilable at one certain supplier , but you might as well make a mold at home . greetz , diemai
-
@ ROWINGADUBAY About 30 years ago I went through an apprenticeship as a toolmaker in the metal industry , and I believe to recall to have heard , that an increased length of threaded shaft does NOT result automatically into a stronger bond ! With a certain length of a thread the maximum strength is achieved , can't be increased anymore by adding threaded shaft length ! But glueing in the eyes certainly does , extend the pilot hole a bit larger in diameter at its entry to create a kinda glue plug surrounding the eye's shank ! good luck , diemai
-
@ jamie The link to that particular video is , you may also utilize the "YouTube" search funtion for my webname there , which is "61diemai" .Thanks a lot for your interest , .......I'm planning on making more lure test videos in future , but right now I am pretty short of leisure time for making lures , all turned a bit slow with my carving presently ! greetz , Dieter
-
@ BrownPigs I haven't seen a homemade muskie bait yet with such an "unconnected" line tie on a Lexan lip , ........guess , that people are not that confident and go thru-wired exclusively . You can rig such line tie onto a metal lip , that is screwed onto the lure body , preferably made of stainless steel or thicker aluminium sheet . I have once seen a video of a huge African nile perch , more than 60" long , ...destroying a "Rapala Super Shad Rap" , the wood body was already halfway gone , but the fish still hung on the hook and harness . If you see such , you won't like to make any experiments and go thru-wired for big fish lures ! But if you still wanna trie it , use thicker Lexan , and make sure to anchor the lip with crosswise pins , not just glue it into it's slot . greetz , diemai
-
@ BrownPigs Check out this old thread of mine , .......some pictures and write-ups in there , that might answer your question(or also raise new ones ) . As from post #15 : http://www.tackleunderground.com/community/topic/13043-new-banana-lure/page__p__95091__fromsearch__1entry95091 good luck , diemai
-
@ jamie Thanks a lot , Jamie........much appreciated , .........metal lures are actually what I started out with many , many years ago ! And I still do like them , .........at least all kinds of spoons ,........ don't fish inline spinners THAT much anymore ! greetz , diemai
-
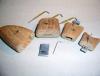
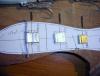
Took a chance today and put this particular hinge design to a test ! Still could not find suitable tubing , so I just utilized stripes of 0,5 mm stainless steel sheet ,...... the principle remains the same , anyway . The total swing of all sections scratches 90° like this , still have to take some material away from the male parts to achieve a slightly larger gap , then it should be OK , even after painting and topcoating ! The brass tubings still have to be trimmed to suitable lengths , they act as bearing bushes and to seal off the hinge bores against water sepage . I will have to epoxy them into the bores caring about accurate fit and location vertically , as they also act as spacers for the hinge sleeve , a vertical bearing surface and also set the proper vertical position of the segments against one another to maintain smooth outline transitions at back and belly . I will squeeze the bottom ends of the belly tubings closed before glueing them in , ........this way the hinge pin can't slide out at belly side anymore , ...........after the final assembly I would just secure the top end of the hinge pins with a drop of glue , ....leave a small countersunk at the back exit of the hinge pin bores for that purpose . I will also drill one or two little crosswise holes into the sheet metal connectors , so that the epoxy glue will bond them more reliable into their slots , .....the crosswise wire pins shoud assure the possibly strongest bond . Hope , that you can figure out by my pictures , ........could not take the 90° total swing of all sections , all parts are still loose , it would have fallen apart on one single improper move ! greetz , diemai

-
@ hazmail Never saw this two earlier patterns of yours , Pete , ........they really look great ! And these latest spot patterns are also some kinda special , .......great paint art ! greetz , Dieter
-
@ Milia B , @ flatsrat76 , @ deadeyejr . Thanks a lot for your kind words , folks ,...... much appreciated , ............encouraging me to make some more test videos at times ! And Milia , .......I am filled with that very imagination as well anytime that I hold one of my freshly done homemades in my hands , ........great expectations , .......but sometimes do come true ! Thanks again , ..........greetz , Dieter
-
@ jigginpig I see your concerns about friction on the joints , .........but I think , that these pop rivet heads would act as a good bearing surface , because the minor the contact surface , that you've mentioned , quite a bit . But still I guess , that this tubing construction introduced here would not move as smooth as the finished bait shown does , but maybe still sufficiently frictionless ? Just oughta try it out , but.... heck , ...I could never find suitable tubing , 12mm dia. is a bit too small , I want 14mm , 15mm or even16mm dia . brass ! I might as well make these connecting parts out of sheet metal , bend in the same manner as shown in my "sheet metal hinges" tutorial , .........the result would be pretty much the same ! But thanks for your input and hints , anyway , ........much appreciated ! greetz , Dieter
-
 @ Lance Thanks a lot ! In fact I like these lure designs of yesteryear quite a bit , as many of them are fairly easy to reproduce on a lathe and I am always curious about their swimming actions . I do not own airbrush gear as well , I paint my lures with rattle cans and/or model making enamels . I don't bother about premium grade paint jobs , I am rather much more interested in lure construction and design , ...sad , but true ! greetz , diemai
 -
 Got the line , Mark , but not the weather , ..........seems that winter won't leave too fast over here ! thanks a lot , .........greetz , Dieter
 -
 Nice crankbaits , .........very interesting outer shape on the two bottom ones ! Welldone paint jobs , too ! greetz , diemai
 -
 .......guess , that you have achieved your goal , ....truly an unique looking lure ! Did you give it a swim already(not in snow , but water )? welldone , ........greetz , diemai
 -
 Nice spot pattern , welldone ! greetz , diemai
 -
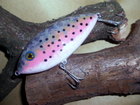
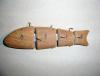
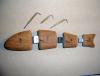
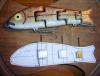
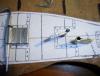
Hi , folks , Being inspired by TU and by all of the great fella's in here , I've been tinkering with a few swimbait designs during the past months(or even more than a year ?) . Always on the quest for the possibly easiest , fastest and most reliable way of joining wooden swimbait sections , .......also a lot of ideas were put up in here by other fellow members , ....just a great community ! Anyway , the last idea posted in here , that I can think of , was utilizing double leader sleeves as a joining part , and that is the basic of the construction , that I have thought of right now . My idea is to make the joining parts inbetween the single swimbait sections out of round metal tubing , that is simply squeezed flat in a vise , leaving an open sleeve end for the later connecting hinge pin to pass through . The flat side of the squeezed tubing piece would be epoxied into a centered slot in the male part of the joint , additionally secured by a crosswise wire pin , ......the sleeve end of it would reach into a sufficiently large and wide pouch cut centered into the female portion of the joint . The required slots and pouches could easily be furnished with a "Dremel" and it's different small drill and router bits . Like on my previous swimbait(also shown on the picture) I would glue in small pop rivet heads into the hinge pin bores to act as bearings , spacers and seal off against water sepage(check image , I've laid them in about the position they would be glued in later) . One would have to take care about making the pouches in the female side large enough for the joint to still move freely after topcoating as well . If the body width of the bait is still thick enough at the female front parts , these pouches would probably not show too much , ......only if the flanks do taper down the tail a kinda gap would probably appear , as the material is not thick enough anmore to cut a "hidden" pouch still providing sufficient sideward play of the joint . I intend to round off both opposing section ends a bit , so that they are able to pivot against one another without binding , ....maybe it would even be enough to round off only one side .......I shall see ? On the pictures you can see the original sketch copy of the finished bait already glued on a teakwood kitchen board , I have marked the intended separation lines with a felt marker . The front hinge piece is made from stainless steel tubing 12mm X 1mm (12millimetres dia. and 1mm wall thickness) , the one in center from 10 X 1 aluminium and the rear piece from 8 x 0,6 brass tubing , ..............these are all tubings , that I could find down the workshop so far ! Just did some testing today to see whether shaping the tubing pieces would cause any difficulties , ...but it really doesn't ! Just cut required length off and squeeze it in a vise to an elongated shape , ........now put a round dowel(drill bit shaft or nail) into one inside end of the oval , leave that end a bit protruding over the vises edge and squeeze real tight finally , .........the dowel inside of the protruding end would keep a sleeve open , you might only have to pull it out with pliers afterwards . Naturally that dowel has to be a bit thicker than your intended hinge pin diameter , in this case I used a 2 mm bit shaft and I am gonna take 1,5 mm wire pins to connect the lure sections later . The stainless steel tubing would surely hold up against any fish , but it is real heavy stuff , ........and not easily accessible to me ,...... found a piece accidentally on the scrapyard of my work . The center aluminium tubing might probably be too weak , as after bending it to shape it is obvious , that the material's structure has already been disturbed at the tightest curves , ........don't trust on it too much ! The brass tubing does not show signs of wear and tear like the aluminium one , but it is too thin , ....I need it with a thicker wall of 1 mm as well , so I guess , that this would be the one to go for , ......it is not quite as heavy as steel and also easy accessible over here ,....... almost every tool mart stocks brass tubing . Also I think , that I would need a larger tube diameter than just 12 mm , maybe 14 mm or even 16 mm , so that these connecting hinge parts would turn out a little longer , so that they could be anchored a bit more sturdy into the wood . Well , just my thoughts so far , .........I am quite confident , that this design would work out , ........what do you think about it ???? greetz , diemai
-
@ jamie I haven't forgotten about my promise making a homemade spoons video , .............only took some time , .......it's never too late , though ! So here it is , sadly still of minor quality , .....just bought myself a little video camera , being an absolut computer dummy I've had a tough time getting all of the originally twelve video sequences from the camera together to make up for two clips and finally submit them onto "YouTube" . Maybe also my PC memory capacity is too small , don't now , .........tried to utilize "pinnacle3"(a download from a friend) , but I could not get my camera uploads into that program to work on them , so I've tried my old "picasa3" , and I finally got it done , though dead slow ! I don't know , why sometimes the pixels run wild in that video , .....maybe next time I should do the filming with less pixel setting on the camera ? Anyway , at least something is visible , .....and in general the picture focus quality is a bit better as on my older videos taken with my simple foto camera . Hopefully I would be able to learn a bit more about all of these things to be able to produce better lure videos in future . greetz , Dieter
-
 Absolutely great work , foiling at it's best ! greetz , diemai
 -
 Very beautiful and premium grade paintwork ! Great job , ....greetz , diemai
 -
 Thanks a lot , ............actually such patterns always come in quite useful , when I can't think of something different ! greetz , diemai


