diemai
-
Posts
3,867 -
Joined
-
Last visited
-
Days Won
23
Content Type
Profiles
Articles
TU Classifieds
Glossary
Website Links
Forums
Gallery
Store
Everything posted by diemai
-

Help! Problem With Ink Running Under Polyurethane Topcoat
diemai replied to castmaster's topic in Hard Baits
@ castmaster Not quite sure , whether I have used polyurethane before as a topcoat , but I've had same problem before with some other types of topcoat like PUR-laquer(probably the same stuff) , two component automotive laquer , modelling dope and some kinds of epoxy . As I am really fed up of these issues , I always cover my lures with acrylic clear paint twice prior to putting on the "real" topcoat . Sometimes some of those clears would also dissolve my paintjobs(certain paint types) or the black center dots of "nightglow" lure eyes . If you only need to protect your signature , paint only this one over with acrylic clear , ......you might also try to apply a piece of transparent(fingerprint-free )tape onto the writing , it should not be visible under the final thick clearcoat anymore . good luck , diemai -
@ Nathan I have made a few ,..... guess , one or two are amongst my gallery uploads in here ! I have always tried to make the lip plane under an accurate angle of 45° refering to the lengthwise center axis of the lure blank . Wasn't that easy to do on spindle-shaped , lathe-turned blanks , but I've also made "Jitterbug"-style lures with a rather rectangular cross-section and body shape , so I could use the lures belly outline as a reference for accurate marking and cutting the 45° head plane . The lures work pretty well this way ,........ I remember before making my first lure like that years ago , I had used a commercial "Heddon" as an example . I have tried lips out of stainless steel and aluminium ,...... the steel ones are too heavy for my taste , letting the lures float up head down sometimes(depends on body shape as well). But probably these heavier lips are designed to shoulder into the water better , thus generate more noise , ......I don't know , ......I'd stick to aluminium . good luck , diemai
-
@ BobP ........with greatest passion.......... ! greetz , diemai
-
Hi , Hunter , Have a look at my signature underneath each post of mine ! True words , I guess ! I am very sure , that your are going to improve and soon find out about what makes a swimbait swim like it's supposed to do , ......Rome wasn't built in one day , but with the help of this great site you should hit it right real soon . Seems that you're already obsessed with big enthusiasm , so nothing should go wrong ! good luck , Dieter
-
@ finlander No wonder , that you are looking for a cheap alternative , 1/8" is a pretty large bore to fill up ! I would only drill holes of 1,5 to 2,0mm , that's about half as thick(wire shaft 1,2 to 1,5mm) ,....... but I won't do these on blanks longer than max . 4" , as the thinner bits are pretty much more subject to wander off center as your thicker one , .........only one or two crawlers , that I had rigged this way , were a bit longer than 4" . Made these for an American muskie guy ,.... for my local pike I would have rigged screw eyes only ! But I most likely chosse this method for lures with rotating head portions only , so the centre wire shaft would be glued into their rear portion , the front portion would rotate on that shaft . For thru-wired crankbaits a centered wire shaft is not absolutely neccessary , so I would either cut a slot in the belly and set in a wire harness or make the lure of two halves with the harness inbetween , .....it's just more hazzle-free IMO than drilling a long center bore . I am sure , that pouring in Etex would work out ,......for my previously mentioned "sucking" method I take 5 min epoxy glue , not as liquid as Etex at all( and my bores are smaller)! good luck , diemai
-
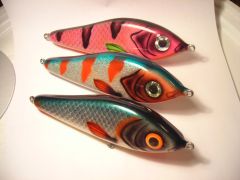 They're very beautiful ! greetz , diemai
 -
@ Capital Fishing Lures Does it have any weights in it's belly ? The single joints are absolutely not of advantage , as the single sections have too much sideward play or twist against each other like this . This way the bait looses a lot of its hydro-dynamic features enabling it to swim in its typical(and desired) "snake" pattern . I know ,........ jointed crankbaits are also jointed with only ONE interconnected pair of eyes , but here the movement is generated by the diving lip ,.......... a swimbait "snakes" due to vortexes generated by the first section and moving down the sides of the bait, pushing the rear sections sideward into the typical motion , any sideward twist of the sections against one another would render the power of those vortices less effective . A tow eye like yours placed symetrically in center might not be of advantage as well(though there certainly are baits like that , that work absolutely well) , ....I like to place the tow eye in a way , that the oncoming water pressure on the head portion of the lure would cause leverage around the line tie to help the first section break out to one side ,.........as a result I would not shape the nose of my swimbaits symetrically nor place the tow eye in the symetrical center . So basically there are three paramount features to be looked after on a swimbait : 1. Jointed in a way , that possibly no sideward twist of the single sections can occur(two pairs of interconnecting eyes , hinges , "eye-and-pin" connection, etc....) . 2. Near neutral buoanycy , either slowly rising or slowly sinking is also possible . 3. Unsymetrical head portion and tow eye positioning to cause kinda leverage around the tow eye . Another basic swimbait rule is , that all the hinged sections together should have a minium of 90° sideward swing from first to last section . Does your bait do the snake pattern on a straight retrieve even ? Or you have to impart an appealing action with rod tip manipulation as you've only mentioned a "dying fish" action ? Only one ounce of weigth for a 6" bait also seems pretty light to me , ........there is a theory , that swimbaits work best , when their body volume weight is at about the weight of the surrounding water , meaning that they would suspend . In reality off course there are floating and sinking baits , that still do work well , but in theory those vortexes mentioned above could move a neutrally buoyant bait best , .......sounds logically to me , anyway ! To view typical swimbait simming patterns go to My link , type in terms like "swimbaits" , "swimbait testing" , "swimbit building" , etc . into the search bar there , you will find heaps of videos on the subject there . good luck , diemai
-
@ finlander I haven't used other but epoxy before to glue in such thru-wires , like you've described ,....... as I don't only wanna fill up the void and/or seal off the interior of the blank , but really bond the harness to the wood as well ! I would get the liquid glue into the bores by sucking through with my mouth , closing all other exits with my fingers , ........never got it into my mouth , as it becomes quite hard to suck through once the holes are getting filled up and my epoxy glue is not that extraordinary liquid as well . Certainly I would still apply glue onto the wire as well before inserting , so I can achieve perfect coverage with glue . I do not thing , that using thicker gauge wire for the hook hangers would make sucha big difference in terms of ballast on 6" to 7" baits , surely they would require some lead into their bellies still ? good luck , diemai
-
@ Herman Nel Hi , welcome to TU ! I am presently looking for a new supplier for epoxy topcoats as well , since my old component supplier has taken the stuff , that I have been using , off his site for months now ! Many builders on German lure making sites use epoxy from My link , which is a supplier for boat building , thus offers different kind of resins and hardeners , also in small amounts . There are two basic epoxy resins and different hardeners available , at least with one resin it is possible to alter the proccessing and curing time by mixing them with different kinds of hardeners . Anyway , I am used to a small proccessing and short curing time from the old product , so I am gonna make my choice accordingly , .........this way I do not need to use a rotator or drying wheel , but I'd be able to only switch around the lures a few times to dry , before the epoxy starts to set . Most guys over here utilize resin/hardener with a longer proccessing and curing time , these provide thicker and more even coats , but these absolutely require a drying wheel , otherwise the epoxy would flow down onto the bottom side of the lures and cure like that , ......and they're wasted ! Maybe , you can try find sucha marine supplier at your location as well and check the offers there ? ? I do not have much experience with different topcoats , I've also been using a two component automotive clear laquer and also modelling dope , but these two are more likely to affect and dissolve any paint layers underneath rather more than epoxy does , ......but to be sure , I'd always coat the paint design with two layers of acrylic clear paint before finally topcoating . good luck , diemai PS : your website is very interresting !
-
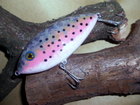
 I like these a lot , ....absolutely hot color in cold water over here ! greetz , diemai
 -
@ finlander I most likely weigh my lures individually in a water bucket , first tape on the weights on the temorary laquered blank(to prevent water sepage on the blank) ,....I never do it on a lure , that is already painted and topcoated . This way I determine about amount of weight and neccesssary location . I would mark the weight locations on the blank and embed these afterwards . I never cast molten lead into a lureblank , .......I've heard of some Dutch and Belgian glider jerkbait builders doing so , but never on a finished lure but unpainted blanks only . They'd cast more lead than neccessary into the lures ,........ whilst water bucket testing they'd drill out lead again to have the lure sink at desired rate and position . If I should find , that ballast is neccessary right at a screw eye location , I would rather put the weights fore and aft the eye , as I most likely would have epoxied it into the body already prior to weighting and painting . But in this case one might also utilize a longer shanked screw eye and put it right through the lead weight . Olive or ball inline sinkers are well suited for this , as one only has to extend the line hole for the screw eye shank to pass through . I have done this on rare occassions on "Spook" type topwaters , when I wanted the ballast to sit right at the very tip of their tails . I would even carve the sinker to a conical shape to make up for a smooth transition with the wood blank . greetz , diemai
-
Thanks a lot for your kind words again , folks ....much appreciated ! @ mark poulson Nice hint about the super glue , gonna do like you've suggested , Mark ! So you mean , that the male hinge part should better point backward and the female half forward ? I have had a discusssion with Dave before about those vortices causing a swimbait to "snake" , I can't imagine , that there would be any difference with this type of hinge , maybe only with the screweye and pin type ???? But I don't really know , ........due to the bearing rivet heads these hinges move so easy , almost without any friction , ......don't think , that there are gonna be any issues concerning reduced movement ! Thanks again , .......greetz , Dieter
-
 Very nice fish , congrats ! greetz , diemai
 -
 Doesn't look like a mess to me at all ! Nice lure , ........greetz , diemai
 -
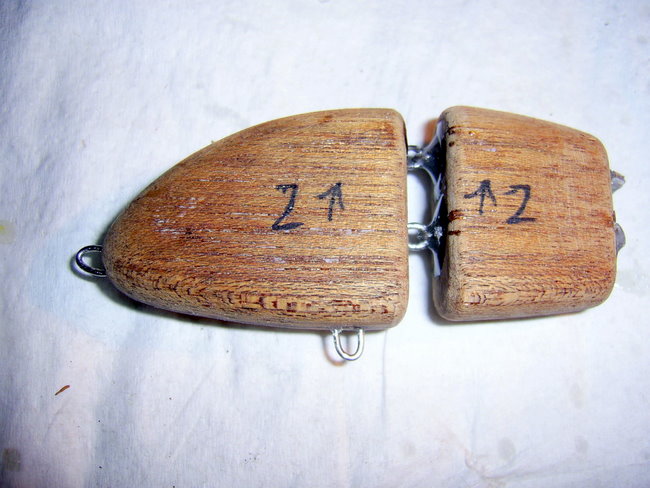
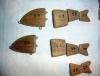
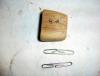
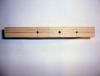
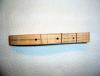
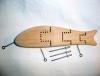
@ Capital Fishing Lures In picture 12 you can view the aluminium pop rivets still with their shanks attached , I'd just knock these pins out after having filed the rivet heads to required length and file in the grooves . You can buy these in any tool shop or ironmonger in various sizes . There are also stainless steel screw eyes pictured there , these are especially manufactured for fishing lures , as they are longer shanked(different sizes and styles available) than "ordinary" screw eyes of comparable size also avilable in tool marts . I mailorder these screw eyes from My link , but there are many other suppliers around as well . But keep your hands from brass screw eyes , as these may easily twist off in hardwoods ,..... always go for stainless ! The wire hinge pins are made from 1,5 mm thick stainless steel welding wire , some guys also use bicycle spokes for the purpose , stainless steel wire in various thicknesses and styles is also available at component suppliers like the one linked above , but I am not sure , whether of sufficient thickness ? Otherwise look out for welding supplies . @ rofish Thanks a lot for your idea , haven't thought about such an temporary eye before , ......I should think over it , it would really ease the painting ! But I won't leave it , probably only make a small 1mm bore and superglue a piece of aluminium wire(got heaps of it for drying hooks)into it and snip it off again , when done with the lure , ........it would hardly be visible anymore ! greetz , diemai
-
 Sorry , guess you should have provided more detailed pictures and descriptions for opinions , ...........is it a sinking glider or a topwater ? greetz , diemai
 -
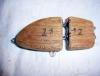
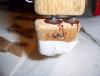
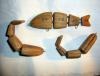
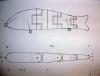
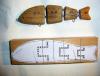
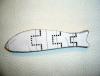
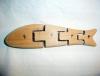
Thanks a lot for your kind words , guys , ......very happy , if I was able to provide some input ! @ Capital Fishing Lures Which connections are you refering to ? The baits made of teakwoood are connected with wireforms epoxied into holes and slots leading through the single sections , an extremely elaborate method , as I had to find out . Cleaning off the excess glue takes ages ! The larger bait's sections are connected by wire pins ,....... guess , if you have a closer look on the pictures and the write up , you will surely figure out how it works ,..........or what is exactly the thing you can't seem to figure out ? @ jamie It was fairly easy to shape that lure , only thing I had to care for is to glue on the sketch copy exactly aligned to the outer edges of the wood board , so that I could drill the hinge pin bores exactly under 90° related to the boards longer edge . I have marked and drilled these holes from either side to meet in center , this way I could eliminate too much wandering of the 3 mm wood drill bit as if drilling through from only one side . You may notice , that from the start I have kept the hinge pin bore of the third joint a bit smaller , as the lure body becomes narrower down the rear , .........but later I had also extended it to 3 mm , as the material was still sufficiently thick and also not too much tension would be applied onto the tail section as it does not have any hook attached . The rigidity of such joints stands and falls with the type of wood used , I guess , ........this beechwood is quite hard and dense , maybe almost like maple , but a tad more buoyant , I suppose ? @ JBlaze , @ captsully18 Indeed these rivet head bearing surface provide very little friction between the single sections , ...if I take the lure blank between thumb and index finger to hold it upright it only takes very subtle , hardly noticable twists from the wrist to get them to swing around , .....very smooth movements ! @ Jio Would still take a longer period of time before I'd get to paint all of these lure blanks , ...I still have to make some more smaller swimbaits for a lure swap , so when I'm done with these as well , I'd start painting them all . You know , that I am not the fastest of a lure carver ! Thanks again, folks , ..........greetz , Dieter
-
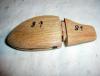
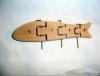
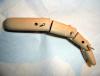
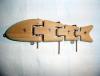
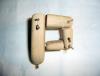
Hi , folks , I've been spending the past weeks with making some new swimbaits and I've found , that I probably chose the most elaborate and time consuming way to do it . These five lure blanks of brown colored wood(guess its a kinda teakwood) have the connecting wire forms epoxied into grooves and bores through the wood body portions , this always involves thorough eye cleaning with a "Dremel" , needle files and carpet knife ,.............. every time before I could connect the next segment . For every step of glueing in the wire form I'd have to wait 24 hrs. for the glue to cure well , otherwise it would smear the cutting tools , when cleaning off the eyelets . I have used about two weeks to connect all of the segments of these five lures , working on them Monday thru Friday mornings one to two hours each day . Also the painting and topcoating of these would surely give me a tough time ,........ guess , that I won't be able to paint the tail section together with the other three sections , ..........how would I hang the lure to dry without an eye on the rear ? Would have to tie a piece of cord or wire around the tail for hanging , thus paint it in a second process , after all the rest is done ! I am not complaining nor asking for advice , just mean to display my experience to help others think about their own designs to avoid too much work on their baits . As a result of this very time consuming procedure I had another swimbait idea back at the 2nd of December . In fact not a new or different idea of hinging the swimbait sections directly ,...... virtually utilizing these as the hinges themselves , not employing any other hinge parts except the connecting pins . Maybe only the working process on this lure , made of sand colored beechwood , is a little different and comes in real quick , if utilizing the right machinery like a drill press , belt sander/sanding disc and a bandsaw . Only the final fine shaping of the hinge portions engaging into one another was a bit time consuming and elaborate , but still a lot faster than glueing in wire forms like on the teakwood lures . Since I made my first swimbait about 1 1/2 years ago with the help and assistance of mark poulson(thanks a lot , Mark , if you read this !) , I was aware , that the problem of those wooden swimbaits connected with a pin would be possible water sepage through the hinge bores , that can hardly be sealed off . Now , to overcome this problem , I have thought of glueing in kinda bearing bushes into the hinge pin bores . These and their bonding glue will seal off the walls of the bores . I took aluminium pop rivets 3 X 6 mm for the purpose , their heads also act as spacers inbetween the clearance gaps of the single sections , thus no binding of the sections would occur after painting and topcoating the single sections in a disassembled condition , also the rivet heads act as excellent bearing surfaces making the segments move real smooth and easy . It was only a matter of minutes to file the rivet shanks to proper length and put some grooves for a better glue bond , .......I just chucked them into the chuck of my lathe with their riveting pins(never removed at that stage) and filed on the with a small triangular coarse file . I would glue in the rivets prior to painting , if paint or topcoat would accidentally cover them , I'd simply file it off to get back to the original fit . I'd also close the belly side exit of the hinge bores with a wooden plug and glue , so that the pin won't slide out , ...the top exit I would finally close with a drop of glue after the final assembly . Hope , that you can follow my thoughts by the pictures , any questions or comments are welcome ! greetz , diemai

-
 Very well thought of design with that cupped chin portion , ...love it ! greetz , diemai
 -
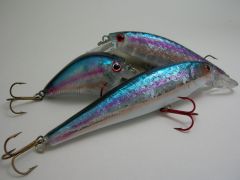
 Absolutely fantastic paintwork , that scale pattern is awesome ! greetz , diemai
 -
I most likely check in the morning after waking up and having my breakfast at the screen and also log in late at night after lateshift work and some TV ! @ Vodkaman Good , that you've been disconnected for only three days , Dave , .......could have been worse ! Nasdarovje ! greetz , Dieter
-
@ Rob Raven Quite popular here in Europe , exellent for medium sized crankbaits and topwater baits . Not suited for larger sinking glider jerkbaits and/or large , voluminous crankbaits , as it would require too much ballast that might hinder the action . It's heavier than balsa but ligther as pinewood and holds epoxied screw eyes very well . I does not have a pronounced grain like pine , cuts and sands very easy . The abache wood blanks should be sealed off against water sepage ,...... many utilize a 50/50 solution of linseed oil and turpentine , but this is a time consuming process and may yellow bright colors on the lures after a few months , when solvent based paint was used . Abachewood is available over here in lumber yards in boards of 22 mm and 26 mm thickness , it is mainly used for seatbenches in the famous Finnish steam baths called "Sauna" , therefore one can sometimes find these under the term "Sauna boards" as well . greetz , diemai
-
@ Net Man I don't utilise a rotator , as my epoxy top coat sets pretty fast ,.... only have to switch the lures round for a few times before it starts to set . For topcoating jointed lures I would utilize a rectangular wood dowel approx. 15mm X 40mm , that is longer than the lure and has a larger and longer open wallhanger eye screw mounted 90° offset on either end into the narrower side of the dowel . One could take rubber-O-rings to fix the lure inbetween the two eyescrews , but it is more firm and rigid to take thin nylon cord(the type for kite flying) and make two smaller knotted loops , .........poke these through the lure's attachment eyes on either end and slide over the open eye screws . To finally fix the lure for painting/topcoating , I'd put a piece of thicker , rigid wire into one cord loop and twist up the cord to put pull tension onto the jointed lure , after it would sit real firm this way , I would bend the wire piece to proper shape to bind with the eyescrew next of it , ..........the tension of the twisted cord will keep it in place . The wood dowel has to be kept rather narrow to have easier access with a paint brush to every portion of the lure . To prevent this jig from falling to the side(not very stable stand on the narrow dowel) whilst working , I'd fix one or two spring loaded clambs onto it to act as a stand , this way it sits stable on the workbench , no matter whether vertically or horizontally . greetz , diemai
-
 Always thought , that your baits were only single works of art , but now I see , that you make multiple baits with the same pattern ............all handpainted ......WOW ! great looking lures ,........greetz , diemai
 -
Site For Hobby Tools, Magnifiers, Clamps,dremel Accessories, Etc.
diemai replied to RayburnGuy's topic in Hard Baits
@ RayburnGuy Thanks for posting this site , ........quite interesting to me ! Not for ordering for stuff , most of the items shown I can get over here as well ,....... but interesting to compare prices and above all , read the English terms for some tools , good learning effect for me , as I won't find these in any dictionary ! greetz , diemai