

diemai
-
Posts
3,867 -
Joined
-
Last visited
-
Days Won
23
Content Type
Profiles
Articles
TU Classifieds
Glossary
Website Links
Forums
Gallery
Store
Everything posted by diemai
-
@ Kribman If you want a pure "Walk-The-Dog" topwater bait , any fins or flaps would surely hinder a nice glide action , ......only thing , that enhances noise and commotion a bit on such baits is to make a scooped out plane under the chin and furnish a moderate cupping onto it . The tow eye would be located at the tip of the nose , but the chin's cupping would most likely let the lure skim , thus remain on surface when working the lure . To add noise and commotion to such a topwater glider I have once attempted not to taper its tail , but leave it straight and carve a deep cupping into it , ...just like a poppers face ! My goal of design was to create a kinda vaccum at the tail of the lure to generate a gurgling sound and a bubble trace behind the lure ! But heck ,........ that thing did not glide sideward a single bit , that tail untapered just did not allow for such action , ..........though the gurgle and bubbling did work out a bit . Made such cupped tails to lipped diving lures , too ,..... they do work well letting the floating lure dive down with a pop and bubble explosion and still wiggle nicely ,........ but I guess , that "Walk-The-Dog" lures just ought to be "streamlined" in every way to provide proper function . good luck , diemai
-
@ Jigman The problem was , that the system could not be accessed using "internet explorer" program , had the same issues ! But Jerry had it fixed by now , there is a post in a thread about it somewhere in here ! greetz , diemai
-
@ Kribman I have made a few cigar-shaped topwater "walk-the-dog"baits before(body shape like "Heddon's Zara Spook") . The belly weight has to be located in the rear belly portion , at about the transition of the cylindrical center part to the tail taper of the blank , so at about 1/4 of body length(or a tad more) from the tip of its tail . I have made versions as well with the weight sitting right centered at the tip of the tail , held in place by the tail screw eye passing through(also epoxied in , off course) . I had found , that the more to the rear the weight is placed , the sharper the sideward darting movement would be , but the distance of the glide would be shorter , ............with a weight placed at about 1/4 body length from the tail end the glide would get a little more pronounced and it would not break out sideward that sharp , ........I much prefer the latter swimming pattern ! The tow eye should be located a bit behind the fore end of the blank , virtually at about the "chin" of the lure , .......this way it surely remains on the surface , when constantly twitched , .........if the tow eye would sit straight at the tip of the nose , the lure might often submerge to 2" to 4" when jerked back in , it would certainly not remain topwater during the entire retrieve . You should use a possibly light wood for these lures , you have better weight options this way and it also remains afloat and glides better , when working the lure back in . good luck , diemai
-
 Absolutely neat paint work , ....welldone ! greetz , diemai
 -
@ captsully18 I'd like to wish you a Happy Birthday , too , ........seems that you're getting into an age , in which "Good Health " wishes might slowly become quite important . So well , .......have these from me as well , but also ........have a nice one and all the best ! greetz , diemai
-
@ spoopa Have a nice and happy birthday , Jacob , ........may all of your lure projects work out the way you've planned ! (and take care of your fingers ! ) All the best to you , ...........greetz , Dieter
-
@ redg8r Thanks for getting it fixed , Jerry , .....thanks for all of your work and efforts to keep this site going ! greetz , Dieter
-
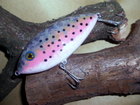
@ RayburnGuy Sorry , Ben , I haven't been able to reply , as I could not access the forums for two days , .......in fact I had typed my reply for two times , but it just wouldn't submit and lateron I could not open up the forums anymore at all . Came across these baits for the first time about 10 years ago by pictures in an US lure collectors book . By the time I made knock-offs after pictures of some vintage lure models shown in there , as I never saw these lures before and I was curious on how their action would be . Well , that larger "Banana" model shown in my video(not the smaller pink one)actually was my first model , made it after the same old sketch like that initial one years ago , which had caught me three pike over 30" on one weekend back then , .......still have that lure somewhere , badly beaten up . I always carry some "Banana's" along in my tackle bag , .....at least during the warm season , for cold water fishing they may swim a tad too lively , I guess ? The lure , that you've mentioned , must be one of the various size models of a "Helin's Flatfish" , some of their versions have these hook spreaders rigged , but some sizes also have only one or two trebles attached . "Luhr Jensen" also made(or still makes ??)a similar lure called the "Kwikfish" , but I am not sure , whether these are two piece jointed lures only or whether they also have one piece "Kwikfish" versions ? I only own a 5" and a 11" jointed "Kwikfish" , but no one piece model ! My homemade "Banana's" are superior to these commercials when it comes to casting , anyway , .....they are a bit heavier , thus can be cast further out ! greetz , Dieter
-
@ arveey Don't know one in particular , but have you checked My link ? On the entry site there click on the "links" symbol on the left(yellow lure) , after a site with three different link options would show , ...click "manufacturers links" and a list with heaps of lure-fishing related sites from the UK , Europe , USA and worldwide would open up , ......maybe you'd be lucky in there ? I know , that there is a source for such stuff in Germany (or the Netherlands or Switzerland , not quite sure anymore) as well , I've visited their site once before ,....... if you want , I could try trace it again ! good luck , diemai
-
@ RayburnGuy I like these kinda lures pretty much , on my first model made after a book picture I've caught three nice pike years ago and since I got hooked on theses lures . Took a lot of trial and error and quite a few rejects to get behind their secrets ! Always carry a few along in my tacklebag , at least during the warm season over here . greetz , diemai
-
@ pikeman ....good question ,...... just had a look over the gallery help site , nothing like a "search-by-name" function like on the old site was mentioned there , only "favorites" and "albums" , so I can't tell , whether it is still possible to view all of ones own uploads in one list as one could do before ? I haven't yet bothered to get deeper into it , .....I HATE HEADACHES ! greetz , Dieter
-
@ Jamie Don't worry about "off topic"(which isn't IMO , as our "how to" discussion is a direct result of that video), no problem for me at all ! Yesterday I have also tried to PM an advanced member and the upcoming error said something like "the person is invalid to receive PM's" or something .....?????? The new site layout really requires some working over , I'd say ! Sorry about your blank spoilt , but I guess this tought you a lesson , .....it's a matter of high concentration and "bit-by-bit" work , don't attempt to go too fast shaping the lip ,........careful passes , eye ball checking , ......pass over the wheel again , etc.....! If you accidentally put a little blemish into the blank , some wood putty would help ,.... but if the entire lip comes to lay in a wrong position or plane , there is nothing much you can do , ......except cutting it off and render the blank into a lipped lure or a prop bait ! good luck , Dieter
-
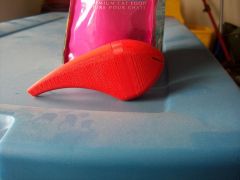 First step to your own lure manufactury ? greetz , Dieter
 -
@ Jamie At first I'd pencil four center lines down the length of the readily turned blank , these also meeting at the round front plane of the funnel-shaped front portion to make up for the lip(looks like the target cross inside of a rifle scope then) . So virtually dividing the blank into quarters , making sure , that these pencil lines are positioned in a way , that one opposing pair of lines is located exactly parallel to the woodgrain , and the other pair 90° offset to the grain ! Now mark another line on the round plane on the front , parallel to the woodgrain and the corressponding center line and rather at the rim of the circumferrence ,..........this line is to mark in about the thickness of the diving lip at it's tip . The lip plane HAS to sit PARALLEL to the WOOD GRAIN for maxium stability ! Now make two lines on either side of the funnel-like front portion , connecting both ends of previously drawn line with the narrowest diameter location at the end of the funnel , these lines meet at same spot with the crosswise-grain center line on top of the blank . These lines I only make by eye balling , these lines on the side are only for "about" saw cut reference . Now chuck the thickest edge(diameter) of the funnel in a vise , in a way , so that the line(s) on the side of it come to sit on one side of the vise vertically for a saw cut , tail of blank should point downward . It does not matter , if you'd squeeze or blemish the wood blank in the vise chucked like this , as the particular loctions would be cut off , anyway . Now take a wood saw and cut down that marked "slice" of the head cone of the blank , don't cut too close to the marked line to leave sufficient "flesh" for final grinding . Now comes the hardest part , as I grind the diving vane to final shape on a 5" dia sanding disc , chucked into my lathe(a belt sander would surely do as well), 40 or 60 grit ! . I must make sure , to hold the blank ABSOLUTELY in a repeatative horizontal position on every pass , when slightly pressing it against the wheel ,......... same time giving it a little "twist" from the wrist of my guide hand to achieve the little curved plane of the diving bill . The small marker line near the bottom circumference parallel to the woodgrain serves as a reference for the lip plane to become paralell to it , also of course for thickness of the tip . The pointed top end of the evolving lip plane should also come to sit centered to the previously marked center line on top of the bait . These two should finally meet at the narrowest blank diameter level behind the cone lip portion of the blank . And if one manages to sand over the entire curved plane in one fluid motion from the wrist , holding the blank absolutely horizontal , a nice homogene surface should evolve ,........ takes some practice , so one should leave enough material standing after the separating saw cut . It requires good eyeballing down the curved plane to determine about little flaws , being uneven or somewhat twisted within , ........off course one might as well sand over such little imperfections by hand , or even utilize a "Dremel" with a sanding drum ??? AFTER your lip plane is done , put it on the workbench and eye ball down the center line at the belly ,...... due to making the lip plane , it might have gotten a little out of center now and requires re-marking to position the pilot holes of the belly eye screws accurately centered . At the end make sure to break all edges of the diving plane thoroughly . At first read this must sound very complicated , but it really isn't , once you get the hang of it , probably you might also find a little different solution , but this is the way , that I do it ! good luck , Dieter
-
@ MuskyGary Thanks for that link , have to check it out ! @ RAD Can't get any US fishing shows on German TV , only have a native production and occassional British and Australian ones , .......not more than 90 min. per week and only on one out of all available stations . greetz , diemai
-
@ Frank ........glad if I could provide some input that simple ! @ all Had some time to think over it , why the links did not work out in my first initial post ,.........I had copied and pasted them into the previously opened "insert link" window ,......guess , that I should have done that straight into my written text without that window instead , .....thinking , that this might have been kinda "double action" that the system could not handle ? Will try that direct pasting on next occassion , .......sorry for the inconvinience ! greetz , diemai
-
Sorry , folks , Something really seems to be wrong , .......the links did not copy and paste well from "YouTube" , and I could only go back to my text to edit FOR ONCE , on a second attempt there was an error notice , that I was not allowed to do thois operation !!!!! Alright , I'll type in the links by hand now , if it won't work out again , go to "YouTube" , and do a search there for "Whopper Plopper" and/or "Make a Lure with Larry Dahlberg" . Hope it works now .........greetz , diemai
-
Hi , folks , Accidentally came across these ones last night , .........though I'm not into pouring nor mold-making , I've thought it might be quite useful to one or another user in here . There are several similar video's around , the "Whopper Plopper" video is seemingly quite new on the "Tube" , only a bit less than 1000 clicks so far today ! Part 1 My link Part 2 My link Another , little older video : My link This guy there must be an experienced pourer , he makes it look so easy , .....really enjoyed watching him ! greetz , diemai
-
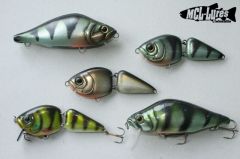
@ JBlaze Thanks , John ,.......in fact I find these kinda hinges the easiest to make , not much space for different ones on this small lures , anyway . It was only tricky to clean them off topcoat overflow in the end , but a 1 mm "Dremel" drill bit and some narrow bladed balsa knifes did the job . Only the line tie , the hook eye and the lower hinge eye on the front section are connected in shape of a three-point harness , all the other three hinge eyes are epoxied into "blind" holes , the tail fins are connected with bent close open screw eyes . These small swimbaits have a 10 gr ball sinker embedded right ahead of their hook hangers , had to hammer that one into a kinda "brick" shape to fit into the narrow wood board(a tropical lighter wood similar to teakwood), cut an elongated pouch on my hobby routing machine to accommodate these weights . The tail fins are made from 2 mm Lexan sheet . Thanks again , .......greetz , Dieter
-
@ jrhopkins Outstanding swimbaits as always , .......just amazing ! greetz , diemai
-
@ jamie I had made bath tub trials with earlier models , just taped on some lead shot to different locations at the belly to try to increase diving performance and/or stabilize running , but only thing it did is to minor the wobble . No , even these original repaints don't have any ballast weights , they feel rather light in the hand . If you use light wood like pine or basswood , they might not dive as deep , but on the other hand made of hardwood like maple they might not wobble that much , also it would be harder to work with . I'd surely prefer the first option ! I have placed the hooks more towards the tail compared to the originals , as the front hook often fouls with the diving plane with one hook point , it just binds over it , ......even if rigged without a splitring . But maybe they are intentionally placed that way to put the balance weight more to the front for better diving performance , but I don't really know . @ Fishwittler This is too bad losing a lure on it's first trip , probably might put me off for a while as well........(just joking ) ! Thanks for your kind words , anyway ! good luck , Dieter
-
@ hazmail Also finished the "Whirlygig" blank for display . Shot two close range pics to show the pitch of the fins , virtually one only has to divide the crosswise diameter line into quarters and the lengthwise center line of the front section into half . So the pitch of the two opposite fin saw cuts results as from connecting one quarter mark next to the center bore with the half of the lengthwise centerline . Difficult to explain , but I'm sure , by viewing the pics you'd get behind it . The other two pictures show the pre-assembled lure and the lure taken apart with all of its components . For any details feel free to call back in , I'd gladly answer all questions ! greetz , Dieter


-
@ jamie By now I got done with those "Rush Tango" blanks , took some more pictures . I pre-cut the diving vane with a saw , the fine shaping of the curved lip plane I did free handed on my 40 grit sanding disc , guess , that this is the hardest part of all , requires a calm hand and good eye balling ! Just sanded it over by hand with higher grit sandpaper and broke the edges . I don't like to mount screw eyes to such narrow lips , so I rigged this certain wire form line tie , that I always assemble on such lure type , all will be epoxied later . I use my "Dremel" with small drill bits and router bits to furnish the groove and slot . Anyway , feel free to post or PM if you've got more questions , always welcome ! greetz , Dieter


-
@ jamie As I know , that it is not that easy to furnish lure copies just after pictures , I have got my lathe turning this morning(wanted to go fishing , but the weather is just too horrible)and made two "Rush Tango" blanks after my new original repaints . This way I could take over the exact measurements and I've shaped them as accurately as I could . My little diagrams are in metric millimeter scale , 1 inch makes up for 25,4 millimetres . The sketched lines are referring to the penciled circumference lines on the wood blanks , the measurements stated "dia" refer to the blank diameter at that particular spot . When mounting eye screws to these lures , make sure to run them EXACTLY crosswise to the wood grain , as this provides the greatest strength , especially for the thin diving vane . After supper I'm gonna proceed with these , so hopefully I could still mail some more pics about how I furnish the line tie on such kinda lures(guess , that this is also shown in an older thread of mine named "New Banana Lures" or similar). @ hazmail Also turned down another "Whirlygig" blank for display , maybe you'd be interested to make one as well ? There is no accurate measurement neccessary on that one , they can be build between 85 mm and 120 mm , slender or a little fatter , ......with longer fins or shorter ones . The shorter lures with longer fins swim a bit more lively , when constantly twitched underwater , but they are not as easy to submerge(but it certainly works) as a longer , slender lure with shorter fins ,..... that one goes down easier and also zig-zags a bit better on the surface(glides sideward a fraction further) , I'd say ! This is the pre-turned blank ,..... body ends are rounded after having removed the dowel remainder on either end . I have drawn reference lines on the body , that virtually divide it into quarters , marked the hole for the belly eye , also made pilot indentions for the holes with an awl on either end . Next step now would be to separate the two sections and sand the opposing planes smooth , after mark the center holes on these planes as well , as I drill the center holes for the wire shaft from eiter side of each section to meet internally(hopefully ) , this way I avoid the drill bits possibly wandering off center as they'd exit . ..........to be continued ........greetz , Dieter


-
@ allstate48 If you've got 20 bucks to spare , go and get the book "crankbait secrets" by Joe Bucher , everything about crankbaits and their different uses is thoroughly and easily understandable explained in there(of course also different lip configurations). But sadly no lure building ! Do a google search on it ! good luck , diemai


