

diemai
-
Posts
3,867 -
Joined
-
Last visited
-
Days Won
23
Content Type
Profiles
Articles
TU Classifieds
Glossary
Website Links
Forums
Gallery
Store
Everything posted by diemai
-
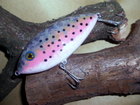
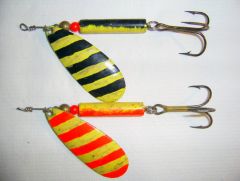
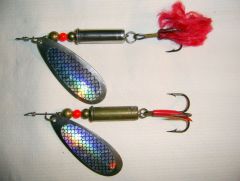
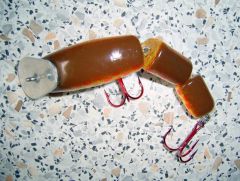
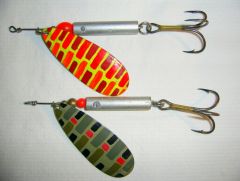 Just had a look in my storage boxes to replace one of these inline spinners , that I had lost to the river today and thought , that I might share these . These were amongst my earliest lure models of my builders carreer , maybe about 15 years old ,.... those days I wanted heavier spinners than the ones available in shops , just to have them cast further and run a tad deeper . The blades are homemade from 0,5 mm stainless steel sheet , for added weight I had first used discharged ammo casings , cast out with lead ,........in this case .357 mag cartridges . The wire shaft is bent in a paperclip manner and cast into the casing , which's upper rim is bent a little inward with pliers to prevent the lead plug from sliding . I made quite a few of these models , but later found out , that the body was somehow too heavy , ......the spinners came back in tail down , thus many did not work well . These are the ones remaining , that for some reason still spin well ,.... all the others I had cut apart and used the bodies as bottom sinkers . But since the idea itself was not bad , and I had already caught a few pike and perch on those few ammo casing models that did work , I came up with the idea to utilize simple metal tubing to also cast out with lead to act as the spinner bodies . First tried brass tubing 8 X 0,5 mm(8mm dia. , 0,5 mm wall) , but the lead plug still was too heavy , the spinner still swam too much tail down for my taste ,..........so I got to try 8mm X 1,0 mm aluminium tubing , which turned out to be perfect ,.......due to its thicker wall it accommodates less lead inside ,......just turned out perfect to make up for the spinners to work well one by one . For casting the lead into the tube , I had made myself a jig out of hardwood to put in tubing and wire form aligned , so that the sideward bore in the tubing(to prevent lead plug from sliding)would be covered whilst casting ,... so no molten lead could flow out . Shown are some models painted with a "glow-in-the-dark" base and some with unpainted body to display the sideward bore in them . Haven't fished these lures a lot for years anymore , but back in the 90's they had produced well , also lost a few:( ! greetz , diemai:yay:
 -
 Thanks for info:yes: ,..... would not blame subtle differences of lure action on different bill materials either ,... but on slight differences in body shape , density of wood , etc. ! greetz , diemai:yay:
 -
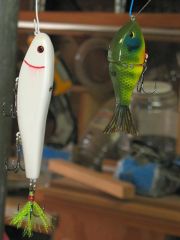 Nice lures , Mark , both are quite inspiring to me , also due to your further describtions:yes: . I really like that glider's shape:yes: ! Good luck with them tomorrow ,........greetz , Dieter:yay:
 -
@ Vodkaman Dave , what you mentioned about magnifying the lip slot angle error by inserting a ruler really works ,...... done this several times before on lathe-turned lure blanks , when I obviuosly could not cut the slot , when the stock was still rectangular . But instead of a ruler I had always used a bigger sheet piece of that particular Lexan or aluminium , from which I would cut the lip ! And thanks about your advice about eye protection ,..... did not bother to mention , since for me it has become most common working almost 30 years in the metal industry , just needless to say ,.............but others might not know:yes: ! greetz , Dieter:yay:
-
@ mark poulson If I think over it , I really see point in your warning , Mark:yes: ! No wonder , that "Dremel" does not sell such an arbor for their round saw blade , but only sells a hole accessories set for it , meant to use exclusively for a stationary multi tool , mounted rigid in a sort of a small drill press , I guess . I've only thought over that option of a small saw blade , since it is always difficult for me to find those thin cutting wheels ,.... thought , that a saw blade would last longer , since my actual stock of wheels has gone down to maybe two left ! But I'll keep my hands off it now , as long as I still have them in shape:huh: ! Thanks a lot , Mark , .......greetz , Dieter:yay:
-
@ pizza Exactly what I refered to , ......0.040" is about 1,0 millimetre , the original cutting wheels from "Dremel" are at least 1,5 millimetres thick ,...... they do cut the wire harness slots for my 1,0 millimetre SSt wire way too wide ! Also found a tiny round saw blade on a fleamarket the other day , only need to make some kinda arbor to chuck it centered . Good luck with your frog:yes: ........greetz , diemai:yay:
-
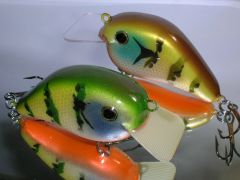
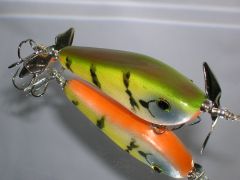
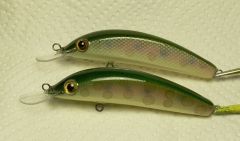
I like these duo-colored stripes of their perch pattern , well done paint design:yes: ! Any special reason for using different diving bill material ? greetz , diemai:yay:
-
@ atrophius Indeed a "Dremel" comes in very helpful for lure carving . As for the lipslots its cutting wheels are well suited , but also try to obtain other cutting wheel brands , if they would fit onto the shaft ,..... since the original "Dremel" ones are a bit too thick for my taste . You can also cut slots lengthwise the lureblanks to set in a thru-wire harness into it , the coarse sanding drums are perfect for rough rounding off body contoures ,..... it drills pilot holes for eye screws and you can utilize its various router bits for carving details like f. e. gillplates onto your lure , even shape cupped popper faces . I even used it to make the cavities of lead casting molds out of aluminium , but that task takes it to its limits . I really might not want to miss my "Dremel":nuhuh: ! good luck , diemai:yay:
-
@ atrophius I'd second to Bester , it's really the best way you could go , cutting your lipslot while the lureblank is still having a rectangular cross-section , only the sideview outline cut out already ! If you don't have a bandsaw accessible , you could utilize a 90
-
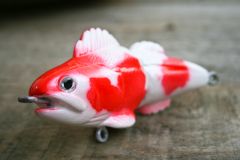 I like these Koi patterns , they'd surely draw attention of pike:yes: ! greetz , Dieter:yay:
 -
 @ 76gator Thanks for further info:) ! greetz , diemai:yay:
 -
 Thanks a lot for your kind words , fellas ,............much appreciated:yes: ! Always like to write a bit of explanations to my lure pics , ........they may be not that good looking as most of the lures displayed in here , but I am quite sure , that some other folks might take advantage and/or inspiration of my posts like I do on others as well , ........and that's what TU is all about IMO . greetz , diemai:yay:
 -
Just wondering how you could keep these little gems that light in weight with all the hardware attached ,..... which kinda wood did you use , ........balsa ,.......or even PVC ? pretty nice baits:yes: , .........greetz , diemai:yay:
-
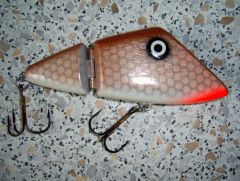
 That line tie piece of sheet metal looks interesting to me , .......did you set it in a groove on the underside of the lip ? I suppose , that it sits loose to render the bait self-tracking:? ? Nice design , anyway:yes: ! greetz , diemai:yay:
 -
 Seems , that after that period of 23 years you've got finally hooked on lure carving ! It's a nice one , indeed:yes: ! greetz , diemai:yay:
 -
@ Green_Fingers Go ahead , ....I'm eager to see your first wooden bait;) ! good luck , diemai:yay:
-
 I'd surely second to Mark:yes: ! Welldone:yes: , ...greetz , Dieter:yay:
 -
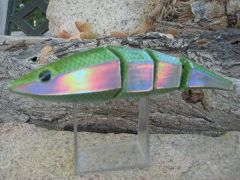
 The hinging and transitions in general turned out extremely well ,......very professional looks:yes: ,........I also like your tail fin design , might take it over it for one of mine in the future;) ! great work , indeed :yes:,........greetz , Dieter:yay:
 -
@ Bassman82 Really depends on shape of lure and desired location of the hook,-and tow eyes , providing a picture of your lure would surely be of advantage ! If the lure's shape is a little "tricky" , you most likely won't get around using screw eyes ,..... if set in with epoxy , they hold up pretty well in medium dense to harder wood . Twisted wire eyes are also said to hold well , but I do not have experience with these . If the space given by the lure shape is sufficient , you might also install some "figure 8" eyes , set into bores leading from the outside to the inside and secured by some metal pins leading crosswise through the lure body and the inner eye of the "figure8" , off course all epoxied thoroughly . Larger swivels could be used as well , I suppose . Another way , that I have done before , is to make some cotter pins out of sst wire , lead them through bores passing through the entire body ,.....at the back I'd carve some grooves at the exit of the holes to bend the wire ends into these to gain a plane lure surface later without any wire sticking out . This procedure goes at first like glueing in the eye and the shaft of the cotter pin , .......the hole at the eye side should be a little extented in dia. to create a "glue plug" , ....after thorough curing the eye is clamped in a vise and the top wire ends bent into the grooves at the back ,.....after filled up with epoxy and worked smooth to the body outline finally . Well , just in brief , hope you can figure out a bit , if further info needed , pls. call back in ! good luck , diemai:yay:
-
 I like that subtle scaling , .....like the entire lure , too:yes: ! Welldone ,.......greetz , Dieter:yay:
 -
@ Pike catcher Using ordinary sized stainless screw eyes , I'd drill pilot holes(about thread core dia.) almost the entire length of the eyes' shaft in hardwood , in softer woods only 1/2 to 2/3 of the shaft length should be OK . The entry of that pilot hole I'd extend to 3 to 4 millimetres dia. about 4 to 7 mm deep , depending on entire eye shaft length ,....... when twisting in the eyes in I'd apply some epoxy glue onto the shaft , as a result a kinda "glue-plug" evolves in that hole extension , .....overflow glue I'd wipe off at that stage . When using extra large or small eyes I'd vary the above mentioned dimensions a bit ,...... never had any failures that way ,.... not with fish nor with snags causing my screweyes to move or turn ! good luck , diemai:yay:
-
 Merci beaucoup , Jo , .......mais ,......moi aussi;) ! Salut:yay: , Dieter
 -
 Nice idea and great execution of it ,..........always fond of little different stuff;) ! Welldone , ....greetz , Dieter:yay:
