

diemai
-
Posts
3,867 -
Joined
-
Last visited
-
Days Won
23
Content Type
Profiles
Articles
TU Classifieds
Glossary
Website Links
Forums
Gallery
Store
Everything posted by diemai
-
@ JBlaze Don't mind doing that , but it is not quite clear to me how to do that without submitting a PDF file:? ? Been on that particular tut-submitting site to check and also looked at some tuts again , so I saw , that there must be different ways to do that! Seems to work similar to posting in a thread , but how could I achieve all of the pictures plus their describtions to be in a row on top of one another , just like in hazmail's tut about his ingenious bubble float baits ? That style of tut seems to be the most simple one to achieve for a computer dummy like I am:huh: ! greetz , Dieter
-
@ Tman2 Thanks for your kind words , ......but sorry , my knowledge in English language is too poor , don't understand that term "RSS feed" ! @ spare tire Tim , I've been looking around for such hinges over here , but seems , that they don't have such in Germany , at least not in the shops , where I went. Only found Nylon hinges , that wouldn't move freely , brass plated iron hinges , that would rust and brass hinges , that had their sleeves off-centered . I am used to metal work , it doesn' seem to be that hard to do , I get the stainless steel sheet for free from the scrapyard of my work and I can make those hinges in different size matching any lure profile . But thanks for hint anyway , might come in handy for some fellow tinkerers over there in the US . @ RiverMan Don't make yourself smaller than you are:nuhuh: ! Without the things , that the cavemen achieved , we won't be where we are now:lol: ! I have a two section lure hinged that way like yours on that picture in progress right now as well ,.........but that one has that "V"-shaped section ends engaging into one another . You may laugh , but I have found that one rather more difficult to achieve than these homemade hinge joint ! Maybe because of the "V"-shape:huh:??? @ Boskabouter I have once made a two section glider bait jointed with two pairs of interlocked screw eyes ,.........and I had a tough time with it in terms of proper alignement and bending them close to bond the two sections ,.......I haven't tried it again , since it did not turn out too well . I believe , that these hinges here are more accurate to assemble , though not as easy and fast as screw eyes . Also the gap inbetween the sections turns out narrower , even is filled out with the hinge sleeves , that can even be painted and topcoated , provided , that the sleeves and all contacting spaces are cut free from paint after curing . So this way there won't be much of a gap visible . Surely the working effort is more ,... but for myself , I don't mind to spend more time working on a lure , as long as I enjoy doing it ! But anyway , thank you all for your interest , guys , I'll continue posting ! greetz , Dieter:yay:
-
 You really hit it very nice , you're a very talented painter , even without an airbrush ! I would not have a hand for sucha realistic look ! greetz , diemai:yay:
 -
 A real nice one , I like it ! I sometimes do lures after pictures as well , always interesting to see , what comes out of it ! And yours came pretty good:yes: ! Just recalling , that the boyfriend of my daughter never made a lure for me:lol: ,.....he's not fishing , anyway ! welldone , diemai:yay:
 -
 Salut , Jo I am very happy about your success:yes: , it is yours:yes: ,..... I only contributed very little help:wink: ! I like your design with that pronounced flat head plane , I guess , it surely add its share for the good swimming action of your lure . Also your paint job on this one turned out to look very natural , I bet , that your local pike would nail it instantly:yes: ! tr
 -
 Guess , that I said it before , Mark , ....you're swimbaits are turning out to look better every time !:yes: I also like the way , that you have given explanations about the working and painting processes ! Welldone lures ! greetz , Dieter:yay:
 -
 A very nice jointed , I like it ! greetz , diemai
 -
.......kick me ,........I'm stupid ! Here it is ! greetz , Dieter:yay:
-
Alright ,....and one more picture showing the jig for shaping the tubing pin head and the two punches , that I have used . greetz , Dieter:yay:
-
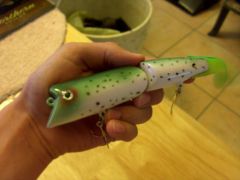
@ atrophius Off course the whole hinge is made of rust proof materials;) ! @ all Thanks you for your kind words , fellas ! Certainly I'll keep on posting on this subject , have the chance to give something back in return of all the info , that I have received in here at TU . After Easter I am gonna be free off work , thus I'd have more time , so I intend to shoot some step-by-step pictures on making and assembling sucha hinge . I am still on the learning curve about it as well . Anyway , yesterday I have procceded a bit with that particular lure , I did break the edges of the section ends for wider swing and assembled temporary crosswise pins . Also made a jig to achieve the "rivet head" on one side of the tubing hinge pin . I have tried to pull the two lure sections apart(as in pictured condition) , as hard as I could ,..... and nothing on that hinge , really completely nothing , de-formed or bent on it , ......test passed . When I drilled the crosswise pin holes through the hinge latches(in assembled proper location)and wooden lure body , I have had a hard time pulling them out of their slots again , since material had built up at the exit of the hole trough the steel latches . To overcome this , next time I won't drill through , but only half way and pull out the hinges and finish the bores externally , thoroughly breaking their edges , so it won't be a hazzle to re-insert them . That jig for shaping the head of the tube pin consists of a block of hardwood and a flat piece of ordinary iron . After having worked with it for the first time I have found , that an iron cover would not even been neccessary , since the flange on the tubing pin also shapes without any contact to the countersunk at entry of bore . So the only purpose of that jig is to hold and guide the tubing , when shaping the head , ......so that it would not bend or de-form . The tubing is 2,0 mm in diameter , the bore inside through the jig is 2,1 mm , so the tubing can be inserted without any binding . The jig should be placed on a steel plate or anvil , the tubing should pass all the way through and potrude about 1/10" over the top . The tubing pin would later be shortened to approbiate hinge length ! With that rivet punch one must first widen the tubing a bit , the little journal on it enters the tubing first for guidance . I took an ordinary 90
-
Really a smooth and subtle swimming action somehow , also on a slow pace ! You were right with your statement when posting that lure for the first time , great action ,.... both on steady retrieve and twitch-and-pause:yes: ! So you really blame that improved action on the different topcoat ? If so , I do wonder , in which way it is taking influence ? Did you introduce your lures at that angling exhibition there ? greetz , Dieter:yay:
-
@ JBlaze Thank you , John , still learning on it ! I fact I have also shaped the lureblank a little different than usual : -First I cut out and sanded down to stencil outline(body outline) , still keeping the woodboard rectangular . -Marked center lines , pilot holes , separation cut , etc . -After cut section separation cut from either side , perfectly aligned , with a saw and sanded smooth . -Marked hinge slots exactly centered and made an initial slot with a "Dremel" cutting wheel . -Fixed sections in a vise and cut slots to proper depth , the saw needs to cut the slot to approbiate width to accommodate the hinge latch either snugly or at least with not too much play . -After I drilled the crosswise pin holes through the blank . -Since I had never tapered or even rounded of the body so far , I now put a strip of sheet metal inside the hinge slots to bind the two sections together perfectly aligned . That metal piece should be as thick as the hinge slot for a snug fit and reasonable sturdy connection of the two pieces . I've punched some indentions and blemishes into it to achieve that required tight fit of the two sections . -Now the lure blank was almost like a one-piece again and I could sand the tail taper and round off all outer edges , this way I achieved perfect transitions between the two sections . Well , so far I went ,.......needless to say , that this temporary bond between the sections must be quite rigid for the described working process . In worst case one could also utilize the pin holes and temporary pin the metal sheet to the sections to bond them reliably for sanding . But as said before , I am still learning....... ! greetz , Dieter:yay:
-
 Very nice paintjob on this one , also like those contrasting bright fins:yes: ! Why do you think the action is better with that thinner(and maybe harder ?) topcoat ! Not so much friction on moving parts ? welldone:yes: , greetz , Dieter:yay:
 -
Too bad about that failed hook up , John ! Hope , that your idea concerning rigging a second hook would work out for the next time ! good luck , Dieter:yay:
-
@ JBlaze Never mind , John ,... in our case , I guess , half success may still be considered a good success , even if that bait doesn't swim well ! You still have the bill option , and even if that one should fail(been there , done that) , you still have learned a lot from it ! That is the big advantage of luremaker's rejects over rejects in any commercial production plants ,...... these only cost money and trouble , our rejects most likely still provide priceless knowledge and experience ! good luck , Dieter:yay:
-
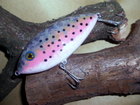
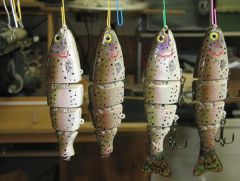
Hi , folks , Just thinking , that I might share my present project in here . Nothing special about the lure , it is a very simple one , didn't want to spend that much effort on it , since it is the hinge , that I am focussed on ! Some weeks ago I have found some small metal hinges in a RC model shop , these are supposed to be used for the flaps and rudder of radio controlled model aircraft . Unfortunately I have found out after a magnetism test , that these were made of brass plated iron , so surely would rust sooner or later assembled into a jointed lure . So I decided to try and build them by myself ,.... since I am a little experienced with metal work , I did not believe it to be too difficult , once I'd get the hang on it . After some trials during the past days and one or two test pieces I finally made that hinge today , connecting the two sections of that bait , that I had shaped the day before . Since I have played the working process over and over again in my mind , it actually took me only a bit more than 35 minutes starting from the bare metal sheet to the(almost) finished pre-assembled hinge . What's left to do , is drilling the crosswise pin holes through the hinge latches , if doing that in assembled stage through the pre-drilled holes in the lure blank , nothing could go wrong ! Off course I'd still have to furnish angled planes to the opposing section ends as well , to achieve a wider swing of the two lure parts . Just wanna keep it simple for this time , but I guess , if working accurately , the common matching "V"-shaped swimbait section ends could be done with these hinges as well . These hinges do add some weight to a lure , as it seems ,... so I am concerned , whether it would still be possible to embed enough ballast weights into the lures belly to prevent it from swimming on its side without letting it sink (this lure model here is a floater) . Probably I should have used a little more buoyant kinda wood ? Anyway , this hinge is bent in a vise , a nail is used to make up for the hinge's sleeve . That nail must be little thicker than the locking pin , which I intend to furnish from 2,0 mm brass tubing . The pin shown is only temporary , to lock the hinge parts finally , I am gonna try to make a kinda rivet head on either end of the tubing pin , for this purpose I have made myself some riveting punches out of the shafts of some reject tapping tools . I intend to fix one upright in a vise , put the finished and topcoated lure sections together and place the inserted tubing pin onto the point of the punch , take a second punch for the other end and gently hit it with a hammer to widen the ends of tubing . Might need a second person to hold the lure in place ? But with a small jig I could make only one rivet head prior to assembly , so I'd only have to furnish one extension of the pin in assembled condition . This jig would be a rectangular piece of hardwood and a piece of thicker steel sheet on top . A bore , that snugly accommodates the pin over its entire length would lead through both parts , they do not neccessarely need to be bonded . The pin would be inserted trough both parts , about 1/10" would still potrude over the steel sheet on top , which should have a little countersunk at its bore . Now I'd take my riveting punch and extend the potruding tubing portion , the countersunk would make up for a nice rivet head on the pin . Anyway , forgot to tell , that the hinge is made from 0,5 mm stainless steel sheet , quite easy to cut with shears . I'd make the hinge latches maybe twice as long as neccessary at first , since it is much easier this way to bent the hinge sleeve and also fix the hinge parts into a vise for cutting and filing the grooves into the sleeve . When all this work ist done and both hinge parts engage and operate properly , the latches of the hinge are cut to proper length to fit into its slot in the lure body . You may see on the pics , that I have made a little mistake doing that ,.......the rear hinge latch got a little too short , but it's still OK , still matching the crosswise securing pin holes . I am positively surprised about this hinge , it appears to be quite sturdy and rigid , the gap between the two lure sections is only about 4 to 5 millimetres wide(approx. 1/5") . As said before , with this hinge it would be possible to paint and topcoat the single lure sections prior to final assembly , but one needs to care, that the topcoat on the hinge sleeves would't get too thick to bind the hinge to the body after final assembly . To prevent this , the grooves in the hinge sleeves only have to be filed a bit deeper(prior to cutting the latches to approbiate length) and the hinge parts need to be assembled a little more potruding off the lure sections . In this case the gap between the sections would become a little wider . But any glue or paint flowing into the sleeves can easily be removed by carefully drilling it out , the sleeve fittings could be cleaned off cured pait with a small balsa knife . Forgot to mention , that the hinge parts are going to be epoxied into the slots and secured by crosswise wire pins , the slot portions top and bottom are filled up with epoxy and later sanded flush to the lure body outline . Gee , this was a lot of typing , hope , that I could express myself at least a bit understandable ,.......critics , questions , opinions and comments welcome , anyway . greetz , diemai:yay: PS : The squares of the background paper on the pics are 5 millimetres (1/5") , so you could figure out about sizing .
-
Hi , Mully , ...........pleased to meet you in here as well ! Welcome to TU ! greetz , diemai:yay:
-
 Nice bait ,.......I like its design ! greetz , diemai:yay:
 -
@ bassrecord , @ MiliaB @ Baz001 Welcome aboard , great , that you're here:) ! That incident , you've described , is one more proof , that one should really take care about whom to choose for his fishing partners . Reminds me to a surgery in a small harbour located at the German Baltic coast , that is known nationwide for its local fishing boats making angling daytrips out on the sea . The surgeon in there has a big showglass on the wall of his examination room displaying dozens of hooks , that through the years he had to pull out of all different body parts of anglers coming back in from their trips on the fishing boats . greetz , diemai:yay:
-
@ Da big tuna I have made spinnerbodies out of copper wire coiled around a nail , horizontally fixed in a vise . Uploaded them in the gallery somewhere , but it was way back all of my uploads . Need to do a gallery search by name to find them . greetz , diemai:yay:
-
@ atrophius Take RiverMan's advice about that Dutch site . I'd recommend a sinking glider in there called "the Roach" , its original name is "Heiddy" . It is the perfect lure for the beginner, both in building and also fishing this type of lures alike . It requires only one weight in the belly , wheras most other designs of sinking gliders need weights fore and aft . It can be fished from sub-surface down to up to 15 feet , depending on the built-in sink rate , subtle twitches or hard jerks , anything goes with this one to make up for an attractive target . Caught my very first glider pike with one years ago , she grabbed the lure that viciously , so that the rear hook stuck out of her gillplate , and she was only about 26" in length ! good luck , diemai:yay:
-
 Seems to me , that your repainting after mess-up was truly worthwile ,.........they turned out very beautiful , indeed ! Perfect craftwork in all aspects ! Welldone:yes: ,...greetz , diemai:yay:
 -
@ Tonkabass Thanks a lot about your hints and advice , ....much appreciated ! I have thought about putting a little share of the entire weight into the tail as well , but in fact I'd proceed with it in a few days time , still got some more lures to carve on my list , always make them in bunches ,.........so many ideas , so little time:( . Thanks again:wink: , greetz:yay: , diemai
-
I have had bad experience with Etex coming off some lures in large chips , after the topcoat was pierced by pikes teeth . Obviously for some reason it did not adhere well to the paint coat underneath , which I now blame on maybe solvent based rattlecan paints , also oil or resin inside of the wood blanks are an possibility , since it only happened to a few lures . I don't use Etex anymore . good luck:yay: , diemai
-
@ Jamie Thanks , Jamie , certainly I'll report about that in here ,.........but I am not the fasted kinda guy , still carving some more , until I get a bunch of lures together for painting . greetz , diemai:yay:


