

diemai
-
Posts
3,867 -
Joined
-
Last visited
-
Days Won
23
Content Type
Profiles
Articles
TU Classifieds
Glossary
Website Links
Forums
Gallery
Store
Everything posted by diemai
-
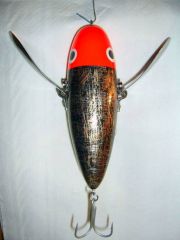
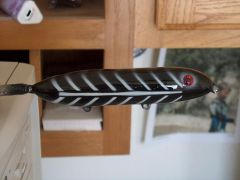
 Just got done with these today , made them in terms of a lure swap . Don't have much experience with such topwater baits , in fact I have built only one so far , also with homemade wings of 0,5 mm stainless steel sheet , but that one works quite well . It also has this slotted wing attachement like I did on these ones , but here I have made the "U"-shaped wing hinge of thicker stainless sheet(1,0 mm) , since I assume , that on the first lure it was too thin(0,5 mm) and its limiting flaps might bent backward under the pressure of the wings to open them further up after a while of use . Due to that thicker material I could not bend the limiting flap forward to proper position after screwing the hinge on , had to do it before in a vise . So I had to drill a hole through the wings to get the mounting screw through , since I couldn't move the wing backward far enough anymore to access the front screw . During my first bath tub tests I have found , that the wings closed too far over the nose of the lures , thus did not open anymore , the oncoming current pushed them together , not opened them up . So as spacers , to render the wings more open , I have placed some cup washers under the front mounting screws , ground them to fit for proper spacing of the wings towards the nose of lures . Now the water pushes between body and wings to open them up properly . The crawlers finally did work that way in my bath tub , but maybe some more tuning of the wings has to be done outdoors , with pliers I can still carefully bent the limiting flaps wider open to increase the wings opening angle , if neccessary . Due to the large play of this slotted wing construction , these lures generate a lot of metallic clicking sound in addition to the dull blob-blob-blob-blob sound , as the wings dig into the water . The bigger crawler is about 5 1/2" , the smaller , jointed one about 1" shorter , both lures are thu-wired through a center bore and have a "figure eight 90
 -
@ lukich I did not mean epoxy glue , that one really isn't suitable . I have used 2K automotive laquer as well , it sets pretty hart , but to very thin layers . The topcoats of that concrete laquer on Finnish made baits are very thick and rigid , but they dip them for many a times , also it is very smelly . One guy on a German site uses this epoxy (601) : http://www.bootsservice-behncke.de/index1.html Click on "Epoxidharze" on left column , after on "epoxidharz 601" in center of page . I get my epoxy from a German component mailorder : HAKUMA ihr Spezialist f
-
 I like those dashes of red(or purple ?) around the gillplate , gives an impression of a somehow sick or injured prey . Very beautiful.....as usual ! greetz , diemai:yay:
 -
 Seems , that you've had quite an effort about the skeleton template , the lines are quite sharp edged and very regular...............I could never be as patient ! Nice job done , greetz , diemai:yay:
 -
 It is so beautiful with the adds of blue ...very nice paint work:yes: ! And now I can finally see as well , how you tune your props:) . greetz , diemai:yay:
 -
@ lukich Don't know that product , but I've read the describtion on one of the pages appearing when clicking your link . It sounds much like the describtion of Etex(used it before) , also seems to be designed for same purposes like Etex . So if you get this product recommended by a tackle component supplier , I guess , that you can trust it , also the working process would be like with Etex , I suppose . But there are also different ways for topcoating lures , one could use ordinary epoxy laquer , in Scandinavia concrete laquer is popular and I have recently read on an Australian site , that one could also use modelling dope , this is a clear paint(also colored available) , that is used to coat and stretch out the tissue on the wooden wing construction of model aircrafts . Maybe also wait for other opinions in here or browse through the threads by means of the search function , there is a lot written about topcoats in here . greetz , diemai:yay:
-
@ lukich Welcome to TU ! Check Lure Fishing UK , on entry page click on the yellow bait for "links" , three link options will open up , click on the top one , many international suppliers for fishing related stuff are listed there , sorted British , European , American and worldwide(which is most likely Australia in that case) . Only place I know around here selling Etex is Lureparts.nl , I guess , there is also an English version of the site available(it is a Dutch shop) . good luck , diemai:yay:
-
 Mark , that filled up crosswise hole , is there a weight inside or it just was in your PVC material before ? Thanks for sharing , anyway ! Greetz , Dieter
 -
@ thorium06 For your start out , do not attempt to be fast , try to be accurate ! Experience you make with your first baits would let you be faster and more effectice later , anyway . If you don't or can't use a bandsaw for your lipslot(the fastet and most accurate way) , cut it by hand after a marker line , it requires a woodsaw saw with a wide(high) blade , that would guide itself through it's cut , a narrow bladed saw would tend to wander . Fix the still rectangular workpiece in a vise . Do all marking work on the still rectangular woodblank , also cut the lipslot and slot for internal wireform or you may also already drill the pilot holes , if you intend using eyescrews . If all marking(with measurering gauges like 90
-

Homemade European style fishing essentials
diemai commented on diemai's gallery image in Terminal Tackle
 Thanks , Milia ...guess , that's what such sites are for;) ! greetz , diemai:yay:
 -
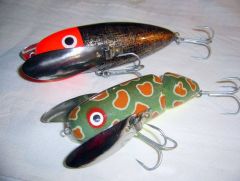
 The last two made that previously described way so far . Top lure is about same size and shape like the larger sinking glider . Bottom lure I have basically turned to a little differently shaped blank to make up for a "perch" body . The weigths in these also sit at about same location like on the minnow baits , so hopefully the improved casting performance would work out with these as well . Also have that same action like the minnow baits of previous upload . Top lure was rattlecan painted , the "Perch" pattern I have entirely brush painted with modelmaking enamels . These six lures are my first ones topcoated with two layers of modelling dope on top of acrylic and epoxy layers , came across that dope suitable for lures on an Australian site . greetz , diemai:yay:
 -
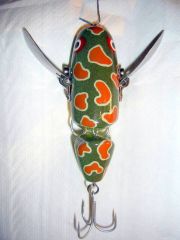
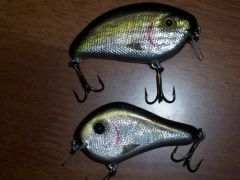
 These are made the same way like my previously uploaded gliders , having their flanks tapered towards their heads on a basically spindle-shaped blank . My target of design was to achieve a reasonably "fish"-shaped lure blank , that should be a bit more voluminous at its rear , thus to be able to have its ballast weight placed more to the rear and still float up level . The hole purpose of this rear weight is an improved casting performance , but that still remains to be tried in some field-testing , since I just got done with them a few hours ago . And in fact the weight(6 grams inline sinker) inside of these lures came to sit right halfway between belly hookhanger and the very transition of the plane flanks to the round rear portion , so actually a little behind the lengthwise center of the 4 1/2" lure body . Hopefully this would be enough to enhance the casting performance , that I'm trying to achieve ! During my first bath tub tests to determine about the weighting the lure action appeared to be a kinda blend between a "Rapala Original" and a "GrandMa" , also no overturning on sharp jerks occured . Lures are painted with rattlecans and plated with some glitter jelly under their topcoat . greetz , diemai:yay:
 -
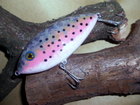
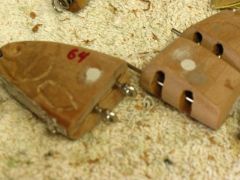
 Here are my latest sinking glider jerkbaits , basically lathe-turned , but with their flanks cut plane and tapered down the head of lure . For this purpose I left one end of the basic wood dowel remaining on the turned blanks head end , I had cut it to a square shape prior to turning(I most likely use round dowels for turning) , so that I could utilize that square end to fix into the vise of my hobby routing machine to cut the flanks plane . After I have cut off the square end and shaped the curved upper head portion on a 40 grit sanding wheel . Lures are weighted fore and aft to sink level , the larger one(approx. 4")at 6" per second , the smaller one about twice as fast . Larger lure is painted with rattlecans , smaller one only has a yellow base sprayed on , the "catsuit" pattern(just out of a temper:huh:) I dotted on with earcleaners and modelmaking enamels . Haven't tried them outdoors yet , but I have made a similar lure before , on these ones here I have improved the line tie location compared to that previous one , so I am quite certain about a good gliding action . greetz:yay: , diemai
 -
Happy birthday , Jamie , ....still rather more juvenile than mature .....? Anyway , you've got still ten years of fishing ahead of you , that I have already passed........ ! Have a nice day:) , greetz , diemai
-
 I like the top one , must cause quite a wake on the surface ? Welldone , diemai
 -
8" four piece silver/shite trout and smallie
diemai commented on mark poulson's gallery image in Hard Baits
 Nice fish , Mark ! Funny to me , that they go for such large lures half of their own length.........maybe I should try 6" to 8" baits as well for our local perch :lol: ? congrats , Dieter
 -
 Nice bunch of jerks you've made there , quite a distinctive paint style with the square netting mesh ! greetz:yay: , diemai
 -
 Had a similar construction on my mind as well(purely theoratically , never started out at all:o:o:o) . I did not think about applying epoxy to the belt portion at all , only a little to the PVC halves to bond these together , and fix the belt to the lure body just by some crosswise stainless pins or screws leading through the body . With PVC you won't have to bother about any watersepage , the belt material won't soak up too much water , anyway . But I was not quite sure , whether such belts were flexible enough for the purpose ? good luck with it:yay: , greetz:) , Dieter
 -
@ Grit Alright , I understand......for your purpopses suitcase-sized boxes would really be more practical than cupboards . In that case I'd be thinking 'bout assembling some kinda "U" shaped aluminium or plastic profiled rod onto the top rim of the divider sheets , just to lock the spinnerbaits hanging in their grooves in place , thus prevent them from falling out whilst handling the transport box . That profile rod could be simply hinged and pivot around a small pin leading through one side on top rim of divider sheet and the two pointing downward "shanks" of that "U" profile . The opposing end of the profile rod might be locked in place with a small detacheable pin or hook on the other side of divider top rim or by simply binding onto the divider sheet(depending on size and/or snug fit of "U" profile onto divider sheet) . The grooves to hang in the baits need to be deep enough , so there would be sufficient space on the dividers top rim for the "U" profile rod to fit over it without the baits' wire arms disturbing it to lock down snugly . I have seen sucha similar construction once on a small commercial bait box in a catalog . But if your divider sheets lead upward snugly right against the inner top lid of your transport box , this would also prevent the baits from sliding out of their grooves whilst handling . Maybe plate the inside of the top lid with a flexible material like foam or felt sheet to come to sit snugly onto the dividers , thus lock the baits in place . Uuups , another difficult thing to explain on a distance..........! good luck , diemai:yay:
-
@ Grit Do you really need to transport hundreds of spinnerbaits ? For simply storage it won't be such a great problem(though a bit time consuming)to construct a large box or a kinda cupboard for your baits , you might also use old furniture . In a clothing cupboard f.e. , you could reinforce the back wall with something more rigid to mount some kind of (metal ?) angled lureholders onto , the long shank should have grooves for the baits to hang into and lead through the entire width of the cupboard , right from back wall to the doors in front . So on each holder mounted to the back wall one could hang a certain amount of spinnerbaits in a row from back to front , one could mount as many lureholders as the space and size of cupboard allows , preferably those lureholders should be fixed with a special locking system , that allows to remove and pull them out in a breeze , just in case , if you're looking for baits hung right in the back , not to have to remove every bait in front one by one for access . You might also utilize a different kind of cupboard , the lower type with three or four large drawers on top of one another . Provided , that these drawers are high enough , you could set in dividers of plywood , plastic or sheet metal , grooved at their top rim to hang in the baits . This way you'd have instant access to your baits just by opening the drawers . Large boxes of any kind might be equipped with such dividers as well , maybe even with two(if high enough) , one on top of another , both guided by two vertical rectangular dowels opposing either side of box , so the dividers could slide down in a groove made up inbetween the two dowels fixed to the boxes wall . This is , if you need access to a divider at bottom , you could just slide out the top one , hold it upright with one hand and get your desired baits out with the other . Probably build a temporary mount for the removed divider for such cases , could just be a solid , heavy board with a groove on top , just to put in the divider vertically not to fall aside and have all baits messed up . But before starting to work on such , you need to do some trial and some calculation on how many baits would finally fit in your construction . Hope , that you understand my thoughts a bit , not easy to explain on a distance . good luck , diemai:yay: