


CL Rods
-
Posts
547 -
Joined
-
Last visited
Content Type
Profiles
Articles
TU Classifieds
Glossary
Website Links
Forums
Gallery
Store
Everything posted by CL Rods
-
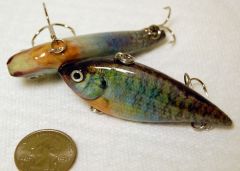
 I tried a bunch of times to get the greens, browns, cooper, gold, yellow to show up in the green shad bait but it just ugh doesn't focus or show. The sides have a hint of green,gold irredescence and the back has the same plus the brown under tones, and copper ruby overtones. Well you probably know the inspiration for my versions of these colors. I also have a few on the wheel where the cheeks are much more vibrant with green irredescent tones.
 -
You are correct! I experimented a bit before using the clips and found that for baits like the RC2.5 and some others where there is a lot of depth to the bill or if it is really rounded you need to use tape. However push come to shove I have found I can also clamp in the hobby knife blades holding the baits and I make sure they are clamped down solidly before coating and mounting. Someone showed a similar motor being used where they took a 2x6 and cut it in a circle and mounted clips on the side. This works well also as it allows you to clamp the hobby knifes easier. If you are concerned over weight of your baits, length etc. DEFINITELY do not mimic this exactly. And test everything before you put a top coat on. I will try to get pictures of my other low cost method soon. Same motor same tapping out the bolt, but this uses an old spool that held rope (FREE from Lowes) and allows connecting the baits between the sides of the spool. Down side is you require more space because both sides of the shaft must be supported. Like I said this one is for small baits and was more for creativity, space considerations and $. I'd love to see more folks creativity and functionality in small batch methods. So post those pictures.
-
Like everyone has said you need to wrap it around and pull it tight. However, I have some netting that won't stretch very as it looks like each netting cell is bonded and doesn't allow it to stretch. So, well I use that netting to do sides only. I mention this because you might have that same type and you are fighting a loosing battle with it. So just make sure it conforms to the bait if you just wrap it and nug it up using your own fingers hands ... And I will say that from time to time if I am spraying only one bait and because I am spraying Acrylics and because I have big hands, I will often wrap it and hold it by hand, spay it, set the airbrush down, grab a blowdryer and flash dry it so I can remove the netting. Not sure if I can recomend that for every one and especially if you are using paints with solvents.... heck the acrylic is bad enough to get on you all the time as it is.
-
Thanks, for the additional update. I mostly use Createx and I actually use their thinners, tranparent base, and extenders. About the only time I use Windex is for a few Hobby paint colors that well, you just can't create their color from the Createx paints pigments. And I usually add a drop of transparent base to the thinned paint to help with the adhesion.
-
 d2t / etex It just doesn't matter what it is, because ripping it across shallow water in the backs of coves or large flats the nose will be on the bottom an awful lot. So it just makes contact with a lot of gravel and rocks.
 -
It will be a shame to know that as soon as you go crank these for the better part of the day the nose will be torn to *@#$%(*& I threw a couple of my threadfin foiled traps again this weekend and came home and put a couple drops of epoxy on the nose for like the 6th time. Fortunately they still swim good and catch fish. I am going to experiment putting either a thin copper or aluminum (roof flashing) band over the nose on the next ones I do foil so the nose won't get chewed and chipped up so much. If it still swims right then yahoo!
-
Just curious if this 'glycol ether' is available on a retail basis and where?
-
I will say that if I had seen some of the enexpensive rod dryers available on eBay now, a year ago I would probably have bought one and simply removed the rod holder and added a luan board and clips to it. But I had this motor and well.... waste not want not...
-
OK, the goal was how can I make a functional dryer for small baits (sorry musky dudes and dudettes)! I am a bit of a pack rat so I often have left over / saved stuff. So I acquired an on sale rotisserie motor (I think it was about 15$, bought it a year ago and never did this)... and 6 clips (under 5$ inc. tax Northern Tool) Step one disassemble the motor housing and figure out how to mount by tapping it out with what I have. (I used to have some taps but couldn't find them) So I put a round peg, uh ..drill bit in a square hole. Used a pair of vice grips and a harder steel bolt gently started into the hole. Result is enough threads to get r dun Next, using spare hex head screws, a small drill bit for pilot holes, an old spool of line (well OK not so old yet for this example), an old saved bolt, washers and nut, and my purchased 6 clips. A side note here, is Suffix line is great, but the spools work out fabulous as the center of the spool is hexagonal! Thus an even better choice for this project and really the only choice available. Drill pilot holes in spool, and tap out the plastic coating on the clips as the holes are already in the clips. Screw the clips down to the spool carefully and run the larger bolt through the spool and tighten down the back nut. Note it has a lock washer built into the nut or you would have to use two nuts and a washer. Mount the motor to an available spot on the workbench in the garage. Screw the bolt/spool to the motor, attach lures to the motor and start drying! And I never imagined this hanger I used as a Bow Hanger when hunting would awaken to have a second life to hang an air brush and hose when not in use.
-
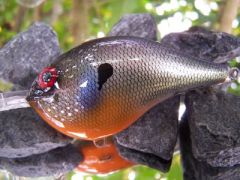
Since I don't have that software or a good color printer I am resigned to my own mind distorting the image! A few beers later and it is amazing! No clear coat yet but here is my latest mind shop version of photo finish.
-
Ok, I think royalties are involved here! I think you need to send me a High res version of your modifications in an email and I need to test a couple of those traps for you! Those look very nice! I guess I am just going to have to get a better printer and give it a try!
-
Have you tried using smaller open screw eyes and putting the hooks directly on them and then closing the screw eye and just eliminating the split rings? Just add extra epoxy to the holes. And you certainly don't need a front split ring as there are several loop knots that you can use to tie line with that will leave action in the lure.
-
Break out the band saw and stick a lip in one to see if you can make them shallow jerk baits. Can't hurt might help.
-
Very cool recovery KcDano
-
Sick! Just Sick! Absolutely some of the best I have seen! And his gallery photos made me feel like a kindergarten kid with finger paints. You need to put together a really detailed tutorial and sell it! List me as the first customer!
-
 I think it will hunt!
 -
Not a bad idea at all but we shall see if TU will allow it. However posting to tiny.pics etc. would be a good place. I'll upload and repost a few I have for blue gill and shad.
-
Awesome, glad someone put the photo to use. Now if I could only do as good of a job with the photo.
-
Pete, you are da man! Thanks again for another fine example on the art of how to! The lips you were working with in the other thread looked pretty much like a circle with a circle notch on the edge of the lip. The title was Forming Polycarbonate "Lexan" and I thought you had stated in a previous thread that you punched the lips out of lexan. So I was wondering how you 'punched' them out. I guess the lexan I have is just too thick and I need to find some that is thinner and I will just have to order it online as I haven't found it locally and I certainly can't punch out what I have. Thanks for sharing so much info, Charlie.
-
It is a very nice tutorial and I too look forward to your pics of your modified spoke tool. Are there any other tutorial links with this kind of detail for balsa specific work? My searchs timed out before I could get through all of the threads. I also was checking out the thread about forming polycarbonate lips which was great. But I was wondering how you got the lips 'punched' out in the shape with a notch in them. Ugh, I know so many questions.... But I really want to try some balsa and like the idea of using lexan lips but not quite set yet on the how to for the lips or if trying to make lexan lips, or buying polycarbonate or circuit board lips would be better for balsa. When money is tight you just hate wasting too much in the learning curve.
-
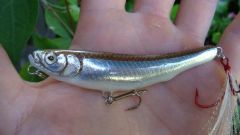 looks very nice, I noticed the rear treble, did you tie it yourself?
 -
Found a couple of references, you could check this link: Translated version of http://www.vuoksivieheet.net/fi/nirha/nirha.html
-
I use Createx. Perhaps you are using either 'thinned' paint or transparent colors. If you use the Opaque colors you should not have any issue.
-
My new pet peave flake off bait is the Lucky Craft Rick Clunn baits. They catch fish but man they don't hold up at all. You'd better coat them when you buy them to help protect them.
-
I'd be honored. I only imitated what the good lord provided! And to Downriver's point, I only really sand off the worst of them or chrome ones. Most times you can lightly sand or scuff and off you go. But once you get big chips and or if the original had manufacturing flaws well....
