


parker085
-
Posts
74 -
Joined
-
Last visited
-
Days Won
1
Content Type
Profiles
Articles
TU Classifieds
Glossary
Website Links
Forums
Gallery
Store
Everything posted by parker085
-
Yes I have tried preheating, didn't help much. I'm thinking my plastic is too thick and the hole is too small. The hole on these little stick molds is really small. I think I'm going to have to try and flour my salt if I'm going to add anymore heat. i did try to bump up the heat up in the 350's and all my salt sunk to the bottom as i was pouring. I'm guessing flouring the salt would keep that from happening.
-
Yes I have check everything in a 55 gallon fish tank I have. I like my baits with lots of salt (weight) b.c I think that if i'm imitating a crawfish the bait should be glued to the bottom the whole time, until I twitch it up. When I tested beavers without salt they float up off the bottom at a 45 degree angle, which is OK for some situations but not my favorite way to present this type of bait. I guess my question is more of what people prefer in a beaver style bait, salt or no salt and why.
-
No the mold I'm using is two piece aluminium mold from Basstackle, so I add all my salt into the plastic to give the bait it's weight.
-
So I got a few 3" stick bait molds from del-mart a little while back and have just now started to play with them. I'm able to pour them just fine when I'm pouring plastic with nothing added, no salt or softer. The formula I would like to pour is the standard stick formula. 1 cup plastic (LC 502)/ 1/2 cup salt/ 1/4 softener as that gives my sticks the fall rate i'm looking for. When try to pour that formula into these molds I'm having trouble keeping the stream of plastic thin enough to pour straight down the center and get full pours. I currently only getting one or two good ones out of seven cavities. My setup is, I'm pouring from a one cup Anchor cup, getting my plastic around 340 to 350, and the formal is the standard senko formula above. I'm currently not flouring my salt but I'm wondering if that may help. Please let me know if anyone else has had this issue and what they did to correct it. Thanks
-
When you are creating a soft plastic to imitate a crawfishdo you want to lay flat on the bottom or do you want to rise up off the bottom? Rigging will be Texas rigged, so it really wouldn't be “floating”,it would be the back part of the bait “raising” off the bottom? This question was something that came to mind when talkingabout how much, if any, salt to put in a split tail (beaver). I personally use a lot of salt in my beavers, for weight and to keep them from floating up. From some old post I found on here it lookslike a lot of people don’t add too much salt. So if you don’t add salt is thatfor color reasons or so the baits floats up? My opinion, not saying it’s right or wrong, is thatI want my beaver flat on the bottom. My thinkingbehind this is, the only time a craw is going to be pinchers up iswhen it's fighting or when it's protecting itself. I agree it would need to protect itself if itwas cornered by a bass, but in most cases a crawfish will try to hide before itfights. So this means most of the time acrawfish is going to be moving along the bottom trying to blend in.I think the bait looks more life like when it holds tight to thebottom. I found video,http://vimeo.com/7106409, of crawfish moving a long the bottom that supports my theory So how does everyone else imitate a crawfish? Also feel free to pick apart my theory.
-
So I found a half dozen of this style crank in a box I found over the holidays. It has been driving me crazy trying to figure out what it is. It has holes in it that water can run through. One in the nose, one in the back, and one in the belly. Anyone know who makes these and/or what they are called?


-
OK do you have any pictures of them? I have a few of the base model white river vises now and I'm looking for a little better one. Thought one of these might be an upgrade. Thanks
-
Can you give me the brand and model? I'm interested.
-
Yes it looks like something is going on. I'm getting an error when I try to go to the site.
-
I will take the (5) LC 3.5" swimbait, (5) LC 4" swimbait, (1) LC 2.5" swimbait If they are still available
-
Ted, Got the powder paint and pins. Thanks again.
-
 Thanks, I would still be trying to figure out what was going on if it wasn't for the tips you gave me. I'm sure with practice they will only get better. Thanks again.
 -
I reheat in the divided cup in the microwave. I'm heating the plastic in two cups to start and pouring them into the divided cup once I get the color I'm looking for.
-
So after endless nights of reading everything I could find here about creating a divided cup (there is a ton of great stuff if you search "divided cup"), I finally created a divided cup the other day. The cup wasn't too hard to make. I used some flashing and JB weld to put the cup put together. I attached a picture of what my cup looks like. After I had the cup I started playing with it. I was having some trouble getting my baits to be two sided (laminate), they kept wanting to swirls. After reaching out to Jim, who was nice enough to give me some tips for getting my baits to come out better, I was finally able to get a few laminate looking baits. Not great but not bad for the first time. Posted a few pictures in the gallery Here are some tips for newbie’s to split cup pouring that I didn’t know (thanks again for the help Jim): Get close to the mold when pouring (This really made a big difference) Don't get the plastic too hot or it will mix together. With the metal in the cup it heats up faster then normal Make sure your divider goes all the way to the spout of the cup (the attached picture is of my second cup, first one didn't go to the spout) Use a 1 cup cup as it's easier to handle I'm sure there is a lot that I don't know but I wanted to share what I learned. Please give me/us any feedback you have about getting started pouring with a divided cup. Thanks Jon

-
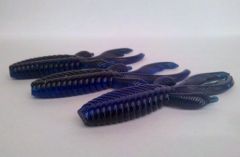
Working on pouring some baits with a divided cup.
-
 First try at pouring two sided baits with a divided cup
 -
I was having a hard time pouring little details too. Like Munkin said, it did help to go to a smaller cup (1 cup) and with only about 1/2 cup of plastic in it. A few other things I have done is: I make sure the plastic is good and hot I try to keep it flowing slow and steady, it goes everywhere when i start and stopping I also try rest my arm on the table and just pour with my wrist, seemed to help Still nowhere near perfect but much better then when I first started to them. Hope this helps
-
I haven't found anyone who makes smelt scent, but I started using Upper Hand Scents Bass Sauce this years and it really gives my baits a good scent. The Bass Sauce has Premium Shad/fish based oil in it.
-
How To Pour A Basstackle.com Bite Me Craw
parker085 replied to rugbyfisherman's topic in Soft Plastics
This is my first year pouring plastic and I was having the same issues. I'm able to get a good pour now by getting the mold hot as well as making sure the plastic is hot, 325 or so. I switch to super soft plastic and I haven't had an issue getting a good pour since I switched. I do however use an injector with this mold anytime I'm making craws with a good amount of salt. -
Thanks. I will be giving it a try very soon.
-
I have been looking through tons of old post and this one is the closest i have found to answering my question. I'm just getting started and I wasn't 100% sure on how to pour a laminate. I'm used two piece aluminum molds, stick mold and split tail. Can i just lay the mold down and pour one color, then slap them together, stand it up and pour my second color? sorry if this is common knowledge. like i said i'm new to pouring my own baits and any help would be appreciated.
-
Thanks. I pulled the needle tonight when I was cleaning it and it worked way better.
-
I left the needle in when i was backwashing mine. Should i have taken it out? I just put water in the cup and held my finger over the front and air pushed the paint up in the water. Hope that was correct.
-
Bobp, Thanks for conforming the backwashing. I Googled "airbrush cleaning" last night and they talked about backwashing the gun, it really worked well, i just wasn't a 100% sure it was good for it. Rookie Thanks for the tip on Lacquer Thinner. i really haven't used it enough yet to worry about it but i will make sure i give it a good cleaning with Lacquer every few uses to make sure i keep it nice and clean.


