-
Posts
46 -
Joined
-
Last visited
Content Type
Profiles
Articles
TU Classifieds
Glossary
Website Links
Forums
Gallery
Store
Everything posted by dhockey11
-
Picking only one is tough. I live on the columbia river in WA and fish for Smallmouth primarily so my answers will be a bit different than most. Instead of shad, we have smolt so I always like a chrome blue back or chrome black back shallow water bait. If I want something a little deeper, I'll use a deep lil N in spring craw. If I have to choose only one though, gold black back is pretty tough to beat.
-
Fish for small mouth. I'm always trying to put the red finish back on =).
-
-
-
It's def the right stuff. Works like a champ =)
-
-
-
Thanks guys, it is the same lure. The picture is way better. I plan on trying to get a better camera that has more control settings and trying it some more to compare. All of the advice here worked well though.
-
Personally, I would put #4s on both, and wrap some lead on the rear treb if it wasnt sitting down properly. Don't have any experience with these KOs though.
-
So I got together a really simple box, adjusted the camera, and followed the editing instructions for Photoshop. The biggest difference seemed to come from the photo box lighting, but some was found adjusting this setting on the camera from 1/500 to 1/1500. Not sure what the heck that does, but the picture looked a lot crisper. I attached two pics for comparison. Thanks guys, Zack
-
I have ventured into this with very little success. I do kill dots with a dotting brush, and thats about it. One thing I did try that hasn't worked yet, is called "inking" in the figurine world. It will only work on textured areas of baits, but I'll throw out the process so you guys can think about it. Paint your bait normally with acrylics, then either brush or dip on a coat of future. Take oil based artists paints, that contrast the colors of the bait, maybe red for gill areas, black for lighter areas, etc. and thin a ton with fake turpentine. You want the paint to flow just like water. Now, load a fine tipped brush, and place the tip in a crevice that you want highlighted. The paint will flow into the crevice and coat the entire area. Use a tissue to clean up goofs if there are any. To get really noticeable highlights, this process should be repeated a few times. Now, as I said, I have tried this on cranks with no real success visually. I use it on airplane models to make the panels stick out and it works great. I think my problem has been that the colors were too similar, but I haven't given up on it yet. Zack
-
Thanks to blazt and everyone else for their help. I will get to the pics as soon as I can, but it will probably be about a week before I can. I plan on trying pretty much everything mentioned here, and posting pics for comparison. Went fishing with the baby bass painted ones, and had a 15-18lb king salmon follow it to within inches of the boat. I almost died, I would have surely lost the bait, so I couldn't take more pictures of it. =) Thanks again, Zack
-

Want To Make A Mold Or Reproduce A Old Crankbait, Where Do You Start ?
dhockey11 replied to reel doctor's topic in Hard Baits
Thanks hillbilly. So, from your post I am gathering that the material in the video IS alumilight? if it is, have you ever had any problems with strength due to the the thin walls? -
I'm not selling baits, just a hobby. I will try to get a better camera, but some new fishing rods don't sound too bad either =).
-

Want To Make A Mold Or Reproduce A Old Crankbait, Where Do You Start ?
dhockey11 replied to reel doctor's topic in Hard Baits
Any idea on what kind of epoxy would be adequate for the type of molding in the video posted by hillbilly? I am hoping to give this a try over the summer. -
Thanks for your reply. I guess we all got used to being able to click on someones name to look at all of their past photos.
-
I finish my model airplanes with Future (Pledge with Future Shine) only. For a crankbait, I would do two dip coats. This isn't the shiniest clear coat, but looks great and doesn't distort the color much at all, much less. If they are going to be handled much, I wouldn't suggest this route.
-
I have no idea. I have pictures in the gallery, but that link seems to be taking me to my gallery album, which is empty. Not sure how to add to it. After a little bit of looking, I actually can't find anybody's pics through the gallery link on their page. Something has definitely changed.
-
Turns out blazt was right, its not in "my albums" but its on the gallery. Figured that would autoadd that to my albums. Any idea on how to upload to make an album?
-
Thanks to everyone that replied. I like the idea of building a light box. Thanks for the photoshop instructions Vman, I have the program, but its a little complicated for me to go in blind with. It will probably be a couple weeks before I get this done (finals week is fast approaching at school), but I will post some pics of the resulting box and photos from it. I didn't delete my pics, but they are hidden right behind gunnie's most recent set of masterpieces. Should be able to click on my name and go to my gallery or something too, so idk why that isn't working.
-
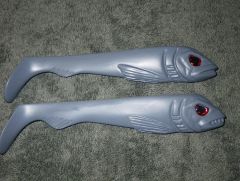
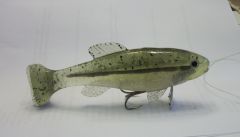
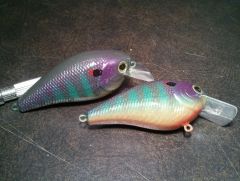
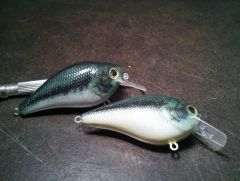
I have done a brief search of the forum, and couldn't find any answers. Not sure if this is the appropriate place to post this either, but what the heck. I just posted a couple of cranks on the gallery section, and I am really happy with them. The only problem is the pics are pretty crappy. I was wondering if you guys have any tips on taking pics of your lures. Up until now I haven't cared too much since the bad pics hid my mistakes, but my most recent paint jobs are awesome in real life and mediocre in the gallery. Thanks for your help. Zack
-
If your really impatient, I don't think d2t is very hard to apply. I'll tell you my method, which hasn't yet failed, but I wouldn't call myself an expert. 1. I paint the bait with waterbased acrylic paints 2. Squeeze two pea sized drops of d2t using the syringe onto the bottom of a popcan. Then add 2 drops of laquer thinner. 3. Mix it like crazy using a Popsicle stick. It incorporates bubbles, but i will get rid of those later. Make sure it is thoroughly mixed, but its not that hard. 4. Using a cm wide brush with very fine bristles, I load the brush with epoxy and brush it on, getting rid of the bubbles. Hold the bait in good lighting to make sure the whole thing is covered. The large peas sized amounts of d2t usually coats 2 baits for me, leaving some excess. In my opinion, go as thin as possible, on every coat. 5. I don't have a lure dryer yet, so I turn it by hand for about 15 mins, then clip it too my benchtop. Rotate it every 15 mins for another hour. 6. About 4 hours later, when the d2t is dry but a little soft to touch, I coat again using the same process. 7. Again, dry using the same process. 8. After 24 hours, they are fishable in my experience. I am also going to switch to DN soon, if that says anything about the time consuming nature of this d2t process.
-
BobP is right here. I have a siphon harbor freight brush now, and really wish it was gravity fed. The amount of paint needed to get the siphon to work is just way too much for the 2-4 baits I paint at one time.
-
-


