cwillis999
-
Posts
20 -
Joined
-
Last visited
Content Type
Profiles
Articles
TU Classifieds
Glossary
Website Links
Forums
Gallery
Store
Everything posted by cwillis999
-
In my experience mixing epoxy for one lure may result in a bad mix just because my measurement is not perfect and the less you use to mix the bigger margin for error. Better for mixing for 3 or so at a time.
-
Seems like all the distributors for tinted 1/4" thick polycarbonate like to sell them big. Was curious if someone wants to sell me a couple 12" x 12" squares of 1/4" tinted polycarbonate. Found some on Ebay. Delete post at will.
-
 Walk the dog with it. It will catch fish
 -
 It's just a shallow running jerk bait. That's how I fish it anyway. Sometimes I iradicly fish it like I’m walking the dog with it. The scales are just an exacto diamond handle rolled over a foiled image. I think the thin Dick Nites also helped the scales stand out on this one. But my stock has hardened since then. My first shipment of DN I learned my lesson... don't let ANY drip back in the bottle! Thanks to hammer mechanic for suggesting E-tex spiked with devcon I now use that for my top coat. Seems to defeat the disadvantages of using both independently while retaining the advantages. When it runs out Ill give Nu Lustre a try. : ) But anyway thanks for the compliment!
 -
So I finally got around to making the changes to the lure that you had suggested. Instead of making a lure for each change, I just took the prototyping process into fast forward and made all the changes to 1 lure. I must say It did work well I created a lower profile for the bottom of the bait. I put two 1/4 shot in front of the first hook hanger and behind it. I attached the tow screw eye to the front instead of by the lip. And I put the tow eye screw in horizontal rather than vertical. I also reduced the amount sanded from the corners for a squarer profile. All in all it worked quite well. So well I caught one 3 pound bass on it however I did not retie it on after the catch which resulted in me losing it about 5 casts later. So now I have nothing to take a pic of and show you The horizontal screw eye position was giving me inconsistent retrieves. Sometimes it would come in centered sometimes it would retrieve to one side depending where the knot was holding. So I gave the screw eye a half twist back into vertical and it retrieved consistently strait. The action of the lure does not roll as much but it is a more subtle realistic action than my lures with the lower tow eye close to the lip. Each lure has its place the more realistic lure with the front mounted screw eye for less aggressive situations and the lower screw eye gives the lure a panic attack triggering a bass's predator instincts. Of course many of you experienced fisherman knows each lure has its place and time. I am very happy with both types and have caught fish on both types. Thanks again for the good advice.
-
A lot of good suggestions to think about and things to try to get the action I'm looking for. Thanks guys I am going to try to narrow the lures lip at its base for the lure I have already built and will report back with feedback on how it performed. Thank you for that suggestion Diemai . For now i want to keep the line tie at its location because my theory behind that is the closer the line tie (and main ballast) is to the lip, the tighter the wiggle will be. In my experience a tight wiggle lure that makes my rod tip vibrate or throb rapidly works very good. As far as the horizontal line tie configuration. I have tried it before with limited results due to my own fault really. I can see how it would create more of a swaying horizontal action and I may try it once again now that I am better at getting my lip slot strait. The problem it presents (for me) is less room for error on the lip slot because it is more difficult to tune in that position. At least in my experience or lack there of rather. This may also be because of my lower line tie location that im not willing to give up on yet. One thing I could not try on my bass wood lures is making the lure taller because the blocks I purchase are only 1"x1"x12". But now that i can cut my own blocks out of the PVC board I will have to try to make a taller more square profile that holds weight lower as suggested. Thanks for the suggestion mark I'm torn between using the 1/4" sling shot/bb's or lead. the shot/bb's are very cheap compared to how much i gotta pay for lead but I can't pound out the shot like I can lead to get the weight lower. Food for thought. One thing I do on some of my wood lures is add a lexan tail. I attach the tail with Q-tip tubing glued to the polycarbonate, and brass rod through the tubing and bent in a U shape then glued into the rear of the lure. This might help it keep upright with some rudder action, ill have to try it out on the PVC. I put a pic up in the gallery of that particular bait with the tail if you would like to use that idea feel free. Or if you have questions on more of the particulars let me know. It's really just a combination of ideas i got from here so don't give me credit Sorry about the delayed feedback, this stuff takes me a long time and the experimenting will probably take longer. Thanks again guys.
-
 Such a clean looking lure i enjoy looking at your work
 -
Having fun with my new camera First Upload not first lure.
-
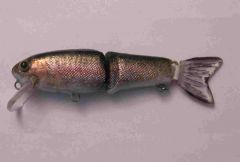
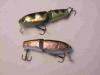
Here are some pics. The yellow perch pattern is made out of the PVC the rainbow trout pattern is made out of basswood. They are 3" in length.
-
I recently tried making one of my jointed jerk baits out of PVC instead of bass wood. The PVC lure seemed to have a different action with more rolling, not enough to turn it over but more than what i was going for. I suppose it may work better in certain situations but it is not the swimming action my wooden baits seem to emulate. I use a 1/4 inch shot behind the lip follwed by 1 bb in front of the middle hook hanger and 1 bb behind it. I was curious if anybody else has run into this with PVC baits when they made the switch from wood. Or if someone has a clever way to dull roll action. I'm all ears thanks.
-
Rot Free 1 x 3-1/2 x 10 PVC Smooth/Textured Trim Board from Lowes is what I use.
-
Windex and Clorox put out window/all purpose cleaner that contains no ammonia. I use the Clorox version its called "green works natural all-purpose cleaner". Works great and you don't have to worry about effects of the ammonia on the chrome because it doesn't have any.
-
That works good Bobp Thank you. I have been using a olive jar it works great for dipping. I bought Dick Nites in the pint size, it fills up a standard olive jar with a little left over so next time i might pour half and half into two seperate olive jars so i don't end up throwing away the little bit left over. The olive jar minimizes surface area which helps preserve it combined with bloxygen of course. Then I use one layer of saran wrap, spray some bloxygen, cap it, another layer of saran wrap, then i seal the whole jar in a ziploc bag. I found another method for dipping that I would like to share. I foil my baits so I tried foiling over the void then dipping. Then i cut out the foil over the lip slot and glue in my lexan lip. It seems to work ok as long as i lap up the area where the lip meets the body with some D2T to hide the cut top coat layers.
-
I just bought some Dick Nites and and pondering how I am going to keep the lip or lip slot clean of any topcoat. I am used to brushing on E-tex and installing the lip as the last step in my lure building process. From what i hear brushing Dick Nites can be a difficult task and I want to keep it as simple as possible by dipping and dripping. Thanks in advance for any insight.
-
I conceal the foil edge with Devcon 2 Ton it goes on thicker than Etex. I also coat some of the sharper edges of my lure (jointed jerk bait) with devcon before giving it the final top coat of Etex. It can be found at some Ace hardware stores, make sure you get the 2 Ton version not the 5 minute version as it cures to fast. If you can't buy it locally there are online resources. Only problem with buying online is, sometimes the shipping cost exceeds the price of the epoxy itself because it is considered a "hazardous material". That may not be exactly the answer you were looking for. I am unsure about the acrylic rattle can. Let us know how it goes if you do try it out.
-
Happy New Year! -Another grateful new guy
-
I disassembled a old rotisary that was bought at a garage sale. The motor itself turned to fast because it uses a small gear on the drive shaft that turns the wheel with the corisponding teeth on it. If you come across this Buy a lazy susan from lowes. Next you will need a board 3/4 thick aprox 8"x12". Cut a slot in the wood to fit over the drive shaft, this will serve as your mounting piece for the lazy susan/wheel. Attach the backboard to the motor. Atach the lazy susan to your wheel. Set the wheel in place with the teeth setting on the gear, then trace the outline or holes you need to drill to mount the lazy susan to the backboard. Attach the Lazy susan/Wheel to the backboard. I kept the timer attached to the motor and the plastic casing. Works great i just set the setting to no heat rotation and there is a knob that sets it to turn for up to 2 hours.
-
I'm only using one screw eye for my jointed baits so my thoughts on the washers is to eliminate the screw eye from wearing down the inside of the joint. Again I may be over killing the washer/wear issue but I did notice that it helped the joint move more freely so I think I'm going to stick with the washers. The soda can idea is great, Thank you! I'm going to try that out. Here is a post [<--mouse over] where Jamie used some beads as washers which doubled as a swivil. Seems like this would work best but I don't use two screws eyes. Two beads in one slot would be a bit much I think. Just for reference here is another post [<--mouse over] about problems persisting to epoxy in the joints. P.S. sorry about the bad picture i need to find a good digital camera. How many mega pixils do i need to take good close ups of my tackle?
-
The good OL KISS system (Keep It Simple Stupid). I tend to overdue things when im new to it. Ill try what you said. Thanks for the input
-
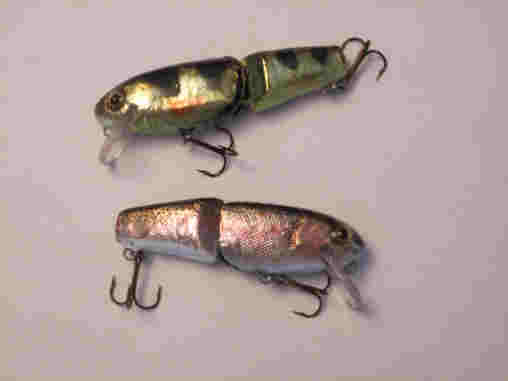
First off I just want to say thank you to all the regulars who make this forum as great as it is. Tackle making has become my new obsession because of you Recently I have atempted to craft a 2 piece jointed jerk bait using the screw eye & pin joint design with a "V" cut. My concern is the wear of the joint and the gumming of the two parts rubbing together. To avoid to much gumming i avoided the E-tex top coat in the joint itself. I layered coatings in this order. linseed oil, krylon primer, 3 coats of minwax polycrylic, metalic paint, gift tissue wrap w/ print, one more coat of polycrylic, Black air brush stripe on top and white on the bottom, then a coat of etex partialy on the male end of the joint but none in the female end. I am not sure if this is the best method as I'm not to confidant in the polycrylic as a sealer but it is the only way I can think of to avoid the gumming mentioned above. I also used some very small washers i bought at lowes on the top and bottom of the screw eye, however they are a little to big and stick out of the joint. I was thinking about making my own washers out of sheet aluminum or stainless steal. What do you guys think would work better s/s or alum? Or do you have any other suggestions for the washers? How do you go about creating a 2 piece joint jerk bait?