spoonpluggergino
-
Posts
355 -
Joined
-
Last visited
-
Days Won
6
Content Type
Profiles
Articles
TU Classifieds
Glossary
Website Links
Forums
Gallery
Store
Everything posted by spoonpluggergino
-

Wood Jig For Round Or Square, Cylindrical Long Baits
spoonpluggergino replied to spoonpluggergino's topic in Hardbait How To
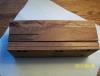
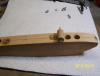
Note I built this Jig out of scrap hardwood floor boards, I also forget to include the following pic. Gino
-
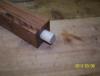
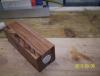
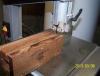
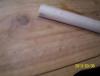
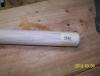
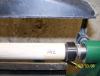
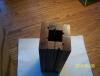
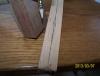
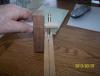
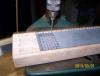
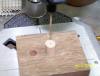
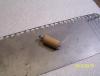
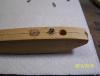
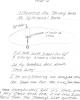
I made this jig when I started making Hellbenders and Bombers. I wanted something that I could cut the diving lip slot and drill my holes 90 degree to the lip. This particular Jig I can make the following lenghts body baits 3.5, 4,5,and 6 inch. I just drilled the front hook hole one inch apart, The diving lip screws dimension are all the same for all 4 baits. The hole dimension you can alter to the bait you are designing This jig can also be used by the saltwater guys that make Spooks, Poppers and Bottle baits This particular one that I made for the larger 6 inch Bombers the over all lenght is 8 inches I am allowing 2 inch for the waste of the lathe when I turn the bait, so that said when you cut your bait bodys lenght allow total of plus two inches for waste on the lathe for turning The dimension are 8" X 2-3/4 x 2-3/4 I built the jig to fit snug around a 1-1/4 dowel pin A: cut a piece of the dowel pin for the bait body you are building B: insert the dowel pin the jig C: cut the slot in the dowel pin , I use a band saw. Do not take out the pin just now, you need to drill holes D: go to the drill and drill all your pilot holes, make sure they are deep enough, so when you turn the piece the holes are still showing E: take the piece out and tape the slot end so to prevent the slot to open when you set it up on the tail stock of the lathe F: now you can turn your bait with the lathe I am showing pictures is sequence to give you a better idea
-
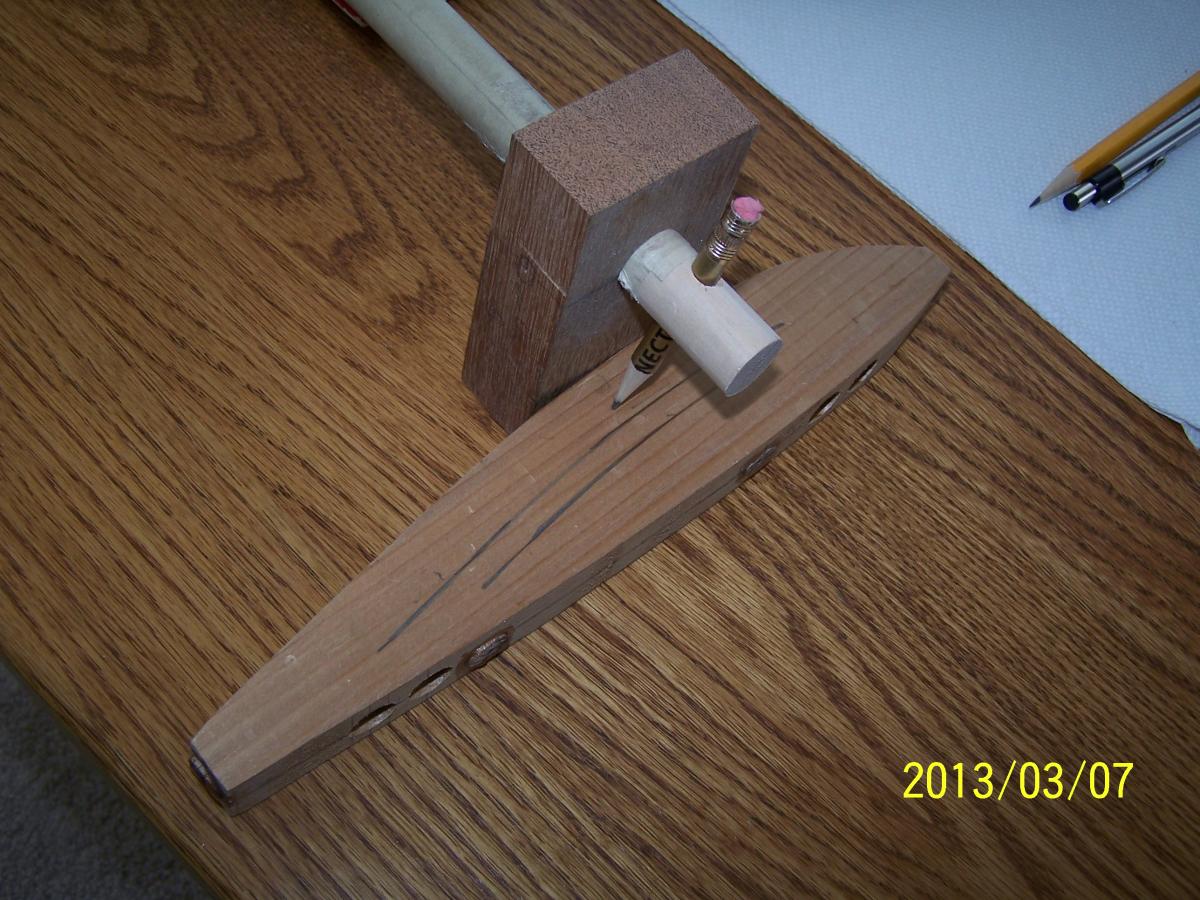
Easy Wood Scriber Gauge
spoonpluggergino replied to spoonpluggergino's topic in Member Submitted Tutorials
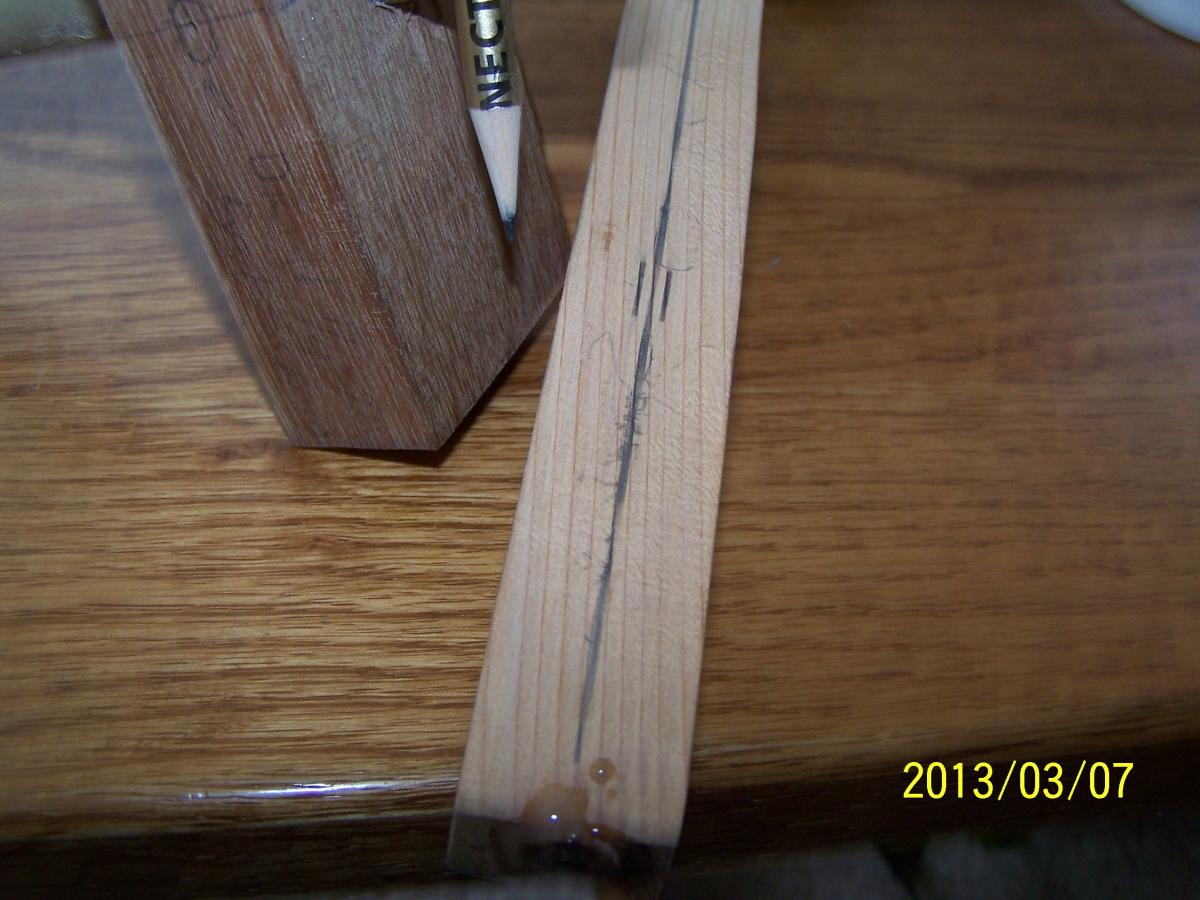
Some times it is hard to see what a tool does, Basically will find and draw centers or parallel lines I use it to find center line top of bait or draw parallel lins on the dides if I am shaving some wood off the side the lines give me a guide. when you want to find a center line let say the bait is one inch thick, the center should be 1/2 set the pencil at 1/2 from the side of the scriber now make your first small mark flip on the other side if on center the pencil mark should fall on the first pencil mark if not try again until it falls on center , usually 3 tries for centers. Note in pic 4 on purpose i scribed two short lines to give you the idea that on the third try I was on center pictures are worth 1000 words
-
Thank you Bsgorilla I ordered 16 OZ. Propionate pellets from e-bay today, I read quite bit on Taclemaking website, they also have all kinds of instruction how to make the propionate batches Thank you very much for your detailed info, wich it is more valuable to me from a bait builder Gino
-
Thank You Guys It worked I used just water and an old cotton t-shirt. I used a scuffing pad to take out some air bubles pimples. I finally got some really nice clear coats on my baits. I went back heating the E-tex with the heat gun in the shot glass that works the best for me, because after vigorously mixing I am able to take all the air out of the e-tex. My basement is 62 degreese and that is a problem, the air bubles will not rise up e-tex too viscous, I also put the e-tex bottles in a pail of hot water. I followed all the direction mixing exaling co2 just too cold bubbles will not rise up unless I heat the e-tex. Couple things I also find out, it is a must to have the wood baits sealed really well, On my last batch of baits I sealed them with Devcon 2 ton 30 minute works great, I also clear coated some baits with Devcon, great stuff. I got lucky on e-bay I purchased three 9 oz. under 13.00 each, now they are back to 17.00 I am going to try to seal with Propioanate, I like Devcon but that can get expensive. I tried a all bunch of other stuff and I do not like any of it, Devcon so fur is the best and quickest. Propionate sounds really promising, a litle bit of work, but sounds it does a nice job on sealing a bait. If any one here uses Propionate I like to hear about it Gino
-
http://bustinbassbaits.com/About_Cranks.html Here is a link to bustingbassbait he shows cross sections of rapala lures Gino
-
Whats Going On? D2T As A Sealer Over Wood.............
spoonpluggergino replied to Diesel Fitter's topic in Hard Baits
Yes I use polytranspar super hide white basecoat and createx paints on the same baits with no problems, make sure to heat set each coat of paint Gino -
When you scuff a bait or light sanding that has been clear coated for several day, what is the best way to clean it before clear coating the bait again Gino
-
Hey Markinorf Thanks for sharing The Zap a Gap ca glue, I looked up the website and read all about the Zap a Gap and on the bottle it does say also on oily surface, tha should work on the swimbaits made from resin Ditto on Zap a Gap, this will be part of my bait building supply Thank you Gino
-
Whats Going On? D2T As A Sealer Over Wood.............
spoonpluggergino replied to Diesel Fitter's topic in Hard Baits
Ditto on the polytranspar superhide white, I get myne from Wasco Mckinzie taxidermy Gino -
Sammy I am not an expert on swimbaits, but I am mechanically inclined and maybe this will help I use Loctite heavy duty clear epoxy 3500 psi, Devcon is rated at 2500 psi, both are 5 minutes,or try a 30 minutes epoxy they have stronger bond Another suggestion looking at your sectin if is possible I would install 4 very small pins at the front corner and toward the end of the bait, you can make the pins from the same wire you done your hook hangars and hinges, than when you put the halves together fill the litle holes for the pins with epoxy, install the pins and join the two halves together. The pins are so small should not add very much weight. Another idea is to drill the holes fill with epoxy, no pins the epoxy will bond together and the holes will act like an anchor Hopefully this will be some help Gino
-
With PVC deck boards I build glide baits and crankbaits it floats and it is very consistent, someone here has the density of the pvc posted, I believe there is a thread on PVC on the hard bait forum. I really love this stuff my glide baits work better than the one that I made from red oak. I use the white trim board pvc for the smaller baits under 6 inches, baits larger than 6 inches I use one inch deck boards it's a lot stronger. Because I'am building muskie baits with PVC I developed a system for my hook hangers and the tow line using hard wood dowel pins, wich I summited a tutorial on how to on the hard baits page. I am not sure I would use this stuff on baits that you turn on a lade, I do not know how that would work. On this site there is a gentileman called Mark Poulson he could answer that better than me. I made Hell hounds and these are fairly skinny and they work great. The biggest thing is fast no sealing required, even dough on the deck boards I think they have some kind of wood fiber mixed on the PVC to give the board more strenght, so I put a thin coat of sealer to keep the wood fiber from raising up Gino
-
MS the tutorial is done Thanks for asking Gino
-
My Hard Wood Dowel Pin System
spoonpluggergino replied to spoonpluggergino's topic in Hardbait How To
Thank You Dave, I am not an engineer but I do understand the surface area concept Gino -
 John You are correct, me and my brother we catch a ton of bass and big ones on the smaller sizes. You can buy the regular sizes on e-bay. I made this for muskie fishing large size from 7 inches to 10 inches over all lenght including diving lip. Bombers and Hellbenders were made around 1949, long time ago and they are very hot lures. I made a Hellbender I will post it when I get it painted Thanks for asking Gino
 -
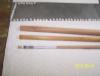
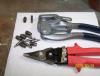
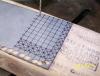
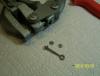
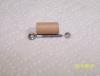
Well today I am really bored nothing to do, so this is a good time to do this tutorial I came up with this Idea when I started making baits out of Azex PVC deck boards. Like most muskie guys we worry about the screw eyes coming out. I personally do not worry if my bait blank is made out of hard wood, one inch screw eye is not going to come out, but I do worry on softer material, big muskie are hard to come by so I do not want to loose a big fish. Now for the guys that use hard wood I came up with the idea to back up the screw eye with a fabricated metal washer that the screw eye threads on, this way the screw will not come loose or pull out. For the guys that feel countrable with just the screw eye in the hard wood, do not install the washer, but you do need it for soft wood I made through wire construction several different ways and for me it has been a real pain, especially filling the holes with epoxy. Any way here we go I have all bunch of pictures for this First step is making the metal washer, I make it from 20 or 22 gauge sheet metal, it is easy to work with I lay out with a marker a bunch of 1/4 squares and draw a diagonal lines for the center Once the center are done I drill out the centers with the right size drill bit for the screw eye i am going to use after the holes are drilled I run the screw eyes through the holes, before I cut or punch them out Now I cut them out with tin snips, than i trim the corners off, if I am using 1/4 dowel pins so they fit behind the pin, if I am using larger pins I do not cut the corners. I also use a Roper/Whitney to punch out the washer , I use the 1/4 die punch. The washers are done next step I cut the dowel pins for the 1 inch screw eyes, I cut the pin about 3/16 shorter than the pin, for the guys that want to install the washer on the screw eye I assemble the pin screw eye and washer and a cup washer if you like to use it and I epoxy that in to the hook hangar or toe line


-
For the guys using Devcon Two Ton: How many coats you guys do for clear coating a bait?? Gino
-
I started using PVC for muskie baits, Mark got me started, great stuff. I am thinking doing a tutorial on my Hard Wood Dowel System especially for soft wood. I done wire through several different ways and the dowel system for me is by far the best way and less hazle to do and fast Gino
-
MS The wood file I like it's Nicholson by Woodcraft. Has two sides, the rough side can really chew the wood in a hurry and the fine side does a nice job smooding out. Of course final smooding with sand paper. If the ammount of wood is a lot I will use the belt sander or the band saw to get close to my pencil marks. You can get the file at Home Depot. Nice to see another muskie hunter on this site. I also use a good carving knife Gino
-
For me to taper the bait I found out that to make sure I am centered I draw a center line than I draw the taper line, front and back. I tried the belt sander for me does not work. I purchased couple of good wood rasp and they do a grea job you have total control versus the belt sander, I do all this and drilling holes while I still have square edges. Also on the smaller baits I use .051 wire and the .072 inch screw eyes. Hopefully this helps Gino
-
 Another 5 inch Reef scraper, bluegill pattern
 -
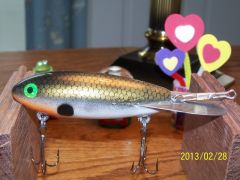
 6 inch Reef Scraper, perch pattern
 -
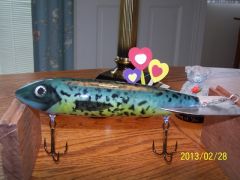
5 inch Reef Scraper, Tennesse shad patern
-
 10 inch Reef Scraper, crappie pattern
 -
 10 inch Reef Scraper, My first rainbow trour pattern