


spoonpluggergino
-
Posts
355 -
Joined
-
Last visited
-
Days Won
6
Content Type
Profiles
Articles
TU Classifieds
Glossary
Website Links
Forums
Gallery
Store
Everything posted by spoonpluggergino
-
Yes Mark is exactly right the paint sticks to the Azek deckboards so well that even when you hit rocks you may get a dent in the bait but the paint never chips. I am also another guy that I will never look back to build wood baits. Hey thanks Mark , you made my life easier Gino
-
 You are the master
 -
Seeking 54 I started plugging all my holes with wood dowel pins. If your lure is plastic use epoxy on the dowel pin, works great Gino
-

Air Bubles In Envirotex Lite Solved
spoonpluggergino replied to spoonpluggergino's topic in Hard Baits
Hey Vic I read your experiment and feel bad that it did not go so well. I forget to tell you that I use a painter heat air gun to heat the glass. I checked the temperature of the epoxy mix only gets to 80 degrees F, before I heat it is at 65 degrees. I only due one bait at the time even if I have multible baits Best of luck , I am leaving for Canada for a week hopefully I catch a big muskie on my glide baits. I made 17 of them, would like to get some teet marks to see how good is the ETEX Gino -
Air Bubles In Envirotex Lite Solved
spoonpluggergino replied to spoonpluggergino's topic in Hard Baits
hey Vic My baits where looking really bad when I started using E-TEX, prior to this I was using Parks from Home Depot. Nothing wrong with Etex just not knowing what I was doing. My basement it really cold I checked the temperature and is 68 degree too cold for the E-TEX. This system I have now it is really sample and easy any one can do it Two things I do I been using the same brush over and over. I keep the brush in a mason jar half full with acetone, when I am done brushing the bait I dip the brush in the acetone i wipe off the exess etex and put back in the jar for next time. The second thing I use a shot glass that allows me to heat the etex, also when I am done I put a few drops of acetone and clean the shot glass for the next time. I do one bait at the time, when I have multiple baits, you do not have to clean the glass every time, mix a new batch and do the next bait PROCEDURE I measure etex with syringes pour in to shot glass heat glass from the bottom up heat the all glass blast heat right on the top of the mixture stir for two minutes with a small flat screwdriver blast heat right on the ETEX when done mixing 5 to 10 seconds all bubbles are gone in less than a minute brush the baits blow hot air on the baits you nare done in less than 5 minutes I put the baits on the wheel and I leave them to harden These baitts finish they look professionally done The reason I start heating the glass from the bottom due to warm air rises, I would say that the entire glass and etex is probably around 95 degree it is hot to the touch Gino -
An Alternative To Trough Wire Construction
spoonpluggergino replied to spoonpluggergino's topic in Hard Baits
On my cedar baits I used the fence post concept ( that's what I call it ). Drill pilot hole the lenght of the screw eye, then bore half way with 3/8'' forstner bit, fill with thicked epoxy, insert screw eyeHey s54 I forget to mention your method above it is a very good idea to Thanks Gino -
An Alternative To Trough Wire Construction
spoonpluggergino replied to spoonpluggergino's topic in Hard Baits
s54 the only reason I am doing this is because I am using PVC board, but I am not backing up the screw eye. I don t feel that is necessary, 0ne inch long screw is not going to come out in my opinion. In my PVC muskie baits I am using 1/2 hardwood dowel pins and 1 inch long screw eyes, but Iam not backing up the screw with the sheet metal washer The only reason I brought this out is that some builders like to do wire trough construction for their muskie baits Gino Gino -
I started building muskie baits for about eight month now and I have learned so much from this site that I really appreciate the basement guys and pro bait builders. I like to give something back. When I first started building I learned how to do wire trough construction, I do not see anything wrong with it at all, very good construction but lots of work. I always try to find another easier way to do something not necessarily better in this case. I am very confident that this is a good construction. I got the idea when I started building baits from PCV boards, I had to drill large holes and insert hard wood dowel pins for the hooks and the toe line. I use oak ½ diameter dowel pins anywhere from 1 inch to 1.5 inches long, depending on the bait shape and size works really nice. Now you can do this with wood. A: Drill the holes for the hooks and toe line for the size and depth of the dowel pin you are going to use B: drill the dowel pin screw eye hole for the screw eye you are going to use in the dowel pins C: need a piece of sheet metal around 20 gauge or thinner, to make a square metal washer for backing up the screw eye, use sheet metal cutter for this Example if you are using ½ Diameter dowel pin cut the washer a little smaller than ½ square, needs to fit behind the dowel pin. Note pre-drill small hole in the metal before you cut the small square. The hole will be a little smaller than the screw eye because you are going to screw the screw eye in the square washer. D: Screw the eye screw pin in to the dowel pin and in to the square metal washer, apply five minute epoxy or 30 minutes which ever you like. Insert the assembled dowel pin screw and washer in to the bait make sure that there is enough epoxy on the washer and bottom of the hole and around the dowel pin. Once the epoxy sets in that screw cannot be pulled out will be there for the life time of the bait, it is permanent. Of course everything must be drilled on center; you have only one chance here Thanks for all the valuable information I was able to get from this site, without you guys would have taken me a long time to build and paint baits Gino Anyone that needs more info or clarification feel free to PM me
-
Air Bubles In Envirotex Lite Solved
spoonpluggergino replied to spoonpluggergino's topic in Hard Baits
Thanks Guys I forget to mention to you guys that my basement it is very cold around 65 degrees, we like our home very cold, our daughter calls us the pinguins. Any way since I have been heating up the e-tex I have zero bubbles in my baits Gino -
This is more for the biginners like me. Prior to using Etec lite I was using Parks from Home depot, had some air bubles problem but not severe. I started using etec and I started to have some major problem with air bubles, could not get them out. I done lots of search watched some video nothing worked, I was very frusteted, but I found the the problem and solution. Parks seems to be thinner than Etec. I picked up a shot glass and measured the ammount of Etec that I needed than I heated the glass and Etec very warm almost hot to the touch, than I stirred for two minutes like the instruction says. When the two minutes are up I blow heat right on top of the glass and keep it warm, than wait about a minute, I look down the glass and all the bubles are gone . The bottom of the glass is crystal clearn not a buble in sight. now is ready to be brushed on. The all process takes about 5 to 6 minutes I know heat is not what is getting the bubbles out, but by making the etec viscosity less dense the bubles come up to the surface faster and you can exale on the bubles and break them up use a torch about six inches away and the carbon dioxide breaks up the bubles. The main thing is heat the Etec almost hot to the touch, it works beatifully. You cannot use the clear plasic tiny cups the will destort and probably melt. No more bubles in my baits Gino
-
Kile I have been making baits and painting for about a year, also I have been reading article on this site for about 3 years. Here some advise I can offer when you find something bookmark it and take notes right away. For me the most important thing is to know your airbrush inside out, dont be afraid to take it apart. I clean my brush thorogly after each use. All you need is a bucket of water,spray bottle and widex ammonia free to clean your brush. I also purchased a airbrush video how to paint baits advertised on this site. I believe is the Amistad Tackle, It helped me immensely. For holding your baits go to Home Depot and get couple of their Heavy duty clamps. Here is another thing that I discovered on my own. I use Envirotex to clear coat my baits, we use cheap brushes and than are trown out this gets expensive. I purchased a cheap brush at Home depot about 5/8 wide than i squized the metal around the bristle so tha hairs will not come off. Now when I use the brush I dip it in acetone clean it with paper towel than I put the brush back in to a jar half full of acetone, now the brush is ready for next time, just paper towel it to get the acetone out. I have used the same brush for six months as of now. To mix the envirotex I use small clear tiny cups, smaller than a shut glass. To measure the envirotex I use small siringes found at Wallgreen the one used for small children to measure medicine This is a great site, everything you want to know is here. Have fun Gino
-
 Thanks Mark, I was not sure if the screws were to hold on muskie baits. The action on glide baits it fur better than hardwood baits. I love the fact that there is no need for sealing the baits. Thanks every body Gino
 -
I have seen other builders here making PVC baits, so I decided why not for muskie. When I build this bait I epoxied red oak dowel pins for the hooks and toe eye. I am really happy with it, and the action on this bait is fantastic. Very easy to build and paint Gino
-
Hello Rich I am a refrigeration mechanical contractor, I deal with nitrogen and co2 quite often. co2 is a gas compressed to liquis so when you start to use the tank it will start to sweat due to the liquis is expanding/boiling and turning in to co2 gas. Nitrogen is what you want to use. By the time you get a high pressure regulator and a deposit on a nitrogen tank you are going to be around 300.00 dollars plus you have to go to an industrial supplier to get a refilled bottle. Another thing is that an high pressure regulator may not control your low pressure let say arount 10 lb. so you may have to install a low pressure regulator downstream of the high pressure regulator. when I started this bait painting I went and purchase an Iawata compressor complete with hose and regulator/filter for 228.00 free shipping and it's very quiete spoonpluggergino
-
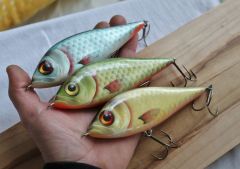
I am a muskie hunter and this is all I fish for. Here is a definition of muskie baits in the muskie world Glide Baits : Are subsurface baits, most of them have a sinking rate of about a foot /second. They are used with a solid steel thin leader about 8 inches long. a pull of the rod tip will pull the bait forward in to a glide, note the rod tip after the pull actually goes toward the bait. the solid steel leader helps the bait swing rigth to left Some top notch baits Hell Hounds, Amma Bamma, Modivator, Phantom Jerk Baits: This baits came out before glide baits. This bait starts at the surface, when jerked with a hard sweep of the rod we try to get the bait down to about any where from 2 feet to 4 feet down and on a pause the baits backs up to the surface again. The classic jerk bait Suick, Bobbie, Manta, Burt and the list goes on Surface / Prop baits One of my favorite baits expecially for night fishing. This are strictly fished on the surface, I think bass guys refer to them as wake baits. Classic baits Creeper, Globe, Bucher Topraider, My favored Hawg wobler. Zara spook type bait weagle, Poes giant Jackpot Twich Baits: also fished on the surface, Usually the lip has a steeper angle that will cause the bait to woble, very good fished over weed beds shallow rocks usually built like a minnow type bait some have flat sides and quite large Cranes, Big Game Tackle Bucher shallow raider Swim Baits: This is also a subsurface bait One that comes to mind Mike Hubert shaddilack Bucktails: To me this is the classic Muskie bait Subsurface bait, but with a fast reel you can burn the surface, you will see a bulge of the bucktails on the surface of the water Spinner baits: A classic bass bait used for muskie but much larger and heavier. I like to use it over deep weeds and just tip the top of the weeds Crankbaits: This to me is also another bass baits but made larger for the muskie guys Gino Gino
-
Check out solarfall video on making fish eyes, he uses 5 minute clear epoxy
-
Ben That is exactly my first reaction to change the ratio of the ballast nothing worked including tail down, level head down and also extremely large ammount of lead. This seems only to effect shorter fatter lures, so I am convinced that shorter wider bait become top heavy so I figured by taking weight from the top would solve the problem. I really love to get suggestion that is how we learn from each others, like they say two heads are better than one. I also like to share my succes due to TU has helped me to advance myself and become a good bait builder Thank you everyone Gino
-
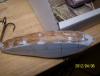
The picture was not on my last post. Maybe this time Gino
-
Here is the picture of one of the 6 inch shad bait that I drilled the holes on the back of the bait. I also done this on 3 other baits same style but 5 inch long. The result it is like I said earlier like night and day. Gino
-
I have been working on some large bellie glide bait. The bait is 6 inches long by 2.5 inches in the bellie. I was having trouble to get them a longer glide, the biggest problem I was having was that the bait would swim out of the water on a longer pull. My first taught was to add more ballast that did not solve the problem,jus a little better. I experimented also wit new location of the toe line screw eye nothing worked to my satisfaction. The all time I was thinking and checking notes that I took here on TU. One thing that stuck in my mind was that lighter wood bait have better action, the other taught was that due to such a wide bait that made it top heavy. I decided to make the bait lighter by drilling 5 holes on top of the back 1/2 diameter all the way down to the shaft wire, some hole 1 inch deep. Once the holes were drilled I cut sliver of dowel pins about 1/6 thick than plugged and glued the top of the holes. For quick testing i used another tip from TU I sealed the repairs with CA glue that works really great to get you back on the water quickly. Now for the good part The baits now glide fantastic, I had two of them I done one first matter of fact I was so disappointed that I could not get this glide baits to work I almost did not test the bait figuring was not going to work. I was wrong. I repaired the second bait this I drilled 3/8 holes due to the back was tapered the first was straight, both now work really good and they will not swim out of the water. Even dough I figured out the problem my logic to make them lighter does not really makes sense to me and top heavy does not really work for me, because when I added more ballast still did not solve the problem. Taking wood from the top made the bait lighter and more buoiant that did not make any sense either. The baits are made from red oak and took out 12 grams of wood and this made a huge difference. It is like night and day. In the way I am glad that this happened, you sure learn a ton when things go array and go to work to figure out how to make something work properly Gino
-
I have been lucky with the drop bellie longer baits, but the shad bait did not work as good. I noticed that the bait was tail down i knew that when I first weighted the bait was a litle lite on the ballast. I wanted to keep it light for slow sinking that was a mistake. I went to the pond and i taped 4 grams of weight near the front hook, than I moved it more toward the nose of the bait, that worked the best. What I noticed that when I jerked the bait to glide forward due to the angle of the chest plus tail dow the bait as a tendency to glide up and come out of the water. The attitude of the bait is level now maybe slightly head down for me that seems to work the best. What I am noticing that when you have a large mass of wood like around the belly to me there is where the center of gravity should be focused. on this type of bait the front ballast is further toward the front I am using just cheap masking tape Scotch 3M I make a litle loaf of split shots than I tape them to where I want them centered and you can cast it and retrieve with out coming off. I do take some paper towel to dry the surface but I am able to use the same tape over to another spot. I was very supprise how well the tape works. You can see the 6 inch shad brown bait in the photo gallery. note ther is no ballast in the rear of the bait My turn to give back to TU members Thank You Gino
-
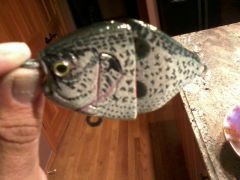 Looks really good Iam having trouble with crappie patern. Muskie love crappies Gino
 -
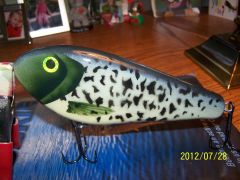
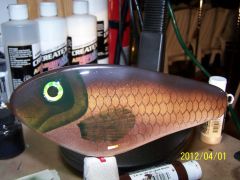 Scale patern that I am working on, not perfect yet
 -
You are right Mark a litle tough to find it. Once on Wasco site I went to WidlifeColors Airbrush Paint Listing, Than I scrolled down to the Greens and it is there # WCO4353 Gino
-
when I looked at the Willife color chart it appeared to me that was black with brown, I was wrong . Sorry misinformation. On the Wasco website they carry Wildlife colors and their description of the CAMOUFLAGE COLOR IS Dark Dirty Green. We are professional we must get it rigth Gino

