-
Posts
355 -
Joined
-
Last visited
-
Days Won
6
Content Type
Profiles
Articles
TU Classifieds
Glossary
Website Links
Forums
Gallery
Store
Everything posted by spoonpluggergino
-
Went through Smith wildlife color charts finally found the camoflafe color, it looks like black with brown in it. The camoflage paint # is 0-435 nedyarb that was good made me laugh Gino
-
I cannot finf this camouflage paint that someone mentioned on another site. Is there such a paint. He mentioned Wildlife paints, but nothing there Gino
-
I am using 3 different wood sealer. the first is spar urethane mixed with mineral spirit 50/50 mix , soak for 15 t0 20min, make sure you wipe off the excess off the bait than hang to dry. It is a litle messy but works . Another is boiled linseed oil with a litle bit of japan-drier I do not like the smell but it does a nice sealing job. The last one that I tried is minwax sanding sealer I really like this one no smell and it dries really fast and it leaves a nice surface to paint Gino
-

Couple Questions For The Glide Bait Masters
spoonpluggergino replied to RayburnGuy's topic in Hard Baits
I am in the process of finishing some shad baits almost a replica of RayburnGuy two of them are six inches one with the same tapered body as RayburnGuy 1/3 tapered to the front remaining 2/3 of the bait to the back 7/8 inches thickest part of bait end are about 1/2 inches. The other bait only rounded edges no taper body, identical side profile. I feel that the pivot point is concentrated around the concentration center point of the two bellie weight. For my baits the tail weight is used more for leveling the bait. To give you an idea the two major weghts are 3/4 inch from the center of the bellie hook, located at center bottom of the radius of the bellie. I figured that by building two baits of similar shape and size but with slight angular shape to one bait than compare how they react in the water is a good learning curve for future baits. I will also post my finding once this baits are completed and tested Gino -

Couple Questions For The Glide Bait Masters
spoonpluggergino replied to RayburnGuy's topic in Hard Baits
I am not an expert on building glide baits. What I have found so far that when you taper the front of the bait and tail end versus a bait that just has front and back rounded off. The tapered bait will definetely will swing from the center line more than the rounded bait. I test mine in my pond and the test that I really like is by retriveing the lure in a straight line without any action from the rod, the tapered baits will swing from right to left on his own. Hopefully this helps -
-

Preferred Way Leveling Glide Baits
spoonpluggergino replied to spoonpluggergino's topic in Hard Baits
Greetz Thank You very much. Very helpful information great videos. For now I decided to level horzontally with a very slow sink rate due to going to use them in shallow water and be able to pause with out dropping to the bottom right away. Thank you to everyone Gino -
After reading lots of post on building glide baits, I am still not sure what is the preferred leveling angle. The few I built they are slightly head down, almost horizontal, and they work good. I am only doing drop bellies 5 inches and up. I have 4 that I tested that I purchased and the model that was tail down glided the best, also was the slowest sinker. I like to be a perfectionist and this drives me crazy, I wish I wasn't Which of the following would be preferrred A: tail slightley down B: head slightley down C: perfectly horizontal Gino
-
I molded various size of lead any where from 3 grams to to 20 grams and I also use Gremlin pencil weigts. I use a few very small split shots to make up the exact weight for my ballast in each hole. Once I get the 3 holes weghted I take the lead from each hole and I remeld and pour back in each corresponding hole The aquarium is an excellent idea, a better way to see the attitude of the bait when leveling. Some more stuff to buy You can purchase graduated cylinder at McMaster Carr. I also purchase spring stailess steel wire from there, very reasonable price
-
-
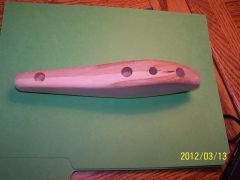
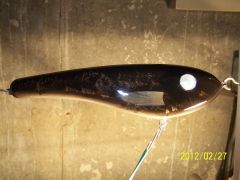
Sbaits I just posted one of my blanks so you can see the location of the holes Gino
-
-
Thanks Ben I been thinking to get my wife to video the action from shore at least the straigt retrieve. I never uploaded a video but I have friend that could do it for me. Sbaits The way I have been dooing the weghting is as follow. Make sure the bait is ready for painting. should be sealed, primed all the hardware on including the hooks in the location chosen. Do a dunk test to determine how much ballast you need, keep on putting split shots or whatever small lead you have until the bait starts to sink very slow once you determined how much ballast you need subtract from this ballast the ammount of weight that you think may add from the paint and clear coat. On my bait the deduction is as much as 15 to 20 grams. At the beginning I weihgt my bait after each coat of paint and clear coating after each coat so I have an idea what the paint and topcoat will add, also you may have to compensate for the solid steel leader we use for muskie baits. I have 3 holes drilled the holes are 1/2 dia. by 5/8 deep tail hole only 1/2 deep. I devide the weigt among the 3 holes the front holes gets more, the tail hole very litle just enough to level the bait the way you want. I like to level mine slightly head down or level should also work. I also checked some of my bought baits some also are slightly tail down. The first one you may not get it just right, but if you log all your data while you dooing your first bait the following baits you get better. It is a learning curve. Note I use a graduated cylinder in milleliter and each ml. equals one gram in weight that will get you close enough the final is by adding or subtracting the weight in the cylinder until the bait start to sink. The leveling I do that in a large sink. Make sure what ever material you use to keep the weights in place while you trying to find the ballast that will be part of the ballast weight. do not forget to compensate for the material you are going to seal the holes that could be couple of grams to be subtracted. Once I start to clearcoat my bait i start to watch that i do not go over the weigt that i achieved to make the bait start to sink . My crappie bait only has two coats of E-TEX, another coat would have put the bait over the test weigt. It sounds complicated but a lot easier once you do it couple of times. Glad to help good luck Gino
-
Responding to Litleriver. Sorry I got carried away, my glide bait is not neceseraly better than Amma Bamma. After all the credit goes to the gentileman that created that glide bait over 30 years ago. My bait is modeled after Amma Bamma because I really like drop belly type of baits. Here are the differences. The Bellie mine is wider 2 1/8 verses 1 7/8 body thicknes mine is1 3/8 amma 1 1/8 and finally the lenght mine is 9 inch Amma is 7 3/4 also the taper from the gill plates area mine is much steeper angle, I figured tha would cut better through the water. Also another major difference mine sinks very slow compared to Amma. But a major difference is Amma caugth 1000 of muskie mine as of now Zero. I do want to mention when I read your guys articles I pay lots of attention and take many notes. One came from RiverMan that a thicker body works much better than a thin body. So I really do not know why especially on a straight retrieve mine swing wider than 4 different baits that I was comparing. In conclusion is not fair for me that I mentioned Amma Bamma should have left the name out. Could be that I really like Amma and I got carried away My apologies Thank You
-
-
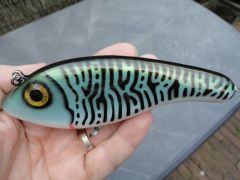
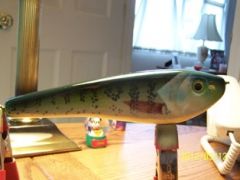
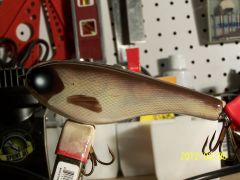
I am really proud of this 9 inch crappie patern glide bait that I build. I tested it in my pond . Here are the finding. the sink rate takes about 11 seconds to drop one foot, the second test. On a straight retrieve with no action from the rod the bait will swing from right to left at least two feet , total of 4 feet span wider than Amma Bamma glide bait. Does it glide Ho yah easly 3 feet. This bait is going to LOTW this year. I am pumped up I cannot fall to sleep. You guys are the best when I started thinking about building baits I really taught I would stink at it. Hillbilly I took your advise and done my final balancing in the sink. It just simply works Thanks again spoonpluggergino PS Amma Bamma is atop notch glide bait, no pun intended. I own 3 of them
-

My True Image foiled and painted largemouth 6inch wood glide
spoonpluggergino commented on brucestacklebox's gallery image in Hard Baits
-
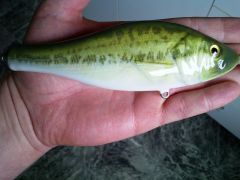
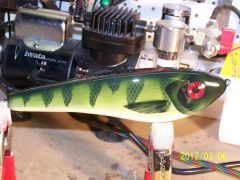
On this bait I am getting better with the air brush I litle more confident. I am not afraid to make muistakes, that is the only way I advance or make progress. This baits are made of red oak. they sink very slow and head sligtly down almost horizantal. My pond was open and the glide very nice. Done the dunk test and also the final balancing was in the sink. I believe Hillbilly mentioned that ,thanks hillbilly Thank you fellow TU members and special thanks to Solarfall for his videos on painting fins and the gills spoonpluggergino
-
-
-
-
Joe I wish you the best, Happy hunting Gino
-
Thank you Bob P and seeking 54 You guys made up my mind Envirotex will be, plus Menards is only a mile away from me. seeking 54 curious about your avatar name are you looking for a 54 inch muskie. Took me 30 years but last year finally caught a 51 incher on a homemade dowble ten bucktails. Yes so far I have been lucky the glide baits are working really nice, thanks to TU members Thanks again fellows sooonpluggergino
-
I want to thank you all of the members on this sight. With out you guys I would still be scratching my head trying to buid and paint baits. The ultimate satisfaction is to catch fish on your own baits, especially if you are a devoted fisherman no matter what your quarry is. I finally was able to complete two glide baits, I think they are the most challenging baits if they are to be done correctly. I tested the baits had some slight flaws but idid not give up made the necessary adjustment and now they work perfectly. I had the ballast right but i did not take into account that when I put the hooks on the rear hook is further away from the axis of the center balance and that caused tail down, I re-adjusted the rear weight and now the head of the bait is sligtly head down. I learned all this from you gentileman, Thank You. I did use the dunk test and this is right on the money taking in to account all the hardware and top coat. I use a 17 inch 1000ML. beaker graduated in 10 ML. My first trial was to find the total ballast that would take to sink the bait, but I did not have any data on the weight of my clear topcoat, so I figured what ever my topcoat would come out should be enough to sink the bait otherwise just add additional ballst once the bait was completed. I am not afraid to go in to the bait and do surgery, otherwise the learning curve stops. Now I know what each layer of topcoat weghts, on a 8 inch glide bait is roughly 1.3 grams. I weighted the bait after each coat of clear and cataloged the data, I will do this for every different and size baits that I will build eventually I will have a pretty good idea on the final weight of the bait once topcoated, of course different topcoats may weght sligtly different. Now when I ballast and balance the bait I will hang the hooks on than balance the bait. I made a gadget to balance the bait I do not after do it in the sink or bucket of water and it seems to work just great. The final test will be in the bucket or sink than to my pond.I pour molten lead in to the bait works great with hard wood, I took this page from another TU member I made a mold out of hard wood and I made lead mold of different weghts and I use this wehgts to balance the bait including small split shots, once i know the total ammount of lead needed I divide it in each ballast hole to get the perfect balance. Once this is done I weight the lead in each hole, than I melt each one and pour back in to the corresponding hole. I use a very small ladle and all the lead comes out without sticking to the ladle. I use a propane torch melts the lead very quickly make sure you do not get it to hot.I also use a scale graduated in grams again this was another TU member Idea to work with metric measurment, it is really easy to use and very accurate. On my first baits I am using Parks topcoat from Home Depot only because I had this from 2.5 years ago when I purchased to repair some foil baits the the foil was peeling off. It seems to be working fine, I will test it out, hate to trow it out I done lots of searching and I see that the most popular topcoats on TU are the following : Envirotex Lite, Devcon 2-ton 30 minute epoxy and the one that I am most intrigued is Dick Nite S81 topcoat, but it also seems to be the toughest one to get shelf life once the can is open. Now I have read all about tapping the can with a screw, but I have not really read how to keep the air out of the can, beside Bloxygen. Beeing a refrigeration mechanical contractor I understand all about pressures and inhert gases and so forth. I know once you take liquid out of the can something will replace that space most likely air, unless the can is pressurized with some inhert gas. My question is for the guys that dip the bait in DN what you do with the rest of the can, and for the guys that tap the can I imagine you guys must take out just enough DN to brus the bait. The reason I am interested in the DN sounds like is one of the toughest topcoat and because I fish for muskie that would be my choice if I could figure out how to preserve it Some info I have searched the internet and the two topcoat that are easly found is Envirotex Lite at Menard seems to have the best price on the larger box under $ 20.00 Devcon 2-ton you can get it at Walmart for $ 18.96 plus 8.97 for shipping. The best price for Devcon is at Hobbylink $13.19 and 5.95 for shipping same size as Walmart Thank you Gentileman for all you help spoonpluggergino


