


spoonpluggergino
-
Posts
355 -
Joined
-
Last visited
-
Days Won
6
Content Type
Profiles
Articles
TU Classifieds
Glossary
Website Links
Forums
Gallery
Store
Everything posted by spoonpluggergino
-
 Great Idea Jio. I have done this on 5 inch soft shad, works great for muskie
 -
Hi Idahobass I am new to painting baits and I am in the proces of doing some baits . I have done lots of search through another website, I found a product that is used by a painter called Beaver top notch geitileman. Beaver uses a Sherwin Williams paint product called Polystyrene Barrier Coat. Comes in a 5 gallon bucket he dips the bait in the Polystyrene lets it dry than dips a second time dryes in about 20 minutes. The beauty of it is that seals and coats the wood in one step. The cost for 5 gallon is around 72.00 dollars. you may have to get some Bloxygen to extend the life of the paint Hopefully this helps spoonpluggergino
-

How To Know When The Paint Is To Thick
spoonpluggergino replied to spoonpluggergino's topic in Hard Baits
Thank you Guys Great advise and info. I will purchase some Createx extender Gino -
I done a search on thinning paint and paint thickness came up empty I started taking some lessons how to use an airbrush, lots good tutorials on the internet. I am very green at this. I noticed when I was spraying white the paint C-Tex was clinging to the side of the cup and the black did not. I do shake the paint really well. I am not sure what the paint fluid consistency should look like. Not having any problem spraying paint, the brush seems to be working properly. If I want to thinn out the paint can I use drops of water, or do I need to purchase C-tex thinner Gino
-
Thanks Bixie. reat deal I have the HP-B but I wanted the HP-C so I ordered one . My shipping was only 6.75, but my residence is in Illinois Thanks again Gino
-
I have done a search on Baking Enamel paint, I cannot find any comments on it. I am priming some baits with rattle can primer and I am thinking on baking it in a electric hoven just for the lures. As any one done this on this site Thanks Gino Another question: why I cannot log on this site through Facebook any longer
-
 Yes diemai you cast them to deep water let them sink than retrieve it. Also you can buy new spoonplugs cheaper than e-bay at buckperry.com Gino
 -
Thanks Diemai. I plan on putting on 7/0 muskie size hooks on. These are actually Spoonplugs designed by Mr. Buck Perry, One of the greatest fisherman ever lived. The lure is designed to troll down to 60 feet bumping bottom. Buck designe 7 size Spoonplugs that mapped the bottom from 2 feet to 60 feet using No-Bo line and than using wire line when going below 30 feet. you can catch all species of fish on spoonplugs
-
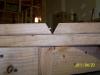
 I have a sheet metal box break in my shop
 -
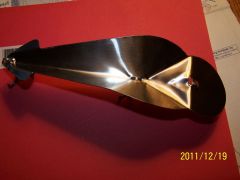
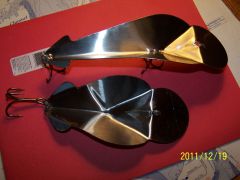
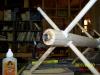
Showing the almost 9 inch and the 7 inch Reef Digger, for big muskie fishing
-
Build this oversized spoonplgs for muskie fishing. I wanted something bigger. they are 7 inch and 8-5/8 inch long made of .030 thick s.s. Gino
-
Now that the lakes are frozen in southern wi. I started making some muskie lures. My last day was December 16th very cold day water temp was 33.1 degree, on the following day the lake was frozen. I am a spoonplugger and Mr Buck Perry made spoonplugs up to 5 inches 800SP which we catch lots of muskie up to 50 inches. I decided to build my own this year so I build one that is 8-5/8 long by 2-7/8 wide and another 7 inch by 2-1/2 wide. I done some testing and they work fantastic, I was really supprised. It is fun when things work right. I made the baits out of stainless steel .030 thick cut them with metal snips and used my shop box break to make the bends, with out the box break would be almost impossible. The final touch was using a fine grinder for all the rounding and shaving extra metal. The first prototype made them from thick paper plate, than cut out the shape than copied that to the sheet, metal worked great. I will post picture on the photo gallery. Building baits is an addiction, I love it Gino
-
http://www.preval.com/shopping/val-pak This may be just what are you looking for. It is a pressurized precision disposable spray can system that allows you to use your createx paint, here is the link Hopefully this helps spoonpluggergino
-
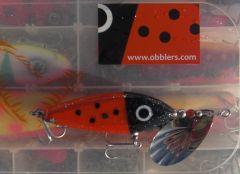
 I believe that is a Striker, I have two of them (9.75 and a 7 inch) They are black with silver lightening bolt on the side, never fished them they are around 30 years old. Gino
 -
Ready To Purchase Iwata Air Brush
spoonpluggergino replied to spoonpluggergino's topic in Hard Baits
Mark Thanks for your response. I did buy the Iwata brush, the salesmen was very helpful, but for some reason he was going to sell me the HP-CR brush due to larger cup size, 1/3 oz. but this brush has a .5mm nozle I switched back to the HP-BR this one has .3mm nozle the only drawback the cup size is only 1/16 oz., hopefully this cup is big enough to paint large muskie baits. My other option is to buy another Revolution brush with the 1/3 oz cup that has.5mm and use it to do base coats. 1/16 oz. does not seem much but I am sure it will most likely cover even a large muskie bait. the other dilemma is that If I decide to buy a second brush I would like to get the High Performance brush in .2mm. Right now I am taking the advice from all of you Tu members that responded with great advice and go with it, I really greatly appreciated. Thank you all spoonpluggergino -
Ready To Purchase Iwata Air Brush
spoonpluggergino replied to spoonpluggergino's topic in Hard Baits
Thank you everyone, you made my decision very easy to figure out what I needed to order. Now I am ready to start building my baits, making them I am sure will be some challenges but I am not intimidated. The air brush that is another story, this has me a litle worried. I am mechanically inclinedI can also do isometric drawing, but I do not have any artistic quality in me, I am sure with lots of pratice and paitence I should be able to at least do some easy paint jobs . I ended up purchasing a Revolution airbrush HP-CR and an Iwata Sprint Jet compressor with a slew of other items and Createx paint kit Thanks again Gino -
I have been purchasing various pieces of tools and equipment, for my new hobby to build/paint hard baits. The air brush that seems to be the front runner, after reading lots of info on TU to me seems to be the Iwata double action. I am a litle confused as to what size nozle to get for painting baits. I am thinking on purchasing two air brush, one with a .5mm nozle to cover the bait with paint and one with either .2mm or.3mm nozle for details. I am looking at the Revolution model HP-BR .5mm for covering the bait and the Revolution .3mm for details. My other option is to purchase one Revolution model HP-BR .5mm and one higher end model like the High Performance model HPC-C 2mm or 3mm nozle If I could do the job with two Revolution model I could save some money and not buy the High Performance model. My thinking is to do this the right way at first, in the long run I may save money, by purchasing something better later and waste money on something that is cheap Thank Gentilemens spoonpluggergino
-
Help With How To Calculate Ballast For Glide Baits
spoonpluggergino replied to spoonpluggergino's topic in Hard Baits
Thank you Vodkaman, I read your Archimedes dunk test a while back and I could not find it. Now I saved it and printed it. I will use this methot, also being Italian I do use the metric system, I purchased a pocket scale in .01 grams, Also thank you everyone for your input, you are a great bunch of guys. spoonpluggergino -
I posted this article about 10 minutes a go and I cannot find it, must be in hiperspace. Let me try one more time I have been reading on TU just about every thing that has to do with hard baits. I am an avid muskie hunter and I really love the sport. I just caught my first 51 inch muskie, about a week ago, after 30 years . I have been building bucktails and done really well, matter of fact I caught my 51 incher on my home made cowgirl. Now i want to try my skills on building glide baits, I know they are a lot more challenging than bucktails. I need to do something in the winter month. Making the baits it is the easy part but getting it ballasted properly it is challenging, placing the ballst in the right place not so much, Thanks to TU member, you gentile man provided a wealth of info. I have done lots of research on the internet, on specifc gravity of wood. I think I understand how to figure the calculation, I hope I do not make a fool of my self but on the other hand you cannot learn if you do not ask. I know on this site there are lots of people with mathematical engineering savvy, so hopefully some one can correct me if am wrong Here we go on the internet I found that the specific gravity of water is 62.4LB./cu.ft. 1 cubic inch = .036LB. or .57OZ. I am going to use Apple wood for my example the SG. is .73 .73 X62.4 = 45.55LB./cu.ft. 1 cubic inch = .416OZ. in this example I am going to use a block of apple wood that measures 10"X.75"X1.5" = 11.25 cu./inches Therefore the weight of water 11.25 cu/in. X.57OZ = 6.41OZ the weight of apple wood 11.25 cu./in. X .416OZ = 4.68 It appears that the apple wood is 1.73 oz lighter than water. In order to achieve neutral buoancy I would have to add 1.73 OZ. of ballast to my bait, or if I wanted to make my bait sink add a litle more ballast. I realize that the block of wood will be cut to shape the bait so a fudge factor would have to be added. Pardon me for my spelling and punchtuation I am from the old country, so am still learning the english language Thank you Gino Testone
-
Thanks every one for your help Gino
-
I have been searching and reading lots of good information from the TU members, great info. The question I have is about mixing colors, I do know there is the COOK BOOK with lots of color recepies, it is great, but for a beginner like me it is a litle intimidating. At some point I know I will have to just do it and learn by trial and error. The only way to learn is to get started , but is good to have some good basic ideas. I know that Red Yellow and Green are the basic primari colors to use for mixing. Now for the question. Is anyone here has used color wheels that give you some ideas when certain colors are mixed to the end resolts. Is it worthed to purchase one of these gadgets, or is it a waste of money Gino spoonpluggergino
-
for any one interested I summited a lure turner TUTORIAL in the knoledge sectin in How to make hard baits Gino Testone spoonpluggergino
-
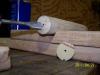
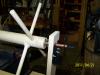
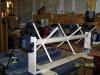
After reading a bunch of really good information summitted by other TU members, Idecided to build one with dowel pins, that I seen here on TU MATERIAL PURCHSED 1 Rotisserie motor kit 1 4 feet by 2 inch dowel pin 2 4 feet by 5/8 inch dowel pin 4 Metal brackets 1 small tube epoxy 1 small tube wood glue Nuts, bolts and screws The rotisserie kit had enough hardware to build the turner. I used the two bushing to mount on end of 2 inch pin to couple to motoe shaft The 1/4 metal stock that came i cut pieces to go from pin to motor couple I took enough picture so you can see how is built. I will try to put them in sequence The center of the pin I found it by drawing a circle with a compass on a piece of card board, than trasfered to pin The center for the 5/8 pins I set the 2 inch pin in a cradle I centered wood bit in the V groove first than clamped down wood blocks The 90 degree second hole used a spirit hole to level first pin to give me the 90 degree to the first hole

-
Hello Bart I dod not know if you are the same Bart that post on spoonplugger net, but any way is nice to meet you. Glad that you are interested in spoonplugging, it is an awsome knoledge base and method of fishing. I am thinkering with a design of a wood spoonplug, it will not replace the spoonplug, I am doing more in the honor and remembering our teacher and mentor Mr. Buck Perry. I am keeping the profile the same as the spoonplug, going to install a longer lip to give the plug a larger profile for the mukie fishing. I just finished making a lure turner, it came out great but the motor as a dead spot , hopefully Home Depot will replace it. I just purchased last week but I used all the hardware to make the turner. Ho well if not will have to spend another 45.00 for another rotisserie motor
-
I submitted a wire twist tutorial on the Tutorial Section Gino


