


jesse1378
-
Posts
274 -
Joined
-
Last visited
Content Type
Profiles
Articles
TU Classifieds
Glossary
Website Links
Forums
Gallery
Store
Everything posted by jesse1378
-
 that is pretty awesome. i love the flare of the spider jig.
 -
i was watching some videos today and the guy had just regular clear....maybe the easiest to test would be to get the duplicolr clear that is already mixed, you just put in the paint gun and spray it. its like 25 for a quart. i used it on my supercharger so it holds up to heat well lol
-
i use 1 cup pyrex cups. i pick ones with a sharper pointed spout. but i have a steadier hand than most. what mold are you pouring, maybe we can cup up with some ideas if we knew what the mold looked like.
-
no prob if you want mor epics of the molds themselves or the baits let me know.
-
if you check out my recent thread about pre rigged swimbaits, that's a LC mold...number 468. and if you check MuskyHunter's thread asking about that i have a pic in there with my other LC swimbait mold. both make great looking baits. i have 7 LC molds total. you cant beat the price.
-
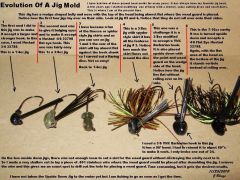
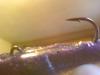
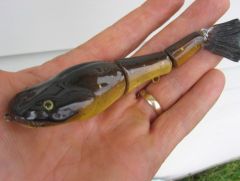
this head was just for visual..its not heavy enough nor a big enough hook. the lead was bare, with some holigraphic foil around it. when i do one for real it will have a red head and clearer plastic.good point on the oxidation of bare lead though. that's something people should think about as well
-
this bait will not be used for fishing. all my first baits go to my dad. a while ago i got him a boat shelf and carved a pop r style bait out of drift wood to put on it. ever since them her gets the first baits i make. i have attached before and after pics. i'm still learning the airbrush and there is alot to learn. but first try, had fun, and i have several boxes of old baits asking for new paint. opinions and comments welcome
-
D2T is the epoxy found in all department stores. i just painted my first bait. i put a thin coat of D2T and sprinkled glitter on the bait. let it set up then added more. turned out great.
-
glad i could finally contribute. i have learned alot and posted pics of my baits, but my first time actually putting something together. i hope it works out foreveryone and you guys turn out some awesome baits.
-
1) use a paper clip through the eye 2)crayon, or anything really on the barb section of the hook...this will set the angle so position wisely. 3) pour the plastic 4) demold/cure 5)post some pics on here if you want to add a stinger, you could do 2 things 1) already add it to the jig head then use a razor to cut a slit and pull it out then attach the treble. 2) use something..coffee stirrer straw, reg straw, or simething like a .22 cal shell to creat a hole to the hook. attach whatever material used for your stinger attach treble. post pics
-
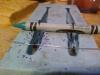
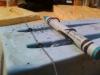
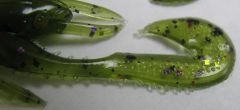
after reading and replying to MuskyHunter's thread i decided to take my own advice and see if i could do it. we here are the results. i attached pics in the order to do everything. i'm sorry about the overdose of glitter in the clear, i hit the table and a bunch fell out lol. i also didnt measure enough plastic so i took some purple scrap and filled in the rest. the jig head was one of the ones from the cheap clear swimbaits at walmart the ones in the 2 pack. Thanks for looking, Jesse opinions/comments are welcome

-
Thanks alot for the vids and translations. the videos were awesome. i just started playing with my new air brush and this makes me want to start making my own hard baits.
-
love the names. i have crazy names for my colors too.
-
Pouring Soft Plastic Over Weights And Hooks
jesse1378 replied to MuskyHunter's topic in Soft Plastics
ok i got it... you ready i attached a pick of my swimbait molds. i have not done this yet, but i will soon. 1)pick your jig head. 2)hold the head in the mold so it looks like what you want. 3) use a paperclip through the eyelet to hold the head where you want it. 4) run a pencil or dowel rod under the barb area of the hook to get the angle you want. 5) pour away for the bottom to attach the stinger.... you could a small coffee stirrer straw to poke a hole to the hook, or if that's not big enought maby something about the size od a .22 cal shell that will give you some room to the hook, shouldn't effect the action or looks and keep the swivel/o-ring in the body of the bait so it doesnt snag on anything. might have to play with this tonight and see what i can come up with. i dont hink i have any big jig heads so the sizes might be off, but the theory will be the same.
-
i just got through messing around and i was not ready for all the differnt thins that can be adjusted. lol i can see this is going to be alot of fun. i have a whole new respect for all of you air brush guys (and gals) out there
-
my air compressor is a 12 gal 1 hp oiled 125 max psi craftsman.
-
thank you for the reply i will prob give the sc9000 a try. i was to keep it simple right now
-
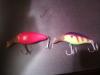
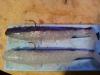
awesome looking baits. what kind of fish is that it looks like its part largemouth bass
-
Good Morning, My wife and i did Christmas early and she got me an air brush. It is a Paasche VL 202 Link here... http://www.amazon.com/gp/product/B00397CDKQ?&tag=shopwiki-us-20&linkCode=as2&camp=1789&creative=9325 and a set of Creatix paints... http://www.amazon.com/POPULAR-CREATEX-COLORS-PAINT-SET-Airbrush-Hobby-Art/dp/B001G570VK/ref=sr_1_2?s=home-garden&ie=UTF8&qid=1292599077&sr=1-2 I have done a little research and i know you can use this brush with the canned air or an air compressor. She gave me a coupon for an air compressor of my choosing....but i dont have a clue. she was thinkig one of the big 30 gal tanks (which is what i want for other things) but i think that's a bit overkill for this. The working preassure for the brush is 22-50 PSI with 75 the max. I guess ill list my questions so it would be easier to answer 1) what size compressor do you reccomend? 2) the paints are water based is that ok? 3) What type of clear? 4) best type of thinning agent? I have to go on a 5 hr round trip to get my boat so i dont have as much time to search before posting. im hoping to have answers when i get back so we can go buy the compressor and i can practice. I'm off for the next week and is prime time to learn. If you can think of anything else i should buy to get myself started please let me know. Thank you ~Jesse
-
it will just take longer to heat up the plastic. but once you get a rhythm down you should be fine. i will be getting a griddle soo so that i can keep the plasitc warm and the molds easier to pour. after reading alot of post and watching the videos it seems like a must have tool, same with the infared thermometer.
-
willing to sell just glitter and colors>?
-
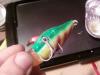
good lookin baits.
-
 looks good to me.
 -
 looks good i never could get mine to get that detailed.
 -
i have a Durham's water putty mold. it's a 3 cavity lizard and what i do is... 1. start with main body 2. for the legs i go from the body around with the leg then back to the body. it connects the leg to the body (kinda looks like the top part of a brush hog) so you have to cut it but you have two options a. cut it once next to the body and have longer legs b. cut it once at the bod then once at the end of the foot. 2. the tail i go out quick to the tip on one side, then back to the body on the other. it works really well with the 1 cup pyrex.


