Musky Glenn
TU Member-
Posts
985 -
Joined
-
Last visited
-
Days Won
9
Content Type
Profiles
Articles
TU Classifieds
Glossary
Website Links
Forums
Gallery
Store
Everything posted by Musky Glenn
-
-
-
Saltshaker, I clear a lot of musky size lures with d2t and have a problem with it sitting up before I get the entire lure coated. (Just starting to harden) I have not had any problem with just mixing up another batch of fresh d2t and just starting right back in where I left off. It all blends right in and I can't tell where I stopped or started. Musky Glenn
-
Mark, They must be weighted differently because these sub surface lures usually fall pretty level, best I can tell by looking at them. The pencil trick would tell me where the center of gravity is, but I can make a guess that it is close to center by it falling level. Would the pencil help in determining if the weight is all in the center or half on each end? I hung weight to the front, middle and back hook to get it to sink properly, level. I then glued this weight inside above the hooks best I could. Upon MUCH further inspection, that even though I sawed the flat front top angle correctly, when I sanded it, I hand sanded it and made it out of square. Thus it is acting as a rudder and pushing the lure to the right. I have resanded it and am getting ready to go back to the lake. I have a couple of more lures that are drying to be taken also. Thanks for all the suggestions, you guys have all the answers. Musky Glenn
-
Little River, I have not changed the line tie. I will give that a try in the morning. Thanks Musky Glenn
-
Mark, I used pvc glue like would be used on water lines. Thanks for your idea on this lure, I am having a problem with it only walking one way and not the other. but will get that worked out. Diemai, I did cut up lead and glue into the bottom ends of the lure. Do you think adding the weight to the center would help the lure walk right and left. The cotter pins were bent over after it was all glued together. Musky Glenn
-
I took the lure to the lake and had a problem with it. It is supposed to walk right and left under water. It will only walk to the right, left as I am looking at it coming in. If I was lucky, I could get it to go to the left once per cast. Just a series or walks to the right. The worry I had about water entering and draining was not a problem. As soon as it hits the water it instantly fills. I glued the weight inside the body near the front and back, would it walk better if the weight were in the center of the lure. That still wouldn't account for it only going to the right or would it? All the cotter pins were bent along the center line. The lure looks semetrical. I am open for suggestions.
-
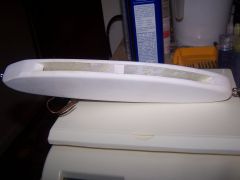
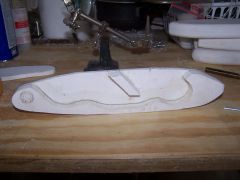
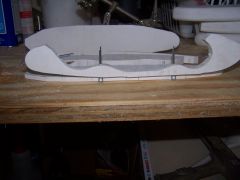
This photo shows the center brace. It is cut short so water can move quickly from one chanber to the next, both for filling and draining. Draining for the next cast was one of the most important aspects of the design. I hope the sides don't act like rudders and limit the "walk" that is so important to this lure. I'm thinking it will probably take a harder pull to change directions. If it does act like a rudder the top won't turn and the bottom will, causing it to roll. I may have to add larger fins to the side to stabilize that roll. Musky Glenn
-
Yes there is one center brace that made it feel sufficient. There are 8 photos in the gallery that show the whole process. I was surprised at how fast it filled with water then sank at the correct speed. Can't wait to sling it a while. Cotter pins were an easy hook hanger addition. I only saved about 3/4 oz. of weight by removing the center, the main weight savings was the lead it would have taken to sink that part removed. Musky Glenn
-
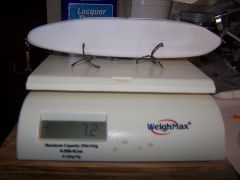
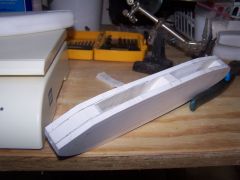
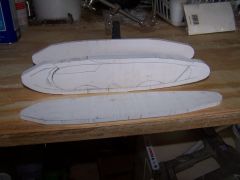
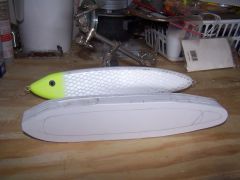
I posted a series of 8 photos, in the gallery, of the lightened hell hound that I made. I used pvc cut and glued it up hollow to be lighter and was able to save 2.1 oz. of weight. Musky Glenn
-
-
-
-
left side, center brace and center section glued together. Center section is short so water will fill the front half of the lure. The lure will sit slightly tail down, just enough for water to run in over the back and fill the lure cavities. (Takes one second to fill) When it is full of water it sits level but sinks.
-
-
-
-
Your right Vodkaman the problem was the total weight not the lead weight. I worded it wrong in the heading. Sorry for misleading.
-
My local musky club helped with a handy capped kids fishing day at Lake Powhatan today so I didn't have a chance to work on the next lure. I will try to start on it tomorrow. I have, for the time being, scrapped the idea of routing out the center. Instead I am going to make a glued up version of the same thing. It will be easier to get the inside shapes that I think I need. I am going to start with two profile sides of 1/4 inch pvc. I will cut a center C shaped section with the opening in the C turned up. This will be the shape of the body that the two profile sides glue to. This will give me a basic canoe shape lure which I can glue in a couple of center dividers for strength. Parts of the top of the C section will get bored out to allow for water entry and exit. I will start out with it more closed and open it up with a battery powered drill at the lake where I can see results of drilling. Thanks for your input. Musky Glenn
-
I took my first lure to the lake this evening to give it a try and I am well pleased with the action. I am ready to paint it but first I will start on the second one and try to router out some of the top material. I am thinking that I might be able to leave the top of the lure open so water will drain when it is lifted from the water. That will make for a lighter lure on the cast, but am unsure what the action will be. I guess that is why we have trial and error. I plan to have sections so that I can maintain some regidity to the lure. I will probably leave 1/4 inch walls on the out side and leave thick areas for the hooks and front tie. Also thicker head and tail section. The normal retrieve is just two foot pulls which cause it to walk the dog under water. I usually have about a two foot swing from side to side. It must sink to stay under water. I really don't have a clue what the hollowed out one will do. Any guesses? This opens up some interesting ideas as far as hook hangers go. I made stainless still screws for the original. For the next one with the thinner walls and bottom I may use cotter pins for hook hangers and line tie since any water that gets around these won't hurt anything. Musky Glenn
-
I took my first lure to the lake this evening to give it a try and I am well pleased with the action. I am ready to paint it but first I will start on the second one and try to router out some of the top material. I am thinking that I might be able to leave the top of the lure open so water will drain when it is lifted from the water. That will make for a lighter lure on the cast, but am unsure what the action will be. I guess that is why we have trial and error. I plan to have sections so that I can maintain some regidity to the lure. I will probably leave 1/4 inch walls on the out side and leave thick areas for the hooks and front tie. Also thicker head and tail section. The normal retrieve is just two foot pulls which cause it to walk the dog under water. I usually have about a two foot swing from side to side. It must sink to stay under water. I really don't have a clue what the hollowed out one will do. Any guesses? Musky Glenn
-
Mark, I didn't see any trim boards that were a full inch thick at my Lowes. All I had to do with the brick mold was to cut off the design section and it left just what I needed. I'm not sure that 3/4" wouldn't work just as good and it should save approx. 2.5 oz. The weight is drying in the first one now. My next one will be a bored out version. Such a simple idea, hope it works like you suggested. This lure isn't a secret weapon, but it is a good one. I fished one of my buddies lures Sat. for about an hour and it is a hand full to throw. I have some heavy action musky rods and I didn't have one stiff enough to do this one justice. Between the three of us we raised (saw) 20 muskies and didn't hook a one of them. But we were fired up all day long. (14 Hours) The good color in the 10 inch version was "lemon head". I used an 8" hell hound in a custom color that I raised 5 with. This lure only weighs about 3.5 oz. a world of difference. (I just hate the idea of paying $29.00 for one musky lure, $18. is certainly high enough. I have mostly done repaints till now, but have enjoyed building this glide bait. Couldn't have done it without "youals"help. You just don't realize how often you pick up some little something that you will remember and be able to use at a later date. And pvc is a dream to work with, easier than wood. Musky Glenn
-
Crankpaint, That is the amount of lead I have attached to the hooks to get it to sink at the rate I desire. This was by reading the weight stamped on each sinker and adding them up. I have not weighted the entire lure and weights but they seem to be in the 10 oz. range. Thanks for all the comments, I kind of figured it would be that way. Neat idea about boring the lure out, I may give that a try. Musky Glenn
-
Here is the ultimate place to find Northern and Musky lures. Probably not much for Walleye. Musky Glenn http://www.muskyshop.com/modules/web/index.php/id/1
-
I am in the process of making my own 10" Hell Hound. This is a musky lure that weighs 10.4 oz. It is a two hand throwing lure. I made my body out of "brick mold pvc" and it measures 10" long by 2" high and is one inch thick. Not a lot of character to these lures. The ends just round over and they glide side to side as you pull them. In order to get this to sink at the correct speed, I need to add 2.75 oz. of lead to the front hook area, 2 oz. at the middle hook area and .75 oz of lead to the rear hook area. That is a total of 5.5 oz. of lead total. This is a big profile bait that works and it needs to be that big. My question is, to displace that much water and sink at the rate it needs to, does it have to weigh approx. 10.4 oz. Can I build any other way and displace that much water and cut the weight by a couple of oz. I respect your ideas, that is why I came here to ask this question. Thank you for any ideas you may have. Below is an address to view what the lure looks like. http://www.muskyshop.com/modules/cart/products.php/nav_id/10/page/1/id/2859/name/Drifter10Hellhound


