-
Posts
481 -
Joined
-
Last visited
-
Days Won
4
Content Type
Profiles
Articles
TU Classifieds
Glossary
Website Links
Forums
Gallery
Store
Everything posted by bassnbrad
-
I just use the plastic boxes the lures come in. Thin, flexible and strong. Cut out a side, tape it down to a old Plano lid with masking tape, draw your design and cut out with a razor knife. Remove from lid, take off tape and use. Would post pictures, but can't share all my secrets...
-
As far as Suppliers, I only use 3deyesdirect, hes a bit pricey, but the eyes are all high quality and hard as glass. He is overseas though, so its about 2 weeks from paid to door. On the saltwater lures I would prefer to upsize my eyes. On a 3-4" crank I will use 6-7mm eyes where-as on the salts I would use 7-9mm depending on the bait bulkiness. I would also only use one of three colors, red prism, silver prism, or chartreuse prism all with a black pupil. If you could get a char/red/blk eye, I think that would be killer on most of your applications. If you want to try some larger eyes for your larger baits pm me. I have some 10-14or15mm that are way to big for my stuff. Hope this helps, bb
-
Like Mr. Glenn said, its basically learning your gun and paint consistencies. As stupid as this may sound, this is a learning technique that may help. Cut out a 12"x12" piece of cardboard and base coat one side. Then with a opposing color (black on white or white on black...) write your name in cursive and print 5-10 times each getting smaller as you move down the board. Play with the paint consistencies and pressure as you go. Once you have the names all written go back and shade them with different colors. The beading up and running sounds like you are putting on too much paint at once or your paint is to wet. If you do not have a "Dryer Filter" you may want to consider one. Also instead of painting try shading, in other words spray light coats drying/flashing between coats. Hope this helps some. That is a purty dad btw...
-

Wondering What Brand Of Airbrush And Compressor To Get.
bassnbrad replied to Clint M's topic in Hard Baits
LOL, oh come on, no more spitting in the lead??? There is a lot of different brushes and opinions of them. I use a Air Pro 720, and am very happy with it. They however are not around anymore. so a inexpensive yet suitable brush similar is the one below. Above all else, Whatever kind you get, make sure you get a dual action brush. It makes a big difference I believe. http://www.ebay.com/itm/270798326414?ssPageName=STRK:MEWAX:IT&_trksid=p3984.m1438.l2649 -
-
No sir, only remember seeing them in one of my searches. Once they hit the retail stores (Academy) I will try them. They're like the Trokar Hooks, "Heard about them, waited till they came out, tried them, will keep using them"!
-
As a starter, that one I posted earlier is a good one. A couple of things you may want to try also, is the jar for that brush and a quick connect. They are very easy to clear between paint changes, If you use the jar instead of the cup, you can unscrew the jar from the connection, and this leaves the suction hose exposed, place the hose in a cup and spray out the excess paint about 5 seconds depending on the viscosity of your paint. The one I bought, similar to this one came with 2mm,3mm&5mm needles and tips. After playing with it for about a month or so, I decided the 3mm (like this one) was the size I needed. For the price its a great starter. Good luck and use the search feature on here, there's tons of info on airbrush preferences and additional info on other things helpful while painting... bb
-
If you gave to buy a HF brush definitely get the dual action. If you can spend a little more, like gekhang said, the ones on Ebay are not bad. Most people like the gravity feed, Me I only paint 1 or 2 lures at a time, so I am changing paint constantly. I use a side mount suction feed as I do a lot of detail work and this puts the jar outside my hand. The gravity feed may be better for this, but I haven't tried. Here is a link to a inexpensive side feed, or just go to ebay and type in Airbrush, you will get thousands of listings. Above all else I would suggest a dual action by all means. http://www.ebay.com/itm/270798326414?ssPageName=STRK:MEWAX:IT&_trksid=p3984.m1438.l2649
-
I'm sorry, those are "Spintech's" by "BasStar"....
-
http://www.tacklewar...page-BSSTH.html These are produced by spintech and were introduced at the Icast show this last year. $6.49 for a 4 pack. Hope this is what you were talking about. bb
-
There is this body only. No hardware attached. About all I know of... http://www.ebay.com/itm/NEW-SHAD-BALSA-WOOD-FISHING-LURE-BLANK-LURE-BODY-/360394122174?pt=LH_DefaultDomain_0&hash=item53e929e3be Picture Size:
-
The Yellow perch, Ok The first thing to do is look at the fish. The main difference of this bait fish from others is the colors. Lots of Browns and yellows. Take a moment and open this site in a second window. Go to the gallery, and find that bait and take a close look at it. FYI, to zoom in on a page hold the ctrl button down and roll your scroll wheel forward, to zoom out ctrl scroll wheel back. I just learned that trick last year after using these danged puters for 15yrs...LOL Anyways the reason for the two screens or pages, is you can read and look at the bait without bouncing back and forth too much. There's a few small nuances on this one that takes explaining while looking at to understand. Now the steps and breakdown 1. Strip/clean/prep the bait. 2. Base coat whole lure white. 3. Belly coat and partially gullet coat, Mix DecoArt Bronze, Anita's Tangerine and FolkArt 4137 Yellow light. Primarily bronze with a drop or two of each of the other colors. You are looking for a orange with a hint of yellow. Do not throw away unused paint. 4.For the Sides mix Americana DA242 Fawn with Folkart 660 Metallic Pure Gold, and Americana DA163 Honey Brown. You are looking for that brownish yellow. Coat the bait From on top of the head and behind the gill plates with light coats till bait has that color. Save this one also. 5. Vertical lines 1st time.. okay the brownish yellow, mix a drop at a time Americana DA130 Raw Umber till it turns a medium dark brown. Ok another tangent here for a moment. for these vertical lines I use masking tape. I have a 2" tape roll I use pieces of. I tear of about 3" and lay it a top off a old flat lure box. Anything plastic, flat and smooth will work. Lay out the tape and cut strips longways about 3/16 to 1/4 wide. take those strips and create pines to paint from one side of the lure to the other leaving about 1/8" between strips. (NOTE, use a lo stick or non residue tape to prevent pulling the paint off the lure...Did That... ) Spray your vertical lines lightly, do not make too dark as you will see why in a moment. Flash dry and carefully remove tape. Save this paint. 6. Now using the paint you just used, add some lateral highlights using the detail brush or needle I spoke of earlier. Making small dots and or lines work from the gill plate towards the tail. These are more accents than anything. After putting a few dots here and there laterally, do a couple with the Metallic black. Not much just a couple. 7. Now you can place the scale pattern material on the bait. 8. Spray the whole bait with several light coats of the Pearlizing. Do not remove the scale yet. 9. Going back to the vertical bars respray these very lightly unmasked on low pressure with Americana DA067 Lamp (Ebony) Black. You are not trying to coat the lines, but shade them and giving texture with fish scales. 10. After bait is dry remove the scale material. If the paint is flappy, ie... ridged from the scale pattern, heat the bait up with a dryer to make sure paint is set well, and ever so lightly brush off the ridges with some 400 or 600 grit wet/dry sand paper. If you ever over sand a spot just touch up with the detail brush. 11. Mix some white pearl with white base and spray the belly lightly, blending the orange belly area. Do not spray too white, you want the orange/yellow to blend through sort of. 12.Using this white mix a tiny bit of the metallic blue just to barely tint it. Spray your gill plates several times to make them stand out. 13. The brown you saved from earlier spray from head to tail, shading along the back as you go. Do not mask this time, over spray adds accents and shading. Do light coats till you like the Upper sides. Now add some of the metallic black and very lightly shade the very top of the back. 14. Using the paint you just had add some accent spots not too many, just a couple to give the bait some character. 15 The orangish yellow you saved from earlier, add a little highlights to the head near the eyes. and by the mouth area. 16. This should put you, pretty close to the same bait. The main thing to realize is that when these colors are top coated it will shine out!
-
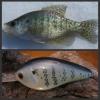
White Crappie 1. Clean/strip your bait to be painted. (This one was a Store bought lure that I Sanded/blasted the paint off) 2. Undercoat the lure with a Flat white. I use Americana Snow (Titanium) white. I also Spray multiple light coats flashing each versus one heavy coat. 3. I sprayed the sides (Lightly) with FolkArt 662 Metallic Silver Sterling for my Scale Pattern. It does not take much to achieve a good scale undercoat which will become apparent later. Flash all coats. 4. Then mixing DecoArt dazzling metallic DAO79 Bronze with Anitas All Purpose 11139 Tangerine produced a light metallic "Orange" Spayed the forward belly area for my belly scale. Flash all coats Now the fun starts, I need to add here, having a computer set up where I shoot really helps. Zooming in on the bait fish pictures for the tiny details and color shifts really makes it easier to see what colors you need and the shading areas. 5. Wrap your lure with the scale material. Ok we are gonna stop here for a minute and go off on a different tangent. I fought and fought scale patterns for quite a while trying to figure out how to keep them straight and not bunching up or curving too much. The important thing I found was I had to stretch up and down straight very tautly. I use of all things CHOPSTICKS from Panda Express. Without breaking them apart, I tape the part where the wood is still together so I can open and close them as needed.I use two sets, one on top to hold the netting straight up and down, and one on the bottom to pull the netting tight. The netting is folded in half with the scale pattern in the direction you want and place the first set of chopsticks through the folded netting. Make sure the netting is straight and not bunched up anywhere. Lay the lure inside the folded netting halves on its back, then using the second set of chopsticks pull both sides of the netting through very tight to hold the lure in place and this will give you your scale masking. After you arrange the netting straight and tight use something to hold the netting in, I use a 12" set of hemostats clamping the netting below the second set of chopsticks. Once your lure is stationary and wrapped then you are ready to move on. 6. Spray body and head with FolkArt 569 Metallic Pearl white. Here it is VERY important, Light coats and flashing each coat. If you spay too much it will produce excess buildup on the netting. You may want to mix a little base white with the metallic here, depends on how much you thin, and your gun. If you mix the base white with the metallic you will only need two or three very light coats. Flashing each. DO NOT REMOVE THE NETTING YET! 7. Now to paint the Vertical bars. You can spray your bars if you wish but for more detail I prefer to hand paint the individual marks. To hand paint, Using FolkArt 661 Metallic Sequin Black, thin the paint in a cap or saucer,(It will not take much, but you need to be able to see the tip of the applicator.) I use both a GOOD detail brush that I trimmed to only a few hairs, or a needle. your paint needs to be thin enough that when it dries it does not dry lumpy. Once again the computer lets me see the details for the bars. 8. I use the netting pattern to paint the individual marks keeping them looking like they are in a fish scale pattern. 9. Once your vertical bars are on, and the paint is dried you can remove the netting. 10. Shading... a. Gills, I used Base white mixed with a couple of drops of pearl white and a couple of drops of FolkArt 670 Metallic Blue Pearl. You will want to thin a little base white and pearl white to shooting thickness, then add the blue one drop at a time to get the shade you want. Shoot your gills and any shading areas you want but do not throw away the blue. b. Upper Body shading, Using the same blue you just shot add a little 1-2 drops DecoArt Metallic DAO75 Ice blue and thin accordingly. From front to back or vice versa, shoot a soft shade slightly above the lateral line. This is all personal preference, but you will be shading not coloring or painting. in other words you want to spray very light amounts not producing lines but shades, make sense? One or two passes is all you need. c. Upper Body shading Higher, Still using the same paint you have mixed now, add FolkArt 669 Metallic Periwinkle, only a drop or two, then add DecoArt DA124 Metallic Purple Pearl one drop at a time. You are looking for that bluish purple color. Spray one or two passes high up on the upper body. This you can shade up onto the back with this as you are fixing to spray the back. 11. The back... I would suggest masking the lower body to prevent over spray. Using the FolkArt Metallic black, spray light coats from Front to back moving your gun away from the lure as you go towards the tail, or reduce your paint if as you move if you have a double action gun. You want to Shade the back and very upper side slowly one layer at a time to get that blended color/shade effect. Flashing between passes to insure color fades are as you want. 12. The Belly.. Here once again is shading, but now you want to get that fish gut effect. Mix your base white with the pearl white and a tiny bit of silver if you wish. Once again light coats and flashed between coats till your shading is complete. 13. After all touch ups are completed and the lure colors are complete I use DecoArt DS48 Pearlizing Medium for my last spray. I thin it wayyyy down, so it is very watery, and shoot it about 10-12" away from the lure, moving the lure or gun so it is just misting the paint. The pearlizing is only to give it a shimmer, not to coat.... Too much will hide the paint. 14. I do my gold dusting which is another very subtle shimmer effect. 15. Clear Coat. Remember as you paint, what you see when painting my seem not enough, but once you clear coat the lure, everything will brighten up and stand out.
-
I'll take the paints, and if the price with a/b and shipping is right that too. Shipped all 1st class if cheaper than flat rate, no rush. Pm me for payment. Thanks,bb
-
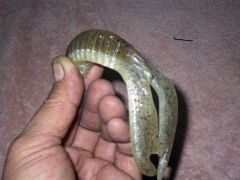
Like Ben, just thinkin' out loud here... Would it be beneficial to build a mold and pour some type of a tail out of epoxy? You could build your hangers into the mold so they are already in the tail, and could actually be used to reinforce the tail. You could also add glitters or pigments to the epoxy to give it flash... Just a thought...bb
-
Make sure you post it, I would really like to see how that comes out, should be pretty kewl.
-
Kewl lookin bait, but if you're goin by the books then no, it would not be legal unfortunately. unless of course those hooks are size 8's. By their definition you have 5 "Lure Bodies". Now why in the world a spinner blade is considered a lure in its own is beyond me, but its their wording. But by their definition this spinnerbait would be 5 lures and you can not use a trailer hook... This would be a point to push with them I would think...
-
I don't think it would be unnatural. But I made the mistake of painting a Pencil popper in bluegill, and soon realized that that was a lot of vertical bars... Too long a bait for that color scheme. But yours should be ok...
-
-
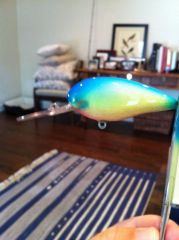
Thanks y'all It was actually pretty easy, meticulous but easy. Painted the regular colors of the body in the hues of the fish, then used the raised scale pattern as a guide. Each dot was painted twice with a hypodermic needle. Once with a base blue then with a pearl blue. It was just one of those patterns that I had not seen painted before and wanted to see what it would come out like...
-
http://www.tackleunderground.com/community/gallery/image/9102-jewel-cichlid/
-
Not the Texas Cichlid, But I did paint this one... The Jewel Cichlid...
-
-

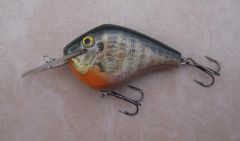
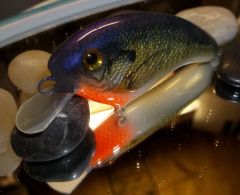
Custom Flatside Balsa Bluegill ( Photo Finished)
bassnbrad commented on Big Bass Man's gallery image in Hard Baits


