SteveLibs
TU Member-
Posts
26 -
Joined
-
Last visited
Profile Information
-
Location
ny
Recent Profile Visitors
The recent visitors block is disabled and is not being shown to other users.
SteveLibs's Achievements
Newbie (1/14)
2
Reputation
-
http://www.tackleunderground.com/community/gallery/image/8279-moss-mouse-new-fixture/ Homemade rotomold
-
Thanks. That is of course where I shoulda looked for info on a wire bait.
-
With all the hype lately, I would have expected to see more discussion about these rigs on this forum. Or is everyone keeping it close to the vest? I notice e-bay is flooded with them now. Sounds like a great opportunity for the custom lure maker.
-
I thought that the fact that colors yellow with exposure to UV was pretty well documented. Keeping colors in the dark slows down the process, no?
-
This looks like the one, but if you follow the thread I think it leads to updates/improvements http://www.instructables.com/id/Make-A-Rotational-Casting-Machine--For-Under-150/ I stumbled on this one later, and think it would be much more practical and funner to do -
-
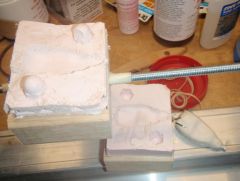
I was gonna try help by posting links to the correct location for the pics in the gallery, but then realized I screwed that up the 1st time and still didnt know how to go about it the right way. Anyway, for the mold I used Alumilites RTV, and Sculpey Clay for the master; and I used the Flex-40 product from Alumilite (http://www.makelure....&Name=Flex%2040) for the body; its worked perfectly once I got the right amount down. There's other durometer levels available, but I havent tried them as yet - duro 40 seems to work fine for my applications. As I mentioned in the posting, I picked this process up from a tip Larry Dahlberg gave me on his forum, and modified it just a bit, and given the small size of the baits (frogs, mice) I'm making, the rod dryer method I'm using works perfect for 'spreading' the goop around inside the mold. I previously started building a simple multi-axis rotational casting device following some simple instructions I found thru web-search, but that turned out to be way unnecessary for bass-size baits....my kids use it now to time-warp their batman figurines into hyper-space instead. I've got several hollow-body baits going now, probably more than I will need for the season, and the process actually turned out to be quite economical (as you know the store bought frogs can be costly), fun, and easy once I got going and got over the initial intimidation-factor.
-
thats just silly try this: http://www.tackleunderground.com/community/gallery/image/8279-moss-mouse-new-fixture/ search around for the other posts on this forum, the gallery and the huntforbigfish forum for the 'moss mouse' discussion. Some great stuff for making your own without the big fancy equipment. Although there are some great videos on you tube etc for making a really cheap and effective rotational casting system, they are NOT really needed and can be acheived this way with a cheap rod drying motor and handmade stand for less than $20 in equip. The materials from makelures are additional, but work just fine! these were just pilot discussions and are much more refined now - you can do it toooooo.
-
Actually, the rod dryer is 11 rpm and I think with the new fixture/design (see subsequent photos) it is just right for this application - you cn get a cheap one at cabelas. The trick is the right amount of Flex 40 to get the right thickness - but i can tell you it doesnt take much (a lot for your $). See makelure.com for the material and huntforbigfish.com for Larry's site and links to the forum, etc - these are really his innovative ideas for the process, as I've stated in the forum etc. There are other duro's of the Flex material but this one seems to work just fine.
-
Thats right its hollow, and the plastic isnt hot. Its a 2 part 'rubber or latex' called Flex 40. Mix it up and let cure for 45 minutes and its god to go. It's very pliable and durable so will collapse to allow the hook to set. See here for further discussion http://www.tackleunderground.com/community/topic/21746-moss-mouse/page__gopid__162258#entry162258
-
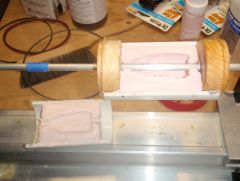
The new mold does not include the hooks. Instead, I used an 8mm tube in the master to create a thru hole. Then, I run an 8mm rod thru the hole. The rod sits centered in the rotating fixture. Spray it with mold release. The thought, as suggested by Larry, is to embed some split shots in a puddle on the bottom half of the bait, and let that cure. Turn the top half of the mold upside down and fill it with just the right amount with Flex 40 to create the right thickness for the hollow body. Raise it up, strap on the rubber bands, turn on the drying motor, and let it spread the goop for 45 minutes until cured. It should create very much the same mouse as before, except a thru hole and no hook. I'll pass the hook thru the back and out thru the front. I've got separate mold I made to create an 8mm 'nose plug' (pink of course) around the eye end of hook, so that it fits nice and keeps it from filling with too much water. I'll post a pic of the finished product when finished, probably this weekend.
-
Maybe one of the aluminum mold makers out there will make a mold for us? Package it with some Flex 40, a few hooks with Rabbit Zonkers, and a pack of split shots to imbed in the bottom, and a cheap rod dryer (in addition to the one in the pic, I have a homemade one from a few scraps of wood and a $6 motor from Cabelas), and I bet you could corner a market. The small bottle of Flex 40 is going to make a LOT of baits.
-
heres the new fixture i made for this. thanks for all your help/suggestions - i think this if going to work out just fine. would be nice to have an aluminum mold that would fit in the fixture instead of the rtv mold, but it will do for now. http://www.tackleunderground.com/community/gallery/image/8279-moss-mouse-new-fixture/


