

littleriver
-
Posts
1,131 -
Joined
-
Last visited
-
Days Won
9
Content Type
Profiles
Articles
TU Classifieds
Glossary
Website Links
Forums
Gallery
Store
Everything posted by littleriver
-
@ mark Thank you! Your right; i would sure hate to lose this one. Working on a second now. We have lots of big stripers on some of the local lakes. I hear they are starting to feed at the surface. I can see one inhaling this bait. @diemai I believe if you get em sitting proper in the water they should swim. Good luck !!! We need a second and i am counting on you. @scrubs These lures are my first attempts at painting anything except walls. It has been a slow process for me but confidence comes with each one. It is great that you have experience. I like painting lures this way. It is slower but I feel more personal and I am in no hurry.
-
 Thank you! Your baits again look great. Great job!
 -
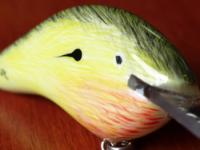
@Dieter They look perfect. Mine sat the same in water without any ballast (lopsided). I just added enough weight to the center to get the bait to sit in the water like the original. A little off to the left or right and she would not sit well. The center for my lure was a little behind that front hook hanger. I used a slip sinker, I flattened it out a bit so it would not sit so high in the lure. Not sure about the wieght of this sinker so I am not saying because I do not want to mislead . But it was a big one. @bill Not sure what you call the technique. I think it is similar to dry brush but the brush is wet just not so much . Often I will strike the first stroke on a piece of paper. But I am getting to the point where I can load the brush with the right amount of paint without doing this step. Only going to the paper when I know I overdid it. I dilute my acrylics to the point they are essentially watercolor. I dip a paper clip in the bottle of paint i am going to work with and dilute this in a solution of 50/50 water alcohol solution . The solution also has a few drops of glycerin for good measure. The dilution solution is pre made. I dilute the paint on the paperclip in a medicine cup with a few drops of the solution. The paint may be be darker or lighter by simply adding more paint. I use a small watercolor brush to do the work. The tip of this brush is teased. By teased I mean the tip is puffed up in all directions (fibers seperated). You'll have to ruin the brush to get it to this point . It is done by pushing the brush hard into the bottom of a cup. I would use a paint in the cup . Tiny particles are forced into the brush head and after cleaning some will be left giving the brush this teased look. Getting a brush to this condition is the tough part. Once you have a brush like this thin it is just a matter of wetting it a bit so a few strands stick together at different points all over the brush . Now your ready to paint. The good news once you have the brush in this condition it can be used over and over. I have been using the same brush since I started. You may have to try a few brushes to find one you like.
-
-
This bait is carved from paulownia, painted with acrylics and covered with tabletop. I like the paint on this one but the action I love. Thank Diemai for sharing this one with us.
-
Depending on the underlying paints, once the surface is breached, it sometimes may peel right off.
-
Toadfrog Are you going for a second opinion? I know they sometimes may be repaired with surgery. A good orthopedic surgeon may be able to help. Though, I am sure the repair is not cheap. http://orthoinfo.aaos.org/topic.cfm?topic=a00031 It amazes me that they can fix it but they act as though some of us just don't need the use anymore while others do. I don't know a soul who doesn't use their arms unless it is gone or broke beyond repair. I feel your pain. Lost the use of my left foot for nearly a year. Losing any limb is life changing for sure. I hope your path forward is easy.
-
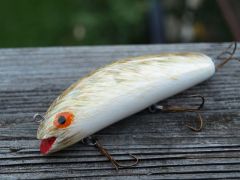
Thank you gentlemen, Now will the fish go for it. I think so. The action reminds me of a fluke. I got a bit lucky; I think. One tip I'll pass along not already discussed is I placed the ballast near the center of gravity. That center was found with hooks and hangers installed. Dieter I look forward to seeing your abachi lures progress. I am sure once your past the uneven weight issue they will turn out fine. I was really impressed how close the teak sat in the water in reference to waterline. Very close to original. I would like to try one using a wood similar. I think you had something there. Just too bad. If I find some wood with similar density I will try it too. Thank you again for sharing this bait with us.
-
Ben Not sure if this is what your looking for but I got this from Dave aka Vodkaman and it works like charm. Simply place square lure blank and pencil cube on flat surface and spin blank drawing a line all the way around. Then flip blank and draw another line. The area between the lines is your center. The block can be flipped to accomidate a variety of sizes. I have even added extra holes for more variety. I like my two lines close together.

-
Here is the video of my homemade Pfeffer banana. I am please with it's action. It is not exactly the same as original but not too far off. I spent the most time getting the huge ballast weight perfectly centered so the bait would sit proper in the water. Small adjustments went a long way on this one. The video starts with the bait dressed with three sets of hooks . The second half of the video I have replaced the last treble with a buck tail treble trailer . Both action pretty good but the buck tailed version was less lively but could be worked faster. I tried a third version with a large curly tail but took no footage of the action. The large tail was too much drag and killed the action. the bait turned into a straight shooter. A smaller curly tail would surely work though. Here it is:
-

Gst International Lacquer Based Concrete Sealer As A Topcoat
littleriver replied to Mad Moose Baits's topic in Hard Baits
Go easy on him Ben, he wouldn't be the first. Probably just wanted to be sure it was a good product before recommending to others. -
 Congratulations! A fine feeling indeed. What lure did you catch that beast on?
 -
Chris Please write back and tell us how it turns out. I have a few friends who duck hunt and I may make a few for gifts depending on your feedback. Good luck!
-
Chris, that is a pretty nifty retriever. How much do they want for it on ebay? First , No such thing as cheap basswood from my experience. You could make this from a variety of timber. If your wanting cheap, I suggest you use a scrap piece of pine 2x4. But anything you can get free and work into the shape would do . I would avoid balsa or oak for this job. Balsa too light and oak too hard. You want something like basswood but your going to pay for it. A scrap piece of pine can be had for nothing . Stay away from pressure treated lumber though . Bad for your health. Once you have the wood selected and shaped, it may be water sealed using this http://www.dollargeneral.com/product/index.jsp?productId=11787193&CAWELAID=1000264234&cagpspn=pla&KPID=P11787193 It may be squeezed directly from the tube to the lure sealing half the retriever at a time. I would install wire and line tie now to see how your retriever sits in water. You may have to modify position of wire to get it to sit the way you want but I believe the wire should be sufficient weight if properly placed. Once you know where you want the wire hook installed and line tie. Installation is simple as drilling holes and filling with devcon to glue in place .( last link provided) Now your ready for paint here is a cheap solution http://www.dollartree.com/household/arts-and-crafts/painting/Crafter-rsquo-s-Square-6-Color-Paint-Pallets/500c565c866p336948/index.pro?method=search I would paint a bright color (pink or yellow) . Once your through painting hang onto the paint brush you'll need it for the nest step. Finally for the finish I suggest this product . http://www.amazon.com/Devcon-Purpose-Strength-Syringe-Minutes/dp/B0006O8QQ0 I suggest you use this because it is cheap enough, doesn't require special equipment and is readily available at many hardware stores like ace or true value. Apply the product with the same brush you did the painting with . You'll need to rotate or flip the duck retriever a few times during the drying process to prevent it all from running to one end. The good news this product sets up in 30 minuetes. I think that about covers it . Any question?
-
@BobP Cold water is sometimes required. No offense taken friend. I think sometimes the things more experienced builders take for granted, young builders find to be eye opening revelations. I know the information you and others have shared here has really helped me. Thank you!!! TUs best feature is it allows the experienced and novice to meet on the same playing field. Sometimes it is frustrating but I wouldn't change a thing. Well maybe a couple of things. I have seen your work Sir. First rate!!! All my baits are a bit different unfortunately. I am working to get my process more standardized so successful builds may be duplicated. But I have to admit the real fun for me is prototyping. I really like msking something new
-
@ Skeeter Thank you for sharing your insights. I am more intrigued than ever before. You wouldn't happen to have one of those heavy baits lying around and an interest in donating to science? But seriously, the subject is one of such simple and most direct impact on the actions of fishing lures that I can't see myself not testing a few. Thank you again for sharing this thread and your experience.
-
@ Dieter I think the bait looks great! Sorry about the problem though. I have to wonder if it it was the soak in the prop overnight that may be responsible. I had a terrible time with this when soaking baits in linseed oil. One side of the bait would sometimes wick in more oil that another and leave me with a bait that just did not sit well in the water. One suggestion to know for sure if it is the wood or the process is to water line test another bait made from teak before water proofing to see how she sits. If ok, then move to prop waterproofing once the bait drys and water test again same as you did before.My hope is this experiment might find the problem and help prevent it on future builds. I eventually moved to superglue waterproofing. I know it is not as good as the prop but Ilike it because it is fast ,cheap, light and never has a bad effect on the performance. It is one problem I can rule out. I think she is fixable Dieter. She sits pretty low in the water, so if your going to use weight I suggest using as little as possible and as close to the center or perhaps a little forward of center of gravity . You may be able to right the ship by moving that front hook over to one side a bit. Heck move it back a little too while your at it. I think this may be the simplest solution. I like Bill's pin idea too. Speaking of pins, I was thinking your could remove that front hook and take a pin with a weight hanging from it with matching the appx weight of front hook and mounting hardware and use to temporarily stick into lure to see if moving this hook position will indeed fix the problem . You may need to move both hooks a little . This way you would not have to drill new holes for nothing. The pin and weight could also be used if the moving of hangers is not desired or not effective. Just use it help locate the position of and how much weight is need to right the lure. That is about all i have Dieter perhaps some one will have an even better idea but I think the bait is very much salvageable with a bit of tinkering. The baits wants to swim and if you get her to sit right I believe she will. Here is a look at my finished bait . Next week I will do some video of the action in the outdoors, as you say. I'll not spoil the surprise.

-
@ Ben / Don-Art Thank you gentlemen for the additional information. Ben, I do plan on doing this once I have some time for it. Most likely next week. @ Bob I would agree , I'm in over my head. But I have enjoyed the discussion and look forward to the experiment. I am not very experienced when it comes to suspending baits. Making them or fishing them, so this has been a learning experience. I believe it is helpful to see the effect of different water temperatures have on the buoyancy of the baits one is making. Knowledge is power they say. I may find nothing useful but for me, not looking where I can not see is not an option. The doorway has been opened and I plan on going in. I am hopeful one will be able to impart at least some of this knowledge into future builds. And perhaps someone reading this thread will too.
-
@ Ben You have it exactly. The only suggestion I might add is to put the pot of water in the freezer first. One could take the temperature right to the freezing point. This would allow for a full spectrum analysis. Having a thermometer will be an obstacle. I know mine is around here someplace. @Don-Art Good point. Water is unique in that it condenses to a point with falling temperatures then it explodes like popcorn forming ice crystals, thus becoming less dense than liquid water and floats on the surface just as you describe. In the beginning of this discussion, I was certain water was denser with deeper depths but after being confronted with Skeeters observations I was certain I knew less than I thought I did. Seems liquids do not compress well . Though their is a great deal of pressure at greater depths, the waters density change is negligible, And from what I am reading, so is the change in buoyancy of solid objects. But the changes in water temperature at varying depths does change the density of water and perhaps enough to affect the balance of our delicate fishing lures.
-
I started thinking about this a little more and an idea came to me. If it is the changes in the density of the water making the suspending bait behave differently at different depths and not the depth itself. Then, it is possible to test the baits behavior by simply floating the bait in question in water of different temperatures. I will give this a try to confirm next week. It should be easy to test. I welcome others to try as well. Always good to get second opinions. If this works, it would be very beneficial. All that needs to be known is the water temperature of the depth the bait is targeting, then weight the bait accordingly in a bucket of water of the same temperature for the desired rise.
-
Sorry to be brief but I wished to share a quick point. Cold water is more dense than warm water. The denser the water the more buoyant. Much like an object is more buoyant in salt than fresh water. I remember my first swim in the red sea. Very high concentration of salt. I floated like a bobber without any effort. Now how about our baits and cold water. I believe what is missing from the discussion is thermocline. We all know in summer surface temperatures are hotter than deeper depths. We also know that in winter surface temperatures are colder than those at deeper depths. These facts would satisify Skeeters observations and the physics involved. Important to know for sure when designing a crakbait.
-
"To be, or not to be: that is the question"
-
Thank you Gentlemen I believe I get what your both saying. I found this helpful ............ http://www.physicsforums.com/showthread.php?t=322544 Now to make a bait do what I want it to do............
-
I know this is not what your looking for but it is a very similar product. You might try a sample size and see if meets your needs. http://www.uscomposites.com/kk121.html
-
Thanks Dieter, Honestly , not as nice as yours but you do have a few years on me. But I am not going to let that stop me. I should have listened to your senior advice and used a heavier wood myself but you know how it is with youngsters. You can lead them to water but you can't make them drink. Are you going to do a water line test once water sealed ? If I had not done one my bait, it surely would have flopped. I am curious how the teak fairs. Looking froward to seeing your progress . Thank you for the lesson...


