

littleriver
-
Posts
1,131 -
Joined
-
Last visited
-
Days Won
9
Content Type
Profiles
Articles
TU Classifieds
Glossary
Website Links
Forums
Gallery
Store
Everything posted by littleriver
-
 Nice!
Nice! -
Thank you Ben for the link. I will be using it soon. I have some freshly carved baits waiting for hangers. I have been putting it off to avoid the syringe. Nothing but bad memories anyway. I can use the accelerator for my fly tying too. Nothing like waiting for superglue to dry a feather to a hook. Thank you again for sharing. Vic
-
Gene I use the method Ben first describes. I use a slow cure table top epoxy like etex. But still this is not slow enough when doing a few baits. I have lost a couple of syringes to curing. I was told by another experienced local lure maker the importance of getting the glue all the way to the bottom of the hole. Really makes a much stronger bond and I say why take a chance when you have gone this far. I am also with Ben on cleaning the syringe. It is a real pain the rear. I use the same epoxy for the bill too. Nice having the time for adjustments like Bob has said. Vic Ben your new method sounds like something I would like to try.
-
Dieter The twist on coil spring locks are fantastic ! I see frog legs and crawfish claws . Thank you for sharing, Vic
-
I have never used MCU products but thinking of trying this winter. I have read about all the storage issues. I really want to just dip and hang my lures but have read many tap the can. I am thinking of putting the MCU can in another air tight container full of desiccant packs. I have access to free used ones. Have no idea if it will work though. Thank you for sharing the link.
-
 I like the different paint patterns. I plan on brush painting something similar soon. Did you do with a brush? Vic
 -
I really liked the punch for the lip quick, easy and precise.
-
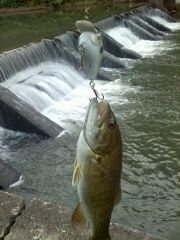
The water is really moving in that river. Bet many lures lost there. Good for sales.
-
I think so too. Seems I can find more videos if I just search using using foreign words for lure. I found this one using the word wobbler. There are three men by my count all working the more compiex machinery. But the women are certainly more interesting to watch. The blond early in the video is wearing her jewelry box by the look of it. I giggle every time I see her working with all those rings on. She definitly got the memo.
-
Just found it this and thought I would share it.
-
My first instinct would be to move the line tie about half the distance closer to the tip of the bill. If you don't mind experimenting with this lure, drill a small hole in bill half the distance closer to tip and another half the distance closer to the body. Now just rig a temporary line tie from a bit of stiff wire in each hole. Then, you will know which way will work best for this lure. Lure looks good!
-
Congratulations! Hope you don't plan on retiring from lure building anytime soon. You'll be sorely missed by those with whom you worked.
-
Moi aussi
-
Thank you Dave. For those who don't know, the Bagley lure used in the video has been confirmed to be an American made model. I am told from 1970 to 1980 but no one can be sure of an exact date. A very good bait IMHO.
-
Here it is......... Enjoy!
-
Recently saw a nickel plated cedar lure sell for $115.00.
-
Recently read somewhere that rubbing compound like that used on car finishes works well. I have not tried it though.
-
If you put them on after paint it makes a very clean look. No paint on bill and no bill to paint around. But it is nice to have the bill to hold while painting if you not using another method already. For alignment I use a line. Mark a line on center of bill with dry erase marker. The center of bait should be straight forward ,line tie and tail hook. My bench has a raised edge. I have drawn a line perpendicular to this edge and longer than my baits. Now it is just a matter of aligning the lip, front and rear of bait with line and pushing together against raised bench edge. Lip against edge of bench and bait tail away . Then slide my bait to the left and right of this line to make sure everything looks square with line. Jig is best but i make no two baits exactly alike so it is hard but using the line as a reference is working well for me.
-
I forgot to mention outdoors is best. Indoors is a real challenge to control lighting. Flash works but never as good as outside. Outside mother nature does the work for you.
-
No pro here. But I can tell you the best light of the day for photos is early morning or late evening. All the masters (Rembrandt) painted their master pieces under this light. Turn flash off. Use macro setting and place lure on a surface that contrasts with lure to set it off. You will know the light is right because there is no shadows to worry about because sun is too low in horizon. Sort of like a very over cast cloudy day.
-
When dipping baits I have found speed into solution more important than how fast out. Very slow in so the surface of the lure does not catch air bubbles on the way in. Once in go deep as can and stir solution lightly. This will help remove trapped air from surface. Next out of solution as fast as you like; makes no difference because surface is all ready coated with solution.
-
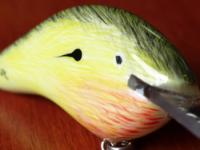
 He looks real. Very nice detail down to the hair. The symmetry is perfect. I like it. Vic
 -

Devcon 2 Ton ...how Many Coats Do You Typically Apply?
littleriver replied to buckwheat12n's topic in Hard Baits
Hillbilly, thank you for the recipe. Rookie, what "forever" finish do you recommend? -
Devcon 2 Ton ...how Many Coats Do You Typically Apply?
littleriver replied to buckwheat12n's topic in Hard Baits
What are you thinning it with Hillbilly, if you don't mind sharing the recipe? I would very much like to safely thin sometimes, especially for a second coat. -
They sell hooks.
