


Anglinarcher
-
Posts
1,607 -
Joined
-
Last visited
-
Days Won
88
Content Type
Profiles
Articles
TU Classifieds
Glossary
Website Links
Forums
Gallery
Store
Everything posted by Anglinarcher
-
Guys, great topic. But, like they say, the devil is in the details. Often it is the smallest details that give us the most problems. First, a little physics (science). The rule of light intensity is that it is inversely proportional to the radius squared. Of, in laymen's terms, if the distance from the light source is 2 inches, you get a specific strength. If you double the distance to 4 inches, you get 1/4 the strength of light. If you go from 2 inches to 6 inches, you actually get 1/36 the amount of light. Worse yet is that most reflectors are inefficient with UV light. So, in short, making a light box for curing UV either requires a lot of Watts or keeping it very close to the light source. I was working on a large box capable of doing large lures or lots of small ones when I moved a few years ago, and never finished the idea, but I can provide links to get you started. http://www.solacure.com/365.html and http://www.tanninglamps4less.com/wo8ba.html I have a nail curing light that works well, but I keep it very close to the lures. Like was said, I can cure a SolarRes lure in 3 minutes and get great results, but again, even then, there are details to follow. First, SolarRes uses a wax as was also stated, a wax that floats to the top as is cures. If you cure for 30 seconds, then rest it for 15 or so seconds, then 30 seconds, then.....you get the idea, then you will not get the blushing on the dark colors. It allows the wax to float to the surface and sublimate or evaporate off with the next exposure. I have another option for you. It is almost as fast as SolarRes, and you get a much better coat. Alumilite has a produce called Alumi-UV. It cures a little slower and does not use wax, a lot more glossy, a little more flexible, and a bit stronger. It is pretty much the same as SolarRes in other details. Larry Dahlberg uses a box, and has shown in on his show HUNT FOR BIG FISH that looks like a 4 foot box with 4 Black Light bulbs. I believe it takes him 15 minutes to an hour, but that is pretty fast. When I use the Alumi-UV with my nail light it takes longer then SolarRes, but still a lot faster then Epoxy or moisture cures. As mentioned, dipping works very well, but I get great results using brushes on both products and I like the control I get. Like mentioned, keep working the wet edge with a well loaded brush. Keep the brush out of UV light and you can use the same one for years. If you are working with kids, then it might not be worth using a brush because of the light touch needed. One other thing, and I am reluctant to tell you. Alumi-UV does not suggest it, and I am not sure about SolarRes, but Microwaves do not cure them, but will heat it a little and thin it for a little time before dipping or brushing. This allows me to reduce the drip time or make brushing easier, but .......... as I said, Alumi-UV does not suggest it (don't know why), so you would need to test this for yourself. Use the microwave for just a few seconds, you don't want to vaporize it, just heat it a few degrees. I have the lure turner for Epoxy (as mentioned, fast curing epoxy will yellow over time and I found that over time it gets brittle and cracks easier in about a year) but I use the slowest epoxy cure I can find. I also use it with Amazing Clear Cast Bar Top Coating but both the Epoxy and Clear Cast take at least 24 hours of turning to get final cure. For your purposes, look at the videos on YouTube and at Makelure.com that Larry and Alumilite sponsor to see how Larry does UV cure. I think you will find that once you have the box and sufficient wattage you can get the kids' lures done and out in record time.
-
http://www.lurebuilding.nl/indexeng.html I have included another site from Europe that might help you. Does not give any theory, but lots of recipes. Great stuff.
-
The whole concept of a "kill dot" is strange to me. In reality they seem to be to confuse the fish on where the eye is and cause them to miss the kill shot. So.....I agree, no bigger then then eye.
-
Ditto
-
Larry Dahlberg has a YouTube video on control surfaces, balance, buoyancy, etc., that would help you a lot. It is also on the Makelure.com site and the Alumilite site. Start with a torpedo shape. The balance point should cause the lure to over correct a little on each jerk to go left and right, but not be so much as to stop the "glide". I find a balance point a little front of the center of buoyancy, a buoyancy just dense enough to cause a slow sink, a profile like a torpedo or slightly taller then wider. It is not that hard, and you can always buy a Dahlberg glider from River 2 Sea and use it as a guide. My slow sinking glider that I got from them thought me tons.
-
Yes, I use to do it all the time with great results. I changed my mold design and not it won't work, but when I go back to my top fill mold it works great. The thing to remember is that the lead will settle to the bottom of your mold before the alumilite sets, so it only works if you have something to catch the lead or you want the lead on the bottom. PS, I use lead shot when I mold the alumilite so there is no hot lead. It would work great for your decoys.
-
I make lures for myself, and a few family and friends, and it is like giving my babies away. LOL Still, I tell everyone that if you are not snagging up once in a while, you ARE NOT FISHING. I try to get them back, and work on makin them more snag resistant without loosing hooking ability, but......snagging up is a necessity once in a while. I remember a few years fishing for Jumbo Brown Trout where I snagged my lure on a root in inches of water. The monster took it off the root for me, and proceeded to spool me and my 10 lb line. Ugg. In short, it hurts to loose a hand made bait, but often they are so much better that it is really worth it.
-
Masking off.
-
This is the correct way. White is not all that opaque, dark colors always are hard to cover, so........ follow the above instructions.
-
I use mesh from fabric stores because it is flexible. I make a blank without the "scale" pattern, then glue the fabric mesh, then create another mold of the new version. It works for me.
-
How about Honey?
-
Welcome to the most rewarding hobby, and most frustrating hobby, in existence. First, I am sure you will get a lot of differing answers out there. There is no one answer to your questions. 1) You might need to search out hardware suppliers if you are not finding the screw eyes you want. Just do your best internet search and good luck. 2) Cutting V joints are a matter of your own skill level. Depending on the size of the lure, I have done well with band saws, properly set up and done with a jig, but I cannot free hand the joint. I can only suggest practice on this...... there is no easy solution. 3) Oval split rings keep the know from getting caught in the gap and cutting off. Round split rings work great with attaching hooks. Best I can tell you. 4) Water based paints are fine for painting lures. They get a clear coat that is water proof so most of us use water based paints in our air brushes. 5) Carving is a talent and as such not everyone can do it well. I CANNOT DO IT WELL. What I do is make lots of templets, keep fitting the templets to the carved piece, remove a little at a time, until I get it even. Again, practice, practice, practice. 6) Basswood is great, but it is not a cure all. Prices are subject to what is available to you. 7) http://www.makelure.com/store/pg/54-How-To-Videos.aspx This is a good source to learn how to make molds, and lots of other things. Alumilite tries to teach you all you need to know and it is actually very simple. Hope this helps, good luck, and HAVE FUN.
-
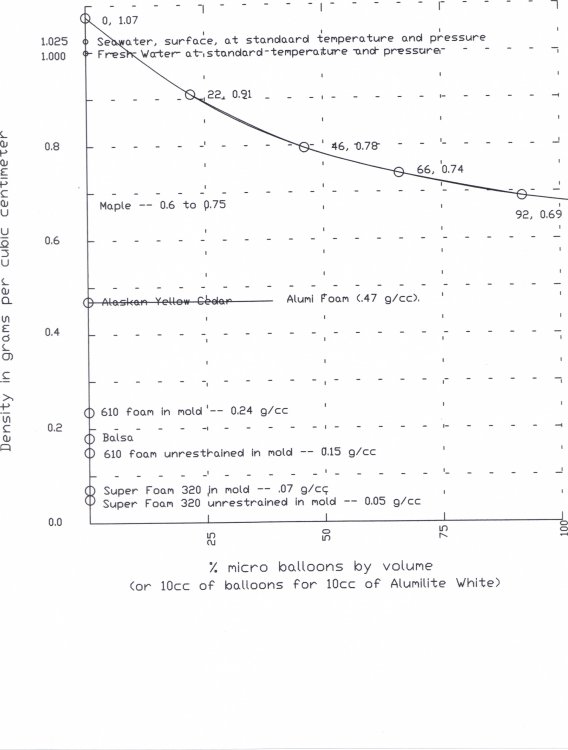
I think the following graph might help some regarding densities. Sorry I have been off the site for so long. I know that the answers below are pretty random, but I am trying to answer the questions above the best I can. I have given the density on the side of several woods, but you can look up the average density up yourself. Remember, wood is far more variable then any plastic or foam, no matter what you have or are being told. No amount of microballons will get Alumilite White to balsa (and still be strong and pourable), and Alumifoam will be much heavier then balsa as well, but a lot less dense then microballons and Alumilite White. The 610 foam matches balsa, but it will require through wires for most applications in my opinion. Alumifoam does not require through wire. In fact, it can and will hold screws on Muskies or Saltwater fish. Tough stuff, but densities about .47 g/cc. Consistent density results come from careful measurement and large vent holes. It is much harder to use then other foams because it has a lot of expansion force. Firm molds, like ones made out of Alumilite Quickset or VacMaster 50 are best. Developing your pouring method with Alumifoam, it might take some time to develop YOUR proceedure. The density of white pine ranges from .35 to .50, so Alumifoam is on the heavier side of white pine ranges. Yellow pine is about .42, a little lighter then Alumifoam. Yes, the foam does indeed expand inside the mold. You will need to pour less then the full amount and let it expand to fill the mold. I prefer about half full with Alumifoam and have a large vent so that the excess can expand out and be trimmed later. I think that when I closed down my YouTube account that my videos were lost, but I had a video of how tough Alumifoam was. You could hit it with a hammer and use a rod and smash it into concrete and do little damage to it. It is not the easiest stuff to get use to, but I have never found a fish that could hurt it yet. Hope this helps some, and again, sorry I have been gone so long.
-
I sure don't have a foolproof method, but ...... I clear coat the sections individually and join it once cured. I then touch up the joints with any paint and clear coat. I know of no other way to get a foolproof result, and I have sure tried everything I could think of. Good luck.
-
Is that why it is called "Craft" Fure and not natural fur???? LOL I have tied tons of flies, and lures, with craft hair/furs and you are correct, they are sure not bucktail. Sometimes you want the action of the Craft stuff, sometimes natural bucktail.
-
Sorry, I have a 1000W unit and I set it for 80%. I stir often, but not hard, and I never get bubbles. Something else is going on, but I get clear, bubble free results. If you think microwaves are hard on plastics, you should see what happens with the metal pans we use to use. Slow, uniform, controlled heating is required for best results.
-
I wish I could give you the solution, but ....... it is not so easy. Heat no hotter then necessary, heat slow, heat larger quantities (small half ounce pours scorch faster then several ounce pours), use the best quality of plastic (debatable on which one is best), and practice. Follow my directions, and you MIGHT get the results you want. I get good results most of the time, but it took me a long time to get it right. I heat in a microwave set at about 80% (1000W unit), stir often, but not so fast as to fill it with air (which causes bubbles and scorches faster). Who knows, there might be some other little thing that I am doing that I don't even understand yet. Ooops.
-
Nice looking baits, but ...... how do you tell inshore verses freshwater? LOL I am just having some fun with you, but now that I live close to both, I often use the same lures for both. It seems a Red or a Speck does not care if a LMB ate it last. Hmmmm.
-
Well done, let us know how it swims.
-
I am glad you find the humor. Considering the video was for basic first timers and done a long time ago, I always considered it a good novice primer. Other mold making features on that site have evolved to reflect better ideas, better molds, etc., but, I can only offer the path, I can not make anyone take the first step, or follow the directions.
-
I use Internet Explorer most of the time and it will not copy and paste on TU. This is the ONLY sight where IE won't work. If I chrome, then I do as Ben suggest.
-
This is exactly what you are wanting to know. Check it out. Other good information can be found at http://www.makelure.com/store/pg/54-How-To-Videos.aspx#prettyPhoto Good lure making.
-
If you are using RTV, then sometimes you can have issues if the Master you are molding is of certain materials. I have not tried molding a Berkley Gulp, but it sounds like it has some sulfur in it and that is one of the cure inhibitors for the liquid RTV's. If you used mold putty then it would be fine, or ....... dip the gulp bait in a clear coat (won't last but who cares) and use that as a master.
-
LOL - I took a couple of the "OLD" versions of them from my tackle box and made RTV molds of them. Now I get them from my man cave. Super easy to make, no real weighting or tuning.
-
First Attempt At Turning Some Plugs On The New Lathe.
Anglinarcher replied to Fredosantana's topic in Hard Baits
I like the looks. It seems to me that you need someone to test them out for you, and being a dedicated tester, I ...... Just kidding. You will do great.

