


Anglinarcher
-
Posts
1,607 -
Joined
-
Last visited
-
Days Won
88
Content Type
Profiles
Articles
TU Classifieds
Glossary
Website Links
Forums
Gallery
Store
Everything posted by Anglinarcher
-
All UV light, anything with shorter wave lengths then Violet need to be considered potentially dangerous. Even regular light can be a problem for us if it is too strong or we don't protect ourselves well enough over time.
-
First, I know nothing about Featherlite, so I don't know if anything I say will apply to it. Alumilite Regular and Alumilite White will bond to anything except silicone while they are curing, but nothing really wants to bond to it once it is cured. So, there are a few things that can be done. First, if you spray a primer coat on the material in the first couple of hours after it is poured, the paint will normally bond to the Alumilite. The quicker you paint the primer coat, the better the bond. For me, this is not an option. Taking a hint from the owner of Alumilite, Mike suggested to me that I put a light coat of paint on the inside of my silicone mold before I pour. This actually transfers a bonded layer of paint to the lure, except for the pour hole and any flashing or sprue you trim off. Because my lures tend to require a larger pour hole, this is a good, but not a great option for me. I checked out several "primer" materials. I checked out Krylon "fusion", because it is said to bond to all plastic. It really does not bond to the Alumilite. It makes it harder to scratch or chip the paint off the lure, but it is not a chemical bond. Less say it sticks to it, or forms a mechanical bond. I talked to a taxidermy company that suggests their lacquer based primer that they use for smooth fiberglass replicas. They were out of the small quantities, so I tested instead the spray lacquers and spray acrylics out of rattle cans. I found that both improve the 'stick'. Last, cleaning the surface of the Alumilite before you paint makes a huge difference. I used a green scotch pad then wiped it with alcohol first; this works very well, but again, improved stick, no bond. I also tried wiping with acetone, which also worked. Finally, I found that with a good coat of ETec, it really did not need to stick or bond all that well in the first place. I make a type of lure that requires Alumilite White and microballons to make a shell, and then it is filled with a 610 foam. I and my fishing friends have a place where we fish along some rock cliffs. The rule is that if we cast 5 feet from shore, we are 4.5 feet too far from shore. Needless to say, we smash a lot of lures on the rocks. I have never ruined the paint job of my ETec coated, Createx painted, Alumilite formed lures. Factory lures don't hold up at all. LOL In summary, if your Etec coat is good, or your D2T coat, then all you should need to do is use a green pad, followed by a wipe down, then either just paint or hit it with a rattle can clear, then paint and clear coat as desired. I have not got my UV cure yet, but Bass100 says it is every bit as tough as D2T, so I expect the same results.
-
Alumilite And Microballoons.....how Much
Anglinarcher replied to muskyslayer96's topic in Hard Baits
The answer really depends on a lot of things. How much the hardware weighs is the biggest thing you will need to consider, but .......... If I can figure out how to post it, I have a graph I did for Alumilite about a year ago that tells what density you get with Alumilite White and various amounts of Microballons. I will post it when I can, but untill that, Alumilite has a lure site they support and you can find the graph at http://www.makelure.com/Lures.cfm -
D2T is pretty tough to beat, but like you, I find that I often make a lot of mistakes with it. Also, it takes a lot of time on a turner. ACC is also pretty great, easier then D2T in my mind, faster then EnviroTec, strong, etc., but it is only one of the many options that Bobv and Nathan talk about. EnviroTec is great, but the time spent on a turner is just far too long for what I would consider a commerical option...... Still, that is what this non-commercial guy is doing right now. Bobv is dead on but I prefer to toss my brushes each time rather then mess with clean-up. I do what Chumdawg suggest with the cheap acid brushes from Harbor Frieght and then brush the ends to remove any particles. Nathan is correct about checking out the Solarez High Gloss UV cure. A friend of mine in the big boy world is also testing a UV cure and he is impressed as well. When I am out of my EnviroTec, I expect that I will go with a UV Cure myself. So many options, sooooo much reading to do in the past threads. Good Luck my friend.
-
OK, not an expert, but I think I have made most of the mistakes you can make with an airbrush. Two things come to mind. 1) How old is your paint? Was it opened and then set for quite some time? If so, it may need to be screened or filtered. I went to Harbor Freight and got some fine paint filter cones. I removed the screen in them and took the top off the bottles of paint. I put the filter over it and then screwed the top back on over it. It screens the paint every time I pour it. Once opened, especially if there is some air space in the bottle, you get films and skins that form on the paint that can send partial plugs into your tip. 2) Do you have a water filter on your air supply? If you get water in the air line it will move through with the air pressure and can cause the spattering/splattering you mention. I'll bet there are otheres that can help more, but until someone chimes in, check these two items out.
-
Thanks Brent. I don't mind a little smell myself, so the Solarez Polyester Gloss Resin will be on my shopping list. It is sure a lot cheaper then other stuff I have used. Please forgive the questions I asked, I did not mean to offend you. It is simply a matter of the Phillps light being totally NOT UVA, but the Nail Lights ARE UVA. Further research has shown that the Clear Tech lights, well to quote the Tanning site; "They are particularly strong in the following ranges: 285nm to 287nm, 310nm to 315nm and 360nm to 370nm. They are not narrowband, as they produce more than a single spectrum, but they cost about 90% less than a narrowband lamp and usually provide similar results." I suspect that I will be using the nail light until I increase my production levels. At that time I will probably make a cure box using the Clear Tech lights. Bass 100, thanks for the information. Are you the one that the TanningLamps4Less.com web site refered to when they said "A person in the midwest purchased two F59 ClearTech 20 lamps and is powering them with an off the shelf 80W ballast. He makes hand crafted fishing lures that require UV to cure, and this configuration cures them in a minute or two. He runs the two lamps length-wise and can sure about 10 lures at a time, being suspended from above, with the lures hanging inbetween the two lamps"? It really does not matter, your information has been very useful. Thanks for the tips on the heat impacting the UV lights. UV lights don't work well below 70 deg. F and they are damaged at 115 deg. F, as measured within two cm of the bulb (at least for the UV disinfection systems I have worked with before). If we follow your instructions about cooling the bulbs down they should last for a long long time. Mark, hope you get over your head cold soon. Bass 100 suggested making a mini box by using the foam with the metal reflector on it. ("Those of you guys using a nail dryer, have you tried taking the dryer apart and using the lights to make a miny light box. It would allow you to hang a full length lure upright without any chance of touching the bait. Use the insulation board from Lowe's that has the aluminum foil on both sides of it. You can get a 4' X 8' sheet for under $10 and it is designed to hold up against the heat of the lights.") I can see a possibility that this would give you an extra couple of inches on both ends, taking your effective cure zone from 5" long to maybe 9" long. Just thinking. You guys have been great, I appreciate your help and I look forward to updates as they come in.
-
Point well taken, but the tanning lights they link to are not made by them. I agree, the flashlight and the screw in lamp light they sell sure sends up red flags. I agree that some have had luck with the other lights, but I also read that some have had troubles as well. I am just trying to figure out a pattern after 13 full pages.
-
OK, one more thing please. Solarez appears to be a great company, but they are not the only one out there. I have contacted a company called Deco-Coat about one of their products called 60-7180. I am still waiting for the cure frequencies as well as the price, but ....... OK, now the Solarez products. ZEROVOC UV Resin does not mention that it cures to a bone dry finish. Polyester Gloss Resin does not say it is Low oder or zero VOC. Clearly the two are different. So, are we talking about using the Polyester Gloss and tolerating a little smell until it cures are are we talking about using the Zerovoc?
-
High All, I find this thread interesting. A friend of mine posted on a different site that he is trying something like this so I got really interested. I knew about the surf board curing by UV from TV ("How it's made"), and I knew that some musical instrumants were done with this stuff, but I had never even considered using it for lures. I guess that has changed now. OK, I have seen that the nail dryers using UV seem to be well received and work well. I suspect that is what I will be using. For the record, they operate with a peak at 370 nm based on my research. Solarez tells me that they suggest 385 nm. Nevertheless, they also suggest a link to a tanning bed light company that I contacted. They told me that their bulbs are broad spectrum and have three peaks, all well below this suggested 385 mn range. Are we confused yet, because I am. The Philips TUV15W G15T8 mentioned by some is a UVC with a peak at 253.7 nm, very far into the UVC range. The 51 LED flashlight mentioned by some peaks at 395 nm (http://www.amazon.com/LEDwholesalers-Ultraviolet-LED-flashlight-7202UV395/dp/B001Q70A0G/ref=pd_sim_sbs_misc_1) At least one inspection UV light is (http://www.amazon.com/Professional-Inspection-Flashlight-380-385nm-Ultraviolet/dp/B0013E3XVU/ref=pd_cp_hi_1) rated at the 380 to 385 nm range. http://www.tanninglamps4less.com/uvcuring.html is a great link, previously given to us in this thread, and I want to point out that they suggest lamps called Clear Tech which have a 360 to 380 nm range. If we are not yet confused enough, consider that the wave length is not all we need to consider. We also need to consider the intensity of light. This is a factor of the wattage, the focus, and the distance away from the light source. In summary, it takes the right frequency and the right strength. The friend I mentioned at the first of this said he is using four each 60 watt bulbs, 4' long, but he is not yet telling me what bulbs he is trying or what the product he is trying - just that it worked quick and he could have been fishing the lure from the start of the lure pour to final top coat cure in 5 minutes. I will find out some day. I have found out that grow lights have little to no UV light. I would be supprised if they work at all. I have also found out that the reptile lights have little UV, and mostly it is UVA. It might work, but it will take a lot of time. It looks to me like once we figure this out we will be starting a whole new wave of lure development. I am excited about it: I just wish I could afford to try them all. But................ AM I CORRECT IS SAYING that everyone has had luck with the nail UV dryers? AM I CORRECT IS SAYING that everyone has had good luck with the Clear Tech lights? What are the final results of using the different flashlights or the GE UVA bulb? Thanks
-
First, I am not an expert. I wish I were, and I am getting pretty good, but I can only offer my opinion. I prefer a double action air brush, and I like the fact that the Talon comes with small, medium and large needles. I usually only use the medium needle, but for some metal flake paints the large will become necessary. Using stencils I can do extreme detail with even the medium needle, but with the right paint, you can learn to free hand very very good details with the small needle. Wow, gravity feed verses bottom feed! I have both, and for volume the bottom feed is nice. You waist a lot more paint when you are using only small amounts of paint with a bottom feed, so I really like my Talon and the gravity feed. I also feel I can paint with much lower pressures for even more detail using a gravity feed. Still, the cup on top can obstruct your view, so there is no one perfect air brush. Any of the paints you mentioned will work well with any of the air brushes you mentioned. The opaque has more pigment so it tends to be a little thicker, but it can be reduced easy and it coveres best. The transparent is nothing but the opaque that has a clear extender or reducer to thin it down. I suggest not reducing it but spraying it direct. The Fluorscent covers just about anything and it sprays almost as easy as anything. Createx is a great paint, but the colors are not real life-like. Some of the other Createx products (other brands by them) such as Auto-Air, have some nice color options, but don't discount other brands. Wildlife Colors, Polytranspar, Hydro-Mist, and also Woods and Water have some more life-like colors and I have found all of them to be about as easy as Createx. There is so much that can be said about this subject, and there are so many sources that can help, so remember one thing "HAVE FUN AND JUST PRACTICE". Don't let the details get to you before you learn about it.
-
Check out www.alumilite.com site. They have a 10 pound foam, a 20 pound foam, and a new Alumifoam that has the same density as a middle weight cedar wood. If you go to the following: http://www.makelure.com/Lures.cfm you will see a graph that might help you out. You will see that the 10 pound foam is the same density as balsa, so the 16 pound you are talking about will be a little less dense. The 320 and 610 foams in the graph are self skining in the mold. You get an excellent finish so you don't need to worry about painting. The Alumifoam skins very well as well. Also, the 10 and 20 pound foams expand well enough, and slow enough, that you do not get mold expansion from silicone molds. Still, the sprue gate, when trimmed, will require sanding and sealing if you want any quality in your finish. My sample of the Alumifoam is faster expanding, even though not as much, and it cures fast enough that you might get mold expansion. You must use a pretty large sprue gate to use it. I find the 610 foam to be more then enough to hold hooks, just as well as balsa. I do not find the 320 to be nearly strong enough. I have not used the 16 pound foam you are talking about, so I don't know what to say. I hope that this helps some.
-
Hobby Lobby usually re-stalks in less then a week. I expect that they have the Alumilite Regular back in stalk already. I prefer the Alumilite White but Hobby Lobby does not carry it at my stores. The Alumilite Regular is pretty good about degassing on its own. As long as you have some air holes to allow the air to excape, you can pour even your largest bait in the Alumilite Regular without degassing. I am attaching a link so you can check out the properties compared to other materials. http://www.alumilite.com/Category.cfm?Category=CastingResins The amazing clear cast is not a structural resin. It works pretty good as a top coat, it works pretty good for craft casting, but it is not a good lure forming material.
-
Yes, you can submitt as many as you wish.
-
I agree completly.
-
Yes, overseas shipment of chemicals can be a real problem. You would have done well in the contest Dave.
-
Here is an idea that I think will make it easy and non-toxic. The product is Alumidust, and it works awsome. http://www.makelure.com/ProdDetail.cfm?Category=Support%20Products&Name=Alumidust Cheep brushes work, they are reused, the finish is excellent, can be used on soft plastic or hard plastic pours, etc.
-
Hey guys and gals, there are some awsome lure makers on this site, and I suspect that many of you designers would love to get your lures into mass production. Here is your chance. See the link below to enter your designs for a chance to do just that, at no cost to you. http://www.makelure.com/BuildOff.cfm Of course, you will need to compete against me, but the rules are clear. Good luck, and good designing.
-
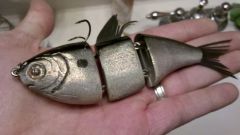 Interesting idea, hooks on top. Well done.
 -
I think the key here is that nothing will stick to the plastic, it must bond to the plastic. That bonding just be either a chemical reaction or a melting. In either case, it will probably require a mask to keep you healthy and safe.
-
LOL - or grind your prey sample, disolve in concentrated alcohol, then use fractional distallation to remove the oils. OK, so maybe you should be pretty good with chemistry for this idea. I am, and I am not going to do it.
-
http://www.lurecraft.com/catalog.cfm/plastic-products/paint-for-plastic-lures Not an aerosol, but works from an air brush according to an e-mail from them. I plan on trying it myself in the future.
-
What is your goal? Remember that to get a worm to float, it must have a density less then water. Therefore, adding a "chemical" to the plastisol would only work if it made the plastisol less dense. OK, if we did that, what would it do to the plastisol? Adding foam would only work if it would not melt at the ~350 degrees plastisol melts at. Adding microballons work because it can handle the heat while still adding glass enclosed pockets of air. I wish I had another solution for you. I have some old plastic worms that have tons of air pockets in them (commerically produced years ago), but they are not very durable and they are a bit stiff. Perhaps, and I have NOT tried this, but maybe using an egg beater to beat in air bubbles before your pour?????
-
Have some, not sure I like them. First, they are heavy for their size. Second, they are a soft metal, so soft that they bend and dull easy. I think they may have a place, but so far, I am not impressed. There has got to be a better way.
-
I believe there is another thread going on about using single hooks. If I were to exchange, I would start off by weighing the #4 trebles that came off the lure and matching the weight with a single hook of your choice. I prefer the Siwash style myself. Still, you might get away with larger or smaller on that bait, depending on hook location and action desired. Time to hit the water and experiment.
-
I have not had good results with a "single point hook" for the front hook. No matter how you mount it, the slop or play of the split ring will allow the point to lay against the body just when you need it most. One exception to this is using bead chain and hanging the single hook well below the body. We do that for steelhead and salmon in the Pacific Northwest at times. On the other hand, double hooks for the front hook do work for me. Of course, on smaller lures, fatter profile lures, the Big O style if you will, a single hook for the rear is perfect most of the time. I saw the Sebile lure on a tackle web site and it looks interesting. It is a Big O style of bait with the hook spring hinged through the center of the body, hook point up. As the fish takes the bait, pressure on the bottom of the lure pushes the hook up through the top. Unfortunately, it looks like a deep diver and I would only desire this type of lure on more shallow diver styles. Oh well........
