eastman03
-
Posts
462 -
Joined
-
Last visited
-
Days Won
28
Content Type
Profiles
Articles
TU Classifieds
Glossary
Website Links
Forums
Gallery
Store
Everything posted by eastman03
-
Great point BobP. The epoxy I use is ETEX as well as Ecopoxy UV resin. Both are slow curing and I have time to mix the epoxy for several minutes, then let it rest for 10 min or so. It really does seem to help the epoxy cure more evenly. I use a disposable 1 inch foam brush that you can get from dollar stores to apply the epoxy (not that I think it would solve your problems). This is a post that has been brought up several times in the past and is my go to checklist for getting good results.
-
First of all, fantastic looking lures and paint jobs! Second of all Ohh man! I feel your pain! I was in a very similar boat. All the work it takes to carefully design, shape, weight and painstakingly pain a bait only to have it ruined by a final epoxy layer, that hurts. I also make lures for pike and musky, and I do love epoxy. Stick with it! I have found for me that to get the best results, I have to make sure the room I do the epoxy in is at least room temp, if not slightly higher. I used to do my epoxy in the garage where I make the baits, but the cooler environment played havoc with my epoxy and all the problems I had. What helped me (besides learning all the contamination issues), was warming up the bottles of epoxy in warm water for a while before I applied it. And making sure that wherever they cure on my turner, that room is at least 20 degrees Celsius. Lots of guys will turn on a light near the baits to keep that area a bit warmer. That seemed to help me a lot. The epoxy on the last few rounds of baits I did have turned out really well. Good luck, and stick with it. Many people will recommend other finishes, but I agree, epoxy done right looks amazing on a lure.
-
Welcome here and welcome to lure building! its an awesome hobby. Learn to search for answers on this forum, I just use google and add tackleunderground to the search. If you have a question, I can almost guarantee it's been discussed here. Youtube is your best friend also. Marling baits. Solarfalls baits. Check out Engineered Angler! Great channel with lots of tips and tricks for the lure builder. His channel is amazing. As for paints, there are a lot of cheap paints you can use, but as a beginner these paints (like dollar store stuff) are not great and can give you problems like clogging and stuff. if you are airbrushing, invest in some createx or testors aztek paints that are ready to airbrush. Get a proper thinner as well and practice practice practice. You really don't need much to get started, just keep making stuff and testing out and honing your skills. Post any more questions if you have them, conversation is kinda slow now, but it picks up in winter usually (that's when I do all my lure building).
-
.5 needle with my badger patriot combined with an airbrush flow improved to delay tip dry really helped me clean less and paint more.
-
Love making lures from wood! I feel like the home lure builders like myself slow down a bit in summer. More fishing less building and posting. It’s my winter past time. I totally agree with you Mark shaping and carving is fun and relaxing I’m working on a copy of my favourite soft bait. A Hybrid bulldawg type lure. I may have to Try the pvc, I really enjoy working with wood. But it is less predictable.
-
I'll third that! My local glass shop let me come take a look and gave me all sorts of pieces of polycarbonate. In return I made them a larger lure for display with their company name on it, just for fun. They were so pumped, I have basically an unlimited source for lip material now! Another spot I have got some from is a plastic's distributor. They had a bunch of cut offs that they let me buy for cheap.
-
Like the others said, measure carefully, equal parts by volume. Mix for a couple minutes. I also let it sit for 10 minutes, it really seems to help prevent fish eyes and other problems. Make sure your room and the epoxy are at least at 70 degrees, you can even warm the bottle up a bit in the sink with warm water beforehand. Cold weather and cold epoxy were a source or major problems for me. Put the lure on a bbq rotisserie and let it spin overnight. I use a 1" foam brush. I make large lures for muskies, the foam brush works well. Disposable.
-
Set the resin part in hot water for 10 minutes to unchrystalize it if it looks lumpy or unclear.
-
You could probably go on the mother site, (http://www.lurepartsonline.com/Online-Store/Lure-Lips/Lexan-Lips-Rounded-Style.html) and order a few different ones to see what would work best for yourself? Just an idea. Looks like they sell lexan lips up to 1/8". I'll have to double check at home what thickness I used. I'll let you know. For my 6" lures, I think its around 1/8". Another good option which I do now is track down a local glass/window shop, or plastics manufacturer (this may not work for you obviously depending where you live). I found a shop in my community that does windows, they often deal with lexan for multiple different applications. The guys let me have a bunch of different thickness little scraps that were completely unusable for them. But, I could easily get a bunch of lips out of each piece. They are now my official lexan supplier, (it helps that a few of them fish, so I repay the favor once in a while).
-
I've never done it, but I've read about guys that will stack a few blades of a metal cutting hack saw together to get the same thickness of the lip. Then you can cut it all in one shot with the top and bottom being parallel. Like others mentioned, probably all best when the blank is not shaped yet. Making a lip cutting miter box also sounds like a good plan to keep it consistent.
-
Thanks! I'll be testing and tuning them as soon as the ice melts and I can get out on the boat. The prototype one I made last year worked great, with a nice wobble. Hopefully these all do the same!
-
I usually just start with some fluorescent yellow, and slowly add drops of fluorescent green till I get the color that I'm looking for. I don't have a formula for it exactly. I'm curious to see if some else does as well.
-
 Thanks!
 -
 Very nice as usual, so clean! I'm always inspired by your work
 -
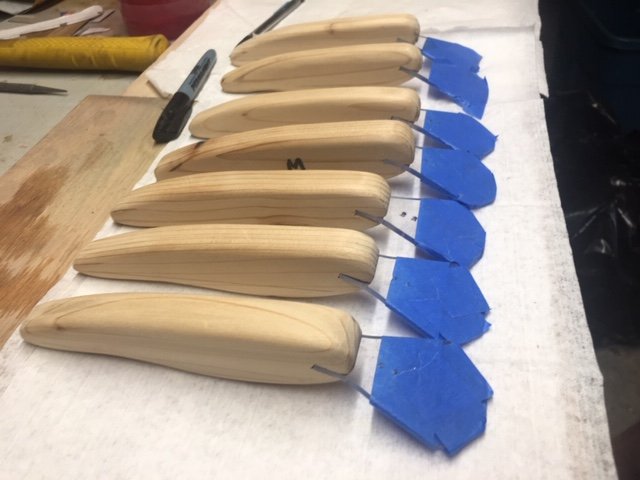
 I added a seven pics of some smaller cranks I finished up. If anyone is interested, I did a little bit of a tutorial in the Hard baits Tutorial section in the forum.
 -
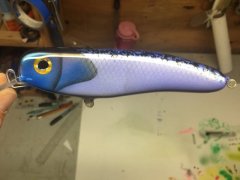
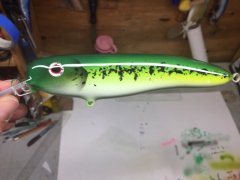
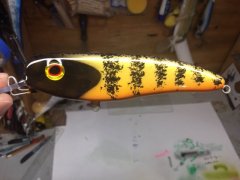
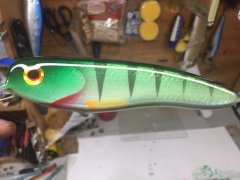
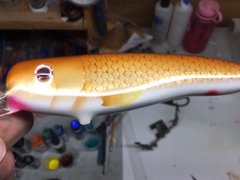
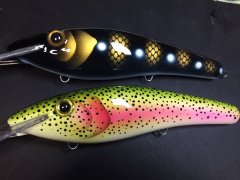
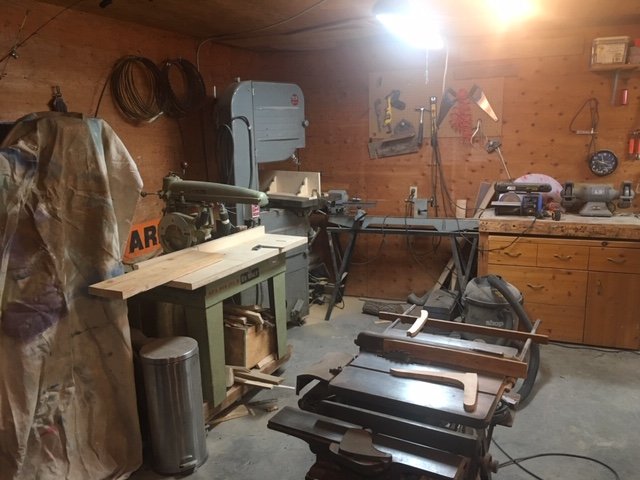
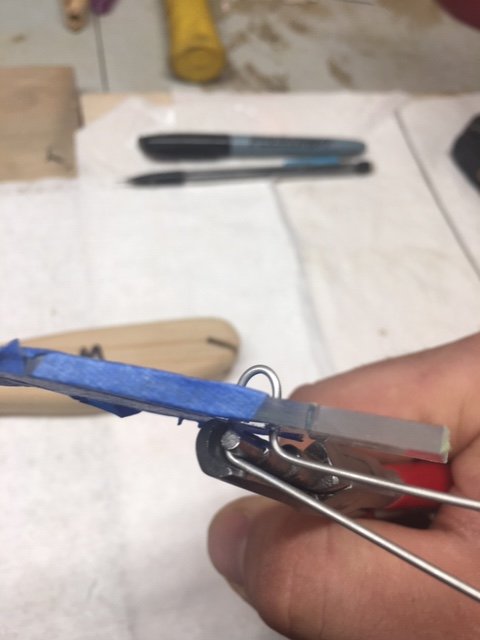
So I figured I would take you along with my latest build. I thought I had taken more pics along the way to document how I did it. This is by no means a different or revolutionary way to do any of the steps, but I always like the how-to's when I first started out, so I figured i'd post one here. A bunch of the first steps aren't documented unfortunately. First I design a lure, in this case I wanted a smaller (6"), medium diving crankbait that floats when paused. For a down sized option for casting in spring. I ripped some (mostly) clear straight grain cedar down to 3/4", and cut them in to rectangles just over 6" long and 2" high. Then I traced the shape out on cedar, and rough band sawed out the shape. I also use the bandsaw to cut out the lip slot that I traced on to the blank. These particular lures are flat sided, so they are easier to shape than some of the others I built that have a more 3d shape (maybe a good lure to attempt for starters). I also designed a diving lip, traced it out on a 3/8" sheet of Makrolon (polycarbonate, same as Lexan), and cut them out on the band saw. I cleaned up all the edges on the lips and wood bodies, up to my trace lines on a bench belt sander. Pic 1 is of my woodworking corner with my big old bandsaw, RAS and table saw. I also love collecting old iron vintage tools from the 1950's but that is another topic all together. The next step for the wood bodies is to round over the corners. I have done this several ways. Hand chisel, or belt sander are options, but I chose to use the router because these lures have a flat side. I build a jig similar to this one in the 2nd picture in order to remain away from the cutter. I have not much experience with the router, and from what I've read, I HIGHLY recommend caution using this powerful tool. Once the lure bodies are rounded over, I gave them a quick sand with 80, 120, and 180 grit to smooth over any imperfections. Now I move over to the other side of the shop and drill the hook hanger, lead and thru wire holes. 3rd picture. I don't have a big old drill press yet, so this is all done with a regular 20v dewalt hand drill. In the next series of pics I bend .051" wire to go thru holes in the lip, then into the lure body all the way straight thru. I also bend little 'figure 8' hook hangers that will connect to the thru wire and act as the hook hanger. Some of the lures have a separate lead hole, and some will only get lead in the hook hanger hole (experimenting with different weights). I will sand the edges of the lips with 120, 180, 400, 1000 and wetsand with 5000 to get them very smooth and back to see through. I fill the lip slot and the thru wire hole with epoxy, then insert the lip and wire and hook hanger. Once this is dry I fill the rest of the thru hole with epoxy until it just shows up in the hook hanger hole. I also drill a small hole through the head of the bait all the way through the lip and use a thick wire to pin the lip in place as well. Then lead gets poured into the holes, and I use bondo (car body filler) to fill in the gaps and any other cracks to smooth it out. Then I dip the lure in polyurethane twice to give it a smooth overall surface and to seal the endgrain. You can see this in pic 12. Next comes the first layer of epoxy making sure to let the polyurethane dry completely and making sure there are no little nibs sticking up. I used and art resin called Ecopoxy Uvpoxy for the first time just to try it out (love it so far). You can see the lures on the lure turner in pic 13. Then comes the creative part. Prime all the lures with white spray can primer. I foiled some of them (pic 14 and 15). Paint in any design imaginable. There are many great resources on youtube, Instagram, right here in the gallery especially! Once painted I added lure eyes that I got from Lisa and Ed's eyes (https://lisaandedseyes.ipage.com/lure_eyes.htm). Then each lure got two more layers of Ecopoxy (pics 16 and 17)and now they are ready to fish. The lures spend the night on the lure rotator that I built out of a bbq rotisserie after each layer of Ecopoxy. This is my first tutorial, I'm still learning every time I step into the shop. It is a fun hobby ( our winters are too long anyway). I will have to take more pictures detailing some of the steps next time. If anyone has any input, ideas, questions or whatever, let me know. Thanks


-
Welcome here. If you can get the lip out, you can get lips from lure parts online, and probably several other websites. http://www.lurepartsonline.com/Online-Store/Lure-Lips/ If none of these seem to match, you can always go get some polycarbonate (not plexiglass), aka lexan, and make your own to fit.
-
How big is the lure you made? And what is the method you used to clear coat the outside (epoxy? uv cure?) Where do you suspect the lure to be taking on water? Maybe post a pic to see if we can help you better. Take Vodkaman's ideas to dry the lure completely! You do not want to trap moisture in there. As far as finishing, probably a complete layer epoxy like etex or other popular brands should keep water out, but depending on the lure, or where the water is entering this might be tricky (like joints in the lure).