-
Posts
461 -
Joined
-
Last visited
-
Days Won
28
Content Type
Profiles
Articles
TU Classifieds
Glossary
Website Links
Forums
Gallery
Store
Everything posted by eastman03
-
I've not had much luck with filling small areas either. I usually wait till the epoxy is cured, then do another complete coating which often does the job. Be very careful sanding down the cured epoxy as i have taken off paint in the areas where the epoxy didn't take! Very frustrating. That being said, the lures I'm making are large musky lures, so a bit of extra epoxy is not a problem. If it is a small lure, you may want to try a small repair, I'm not sure of the best way to do this though. It seems using a UV cured product can give you good results for small voids, but that is an entirely different setup.
-
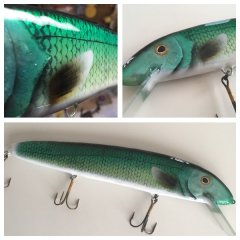
This is a 10” musky crankbait carved from cedar wood. Wire thru. Polycarbonate lip. This is my attempt at a Lake Winnipeg ‘greenback’ walleye. They have a very unique colour. The scales were painstakingly cut in strips from foil. Foil gill plated. Several layers of epoxy under the scales and on top. Painted and more epoxy. It was a fun build!
-
I'm not sure about markers, but make stencils! It doesn't have to be complicated. I make them out of just a piece of paper, or some tape, or a piece of thin plastic. They do the job and make the painting much easier! I'm no good at free handing stripes or detail compared to others!
-
Haha, I clicked pretty fast too.
-
Hey Skeeter, do you have a preference between oil or water based poly? Do you cut it with anything? I see some makers on youtube using poly and recently bought some for myself to try as well. I'm not to worried about dry times as I just let my stuff hang overnight.
-
-
I've used polyurethane, minwax wood hardener and spar urethane on cedar wood. They all do a decent job. For a real smooth painting surface though, a layer of epoxy (or superglue) seems to work best. But, I've never used balsa.
-
BBK - that baking soda trick with runny glue is a good one. I've seen Marling Baits on youtube use that for filling in some problem areas/divots. It seems to work well, because you can build up layers slowly to get the right depth and almost immediately move on to sanding. I also use bondo for most of my fills, but mostly because I have a larger holes (from lead or thru wire) in my musky lures. Looks like there are a number of good methods to do it! The spackling compound you are talking about BobP, is that drywall mud? I'm not sure what compound you mean.
-
Welcome here! Lots of previous topics on solving problems with topcoat, use the search feature, I know I have had my share of issues! This should be your starting point and covers pretty much all issues. If you follow these steps carefully, your topcoat should be perfect!
-
Salty's that last link is a fascinating read! I'm sure that research would extend out to any of the epoxies that we regularly use for lures. I think the scientists who carefully formulated those products would be shuddering at our need to simply mix volatile chemicals into the epoxy to make it more viscous. Obviously, doing so would be sacrificing some part of the characteristics of the epoxy. Also, by trying to get a more waterproof layer by thinning for penetration, we can actually do the exact opposite! Gentle heat seams to be the best way. Thanks for the read.
-
I had trouble in Canada here finding a store that would carry it, I ordered some .051" safety lock wire from Malin. Expensive (had to ship it), and it was to soft for my liking (should have got hard drawn instead of soft, but it would work just fine for most lures). I just came across Stainless Steel Tig welding rod! Cheap, straight as an arrow. Lots of different sizes and strong. I bought some .062 for my big lures. If you are making smaller lures, there are all sorts of sizes.
-
-
It would seem that maybe it wasn't lexan? I have some very old crankbaits that have been beaten and abused, and the bills seem as good as day one besides cosmetic damage. I don't think cutting it with a dremel would have affected it either. From what I understand with Polycarbonate (lexan) could become susceptible to cracking if certain solvents or cleaning agents have been applied to it? or maybe extreme cold?
-
Goo gone seems to clean up sticky residue left by tape. As far as epoxy spill over onto the tape, not much you can do, carefully cut it out I suppose.
-
No No! I take it back, send them over haha.
-
Just so I’m clear, this is not my bait! I wish. It is a nice technique that I want to try.
-
Hey guys has anyone ever tried using scalloped shears to make a scale look with foil? Time consuming, but I really like the effect! I will have to find some of these. This guy has some cool videos on testing screw eyes and wire breaking strengths too (I'm not affiliated or anything, just found it interesting).
-
A mesh bag of used golf balls at Canadian tire. Loofa's. A mesh bag protecting oranges worked well. I got some good mesh from a bag at work from high voltage switch parts. All over the place! I have everyone in my family keeping their eyes open for me.
-
-
If you look closely you will see these aren't lures! I was making some Christmas gifts, and figured these might look cool hanging in a basement bar. I tried to make the opener inside the lexan lip, which didn't work. So, I settled for a heavy wire loop parallel to the lip for the opener, it worked pretty well!
-
This has been an interesting discussion first and foremost! I appreciate everyone and anyone who is on here willing to share any knowledge or skills they have gained! I have learned pretty much everything about lure making from this site (and a few others). I think that even in some of the more 'heated' discussions there is information to be learned. I've only been here for a year or two and I thank the long term members for answering the constant barrage of questions about the more mundane aspects of lure making (even though many of those questions have been hashed over to death). I would consider myself a crankbait maker, as far as custom crankbait maker, that is something I'm just getting started in! Yes, I did attempt some copy's for myself simply to try and learn the process of carving, painting and finishing. But, my interest is in playing with designs and combinations of other lures. I pretty much only make musky lures 8" or bigger because I'm obsessed with musky fishing. The trend there seems to be combining aspects of two different lures to make hybrid lures for very specific situations that the fish have not seen. Like adding double 10 blades to a subsurface 'glider' for example. Anyway like Erick said, luremaking is alive and well. There are facebook pages loaded with stunning paint jobs and interesting lures! Lets keep sharing information and fueling the passion.
-
Simple green, I will have to look into that. I was just wondering the same question to myself. Also, I accidently soaked my air valve in restorer overnight and it loosened up the rubber gasket on the little air nozzle. I probably should not have done that, so just a warning I suppose, make sure you aren't soaking anything with a rubber gasket.
- 8 replies
-
- 1
-

-
- airbrushing
- cleaning
-
(and 4 more)
Tagged with:
-
Welcome back Tally! As a newer lure tinkerer the more experience here on the site the better! Everything I learned was basically through this site.
-
Like Mark mentioned, I use a cheap 3 gallon shop air compressor. I added an inline air regulator, and I also added a moisture trap. I paint in my garage so noise isn't a worry. I only have one airbrush and generally only paint two or three lures in a sitting. My compressor often only turns on once or twice in a sitting (usually scares the crap out of me haha, it is loud). All together though, my air compressor set up is quite cheap (less than $100, Canadian!) and it works well enough for my needs.
-
Thanks for the info Travis! I guess there really isn't a gap, it is just two different worlds kind of. Great looking carvings there. And as far as burning scales into lures in any numbers it certainly would not work! And I agree that the fish don't care, I was asking more for myself just expanding my own knowledge of what is out there. I'll keep looking for some of those carving tutorials that you mentioned and watching videos. Those carvers at the world fish carving championship are insane! I was also thinking long term, I would love to get good enough to make myself a replica of my first 50+" muskie, but that would be a huge undertaking!


