

eastman03
-
Posts
462 -
Joined
-
Last visited
-
Days Won
28
Content Type
Profiles
Articles
TU Classifieds
Glossary
Website Links
Forums
Gallery
Store
Everything posted by eastman03
-
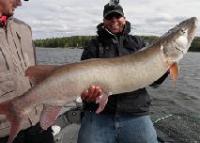
Thanks for the info Travis! I guess there really isn't a gap, it is just two different worlds kind of. Great looking carvings there. And as far as burning scales into lures in any numbers it certainly would not work! And I agree that the fish don't care, I was asking more for myself just expanding my own knowledge of what is out there. I'll keep looking for some of those carving tutorials that you mentioned and watching videos. Those carvers at the world fish carving championship are insane! I was also thinking long term, I would love to get good enough to make myself a replica of my first 50+" muskie, but that would be a huge undertaking!
-
Sounds fantastic. Welcome here and thanks Andy. Hope to be able to order it from somewhere soon! Although, it is often tough to get anything into Canada without crazy shipping prices. Either way, I'd love to experiment with a different topcoat.
-
I was looking at some youtube videos on how to carve wood more efficiently, specifically scale patterns and gills, and it seems most lure makers use a carving knife and just whittle away scales which is amazing and looks great! However I stumbled down the youtube hole into another niche of wood carving replica fish or wooden decoys. Those guys are incredible! They are basically making a giant lure minus the weight wire and diving lips, and they are amazing carvers! There seems to be a gap in tools and techniques from what I see compared to lure makers (I'm talking one off larger musky lures, nothing mass produced). They almost all create their amazing scale patters using wood burning tools, they even use it to burn in more details fin rays on the tail and the other fins. It seems like a efficient way of producing a very life like effect compared to the time it takes to painstakingly carve individual scales onto a lure. I think anyone whittling any type of lure could learn a lot from guys like hans the carver and many other award winning people who carve replicas (and paint jobs). Basically what I'm getting at is, has anyone use this wood burning technique to create scale patterns? I may have to get one of those tools and give it a try myself. They also are masters at using a dremel tools with all the different bits to speed up the removal and detail carving. One name that kept popping up is Hans the Carver, who makes amazing lifelike wood musky (and other fish) replicas. https://www.facebook.com/HansTheCarver/ Here is another artist in this video. Check out at 8:45 of the video where he starts making the burning scale pattern.
-
Do you have a picture of the clumping epoxy? Great looking lures by the way!
-
Vodkaman - Yea I see what you mean, CA glue would be great for that purpose. I haven't used it in that case. Can you slow down the cure time at all to be able to brush it on? Or is it workable as is right out of the tube? (Also, what do you mean you don't finish lures? out of curiousity.) I don't mean to get way off track here. I feel I'd go through a lot of super glue building 10-14" lures also.
-
If I'm making a prototype one off bait (which I often do, and always with cedar), I'll shape it as best I can and just dip it in spar urethane mixed with thinner and hang it to dry. That way I can add weight with a dab of glue or even tape for the purpose of testing. If I get into super glues or kbs, it becomes more difficult to change its shape or drill more holes for lead. The cedar is fairly resistant to moisture especially with a thin coat of spar urethane (it's usually not in the water that long for testing). That gives me room to play with it before I get the right amount of weight and shape and start the finishing procedure (once completely dried out), filling in the lead holes and wire. At that point I'll sand it smooth and put a coat of envirotex epoxy (or kbs or superglue) and paint and then final finish. Just the way I do it, lots of different good ways to do it!
-
The clumping of the etex could be a contaminated lure. It tends to pull away from any oils or contamination on the surface and bunch up or fish eye on another spot. As soon as you are to the painting stage, try to use gloves to handle it, or clean it with denatured alcohol (don't wipe the paint job off though!). Another potential problem depending on your lure is the epoxy will tend to pull away from sharp corners. I had this problem a bit with a large popper I made. The finish would draw back a bit from the sharp edge of the popper mouth. You could wait till it's a bit thicker to paint onto the sharp edges. I like envirotex a lot, it is a fantastic product. But it has it's difficulties. Mix very very well. I usually let it sit for 5-10 min like BobP said. I also use syringes to measure it (measured by volume, not by weight). I know I see on youtube guys lightly torching the freshly epoxied lure to remove bubbles, but be cautious, I've over heated one side of the epoxy by accident and had it run and "clump" as well. I'm still learning myself, there are some good tutorials on this site! Some of the most beautiful and clean lures are finished with envirotex, don't give up, there is a bit of a learning curve. Great tips here! I usually read over this like a checklist before I get started with enviortex! lol
-
Very interesting, good watch. There are a lot of good products out there. The one thing I'm not fully sure on is if there is a difference between a art resin for casting and a epoxy resin for something like bar tops (envirotex)? Or a product like Ecopoxy liquid plastic? Some of the resins are designed for thick pours and some are designed for thin coats. Yea great experiment. It would be interesting to see all these pieces left outside for yellowing testing. I agree with BobP, with the thin coats and a small amount of heat and brushing on, we are using these products basically outside of the manufactures specs. So, with proper precaution bubbles are usually not to much of an issue (at least for some, not myself entirely). Now if I could only get those darn fish eyes to go away.
-
That's awesome! I'm starting to dabble in the soft plastic world (hopefully). Although I may get red flagged here in Canada by even looking at that AR-15 box. haha
-
Fantastic! Thanks for the information.
-
That is a great idea! How was that made? Looks awesome.
-
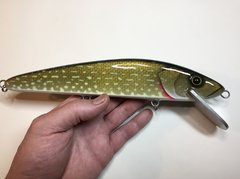
Excellent! How do you get that scale pattern in the foil? Or the gill pattern?
-
 Did you make your own stencil for the spots?
 -
I just use my big shop compressor with a inline air regulator that I installed and also a inline filter so no oil or water gets in there. Works good, I can spray for quite a while before it turns on, but when it does it always scares the sh** out of me haha. I have a 6 gallon shop compressor, I had a smaller one first which worked but was always turning on and was difficult to regulate the air. I'm working in my shop, so noise isn't a factor. If you are doing it in your house or somewhere noise matters, look into one of the on demand air compressors for airbrushing. I don't have any experience with those. Welcome to Tackle underground by the way! Everything I learned was basically off this forum, and youtube videos. Lots of good help here. If you use the search function, there are many good topics already covered in the past too!
-
 So sick as usual, the epoxy work, paint job, thru wire. Everything, flawless. I'm striving to have a finished lure like this! Nice work. Do you have any youtube tutorials?
 -
Thanks Mayberry_Baits, how have I never come across her channel. Lots of great tips and paint jobs!
-
So awesome. Question for you (I asked in the picture also), I see on that one lure you have a random stripy pattern on the top, I was just wondering how that happens? I've seen a few guys do that and I really like how that looks.
-
Friend of mine has a youtube channel and makes incredible videos of all sorts of fish. This one had me laughing. He is quite the character. It also makes me think about all the detail we put into lures of every sort and how much we overthink them. I'm guilty of that myself, fully knowing the fish don't care how nicely my gills are carved, or how many layers of epoxy there are. I love the detail for the artwork and quality of the lures. Either way, this video is hilarious.
-
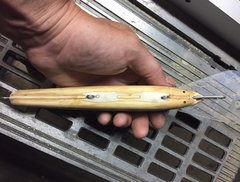
It still floats, but just barely. I'll see what it does when I add hooks and wire. I've never attempted to make anything neutrally buoyant, but this might be the project to try it on.
-
I'll let you know how it goes. I sawed it in half the long way to make a longer blank. Looks like it will end up being some sort of jointed swimbait.
-
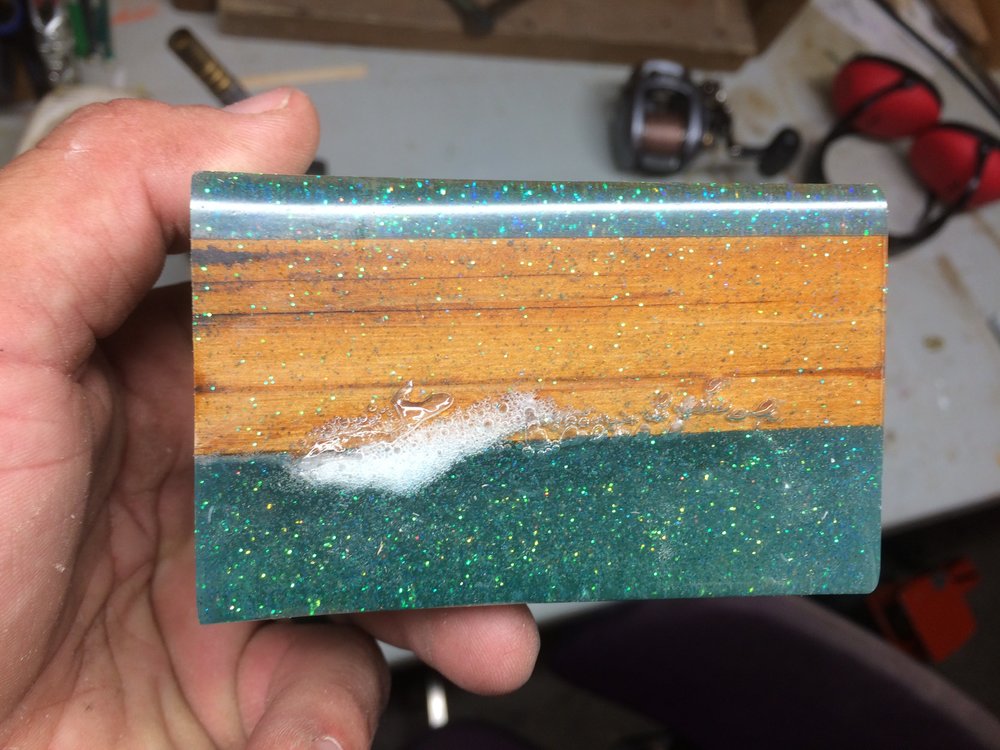
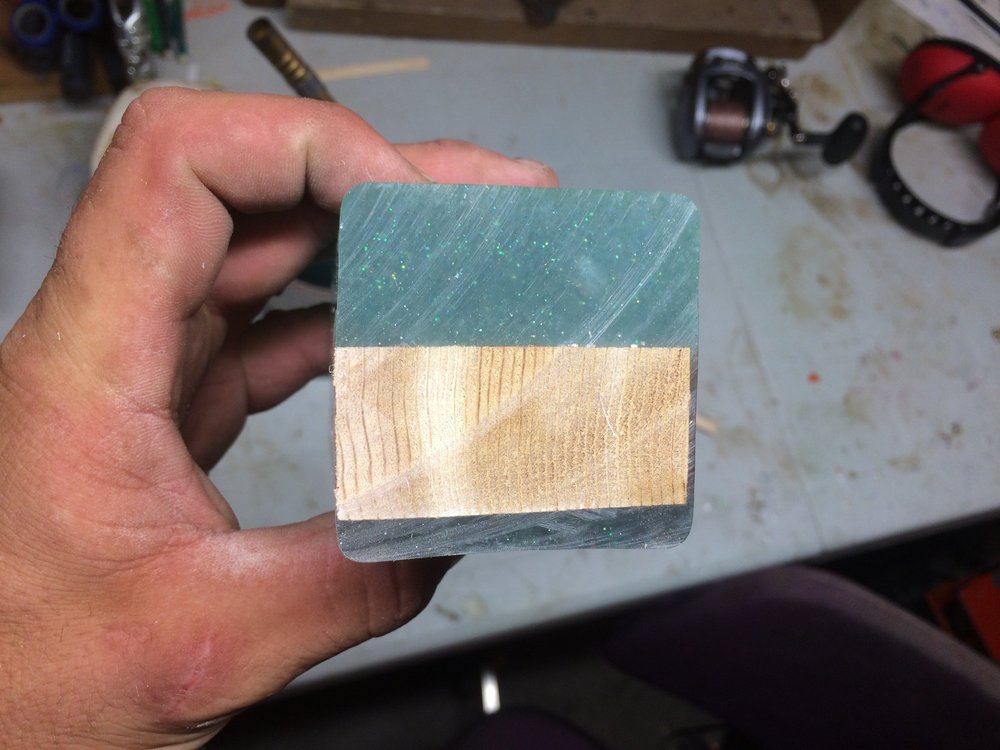
So I had some extra epoxy(ecopoxy) and I wanted to try something with it. I made a rectangle mound and put a piece of cedar in with it and filled the other half up with the epoxy and some glitter. So far it turned out looking pretty cool. Has anyone tried anything like this? I put the block in water and the epoxy is heavier. So whatever I make the wood will be the top. Was just not sure what to make quite yet, or if anyone has dabbled with this?
-
 Love it. I've started filling the slot on my lures using this method. Works so much better than filling the entire slot with epoxy! Neater and stronger probably. How do you cut thin strips like that? What works well?
 -
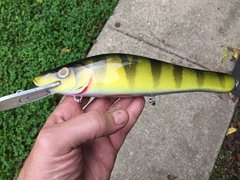
 Cedar. Wire thru. My first real attempt at carving fins and gills.
 -
 Cedar. Wire thru. Pressed foil. Epoxy. 5 inched overall
 -
So I was having some problems with my Envirotex epoxy just recently and I figured I would post what I just found about it. It is probably common knowledge but it saved me from throwing out a good batch of etex. The epoxy I was using on the lures was curing just fine but I had little tiny imperfections (not bubbles) and it didn't appear to be dust. Just some small lumps and voids (probably only noticeable to me when I was scrutinizing it after). I had my etex inside so it was at a good room temp and humidity, but at one point or another it must have been exposed to a bit cooler weather. Well, what I found was some of the resin bottle was crystallizing. This appears to be very common when it's exposed to cold weather. The hardener bottle was still fine. So I though it might be garbage but by heating it up properly, you can liquefy the little crystals and it becomes perfectly usable again! phew. Now I know this is probably common knowledge to most of you, but I was relieved to solve at least that problem with my finish! Here is a good page I found that talks about resin and how to fix it. https://theepoxyexperts.com/coldweathernotice/


