eastman03
-
Posts
461 -
Joined
-
Last visited
-
Days Won
28
Content Type
Profiles
Articles
TU Classifieds
Glossary
Website Links
Forums
Gallery
Store
Everything posted by eastman03
-
I blows my mind watching these tournaments how intelligent and knowledgeable those anglers are. They know the difference between all the grasses and weeds and movements of the fish and tiny ledges down 20 feet deep (or maybe they are just bs'ing me, but it worked). What is more amazing often is that in the same day on the same tourney, guys fishing with plastics in 1 foot of slop can slay bass at the same time as a guy fishing a 20 foot ledge with a rattle trap slaying bass. I need to take that fact and apply it more to muskies and all other fish. There is often a 'trend' or rut that you get stuck in - in july fish are only shallow (for example). When in reality, on any given day, there are active fish in several different depths and ecosystems.
-
Old post, but great read! My other hobbies, play volleyball (not quite as good as i used to). I've been hit by a bug, and an appreciation of vintage wood working equipment. Specifically pre-WW2 era. Just a certain quality and "weight" to these amazing old machines. I love the Beaver equipment made in Canada. Hope to have a huge collection someday. Along those lines as well, I've fallen in love with artifact hunting. I have had the opportunity to do so for years, but never cared to much. But these days, I love nothing more than walking the banks of the mighty Winnipeg river and looking for arrowheads, or any such artifact. I've found a few amazing things. As I get older, I seem to have more of a connection with the past.
-
Why the heck do you think we are on here building baits? lol Long cold winter. Ice fishing, whiskey, making stuff (not all those things go together). Yea, you get used to it. Makes you appreciate those sunsets out on the boat on a nice summer evening that's for sure. I don't take any fishing day for granted. By the time we get back to -10C, it feels like t-shirt weather again. Climbing hydro poles all day at -35C keeps me warm enough, pays the bills too.
-
Look to the bass lure isle. Most musky lures are upsized versions of these bass lures. There are still quite a few that haven't been commercially upsized and "muskiefied". I've tinkered with a few just for fun. Giant poppers. Large size ned rig? I wonder if a muskie would bite a huge wacky worm? That would be interesting lol. Upsized wake bait. Like a big Mann's one minus would be cool for spring I think.
-

My continuing pursuit of perfection (and efficiency)...
eastman03 replied to exx1976's topic in Hard Baits
Wow! Sounds like you are set up alright! Nice work. Jigs make it all the steps easily repeatable, sounds like you are well on your way! -
ohhh so close, I've been lucky enough to guide for several years in a smallmouth paradise at Eaglenest Lodge, Manitoba. Nice one!
-
Oh man I see the confusion. I don't want to slander any bait maker, that wasn't the point at all either. The two pictures were from two different baits. The one with the open eye is from the HL. I've had more than one problem with more than a few baits.
-
Yea, it crossed my mind as well. And I wouldn't totally rule that out. But the bad areas were the opposite of the tape. Like I tapped the gold glitter area, and the green area and painted black around the tape. So the residue would have been on the spots where the epoxy was good. And I didn't use tape at all on the all black back one in the front of the pic.
-
One thing that I was happy about so far with these lures is that this was the first run I tried with the slot on the top method, just for kicks. And I was worried about there being a noticeable line down the top. But without any of the hook hangers in the way, plus some epoxy as a base coat, it easy to sand, and is as smooth as can be (minus the black paint/epoxy issues). The hook hangers on the bottom came out pretty clean as well. It's a bit of a pain, but overall, not tooo much more of a pain than a regular slot method. I think of all the methods, the drill through/fig 8 hook hangers, is still probably my overall favorite. But they all work, and have their merits.
-
Yea I hear ya. I only get to tinker a few evenings here and there between kids and work. I don't have a problem waiting in between steps. Thanks I'm glad I have wood heat in my shop as its -35 C here right now. lol
-
I've used spar urethane cut with thinner before. It seemed to do the job. I can't remember why I changed away from it. Stinky? lol That wood hardener is crazy, how it makes the wood like a rock. It is hard to even sand afterwards.
-
I think it’ll work. Probably pretty shallow, like 6-7 feet? with a big slow wobble. I’ve made one similar looking with a 12” body as well, my lip was slightly smaller and it basically didn’t do anything. I think you have enough lip to give it some action. Let us know how it goes.
-
I totally remember you saying now that you remind me. Yea I’m pretty sure a quick clear with something solves this problem. I’ve never used the rustoleum stuff. Might have to try it too. Thanks. how fast does that stuff dry? Like how soon after would you clear coat roughly?
-
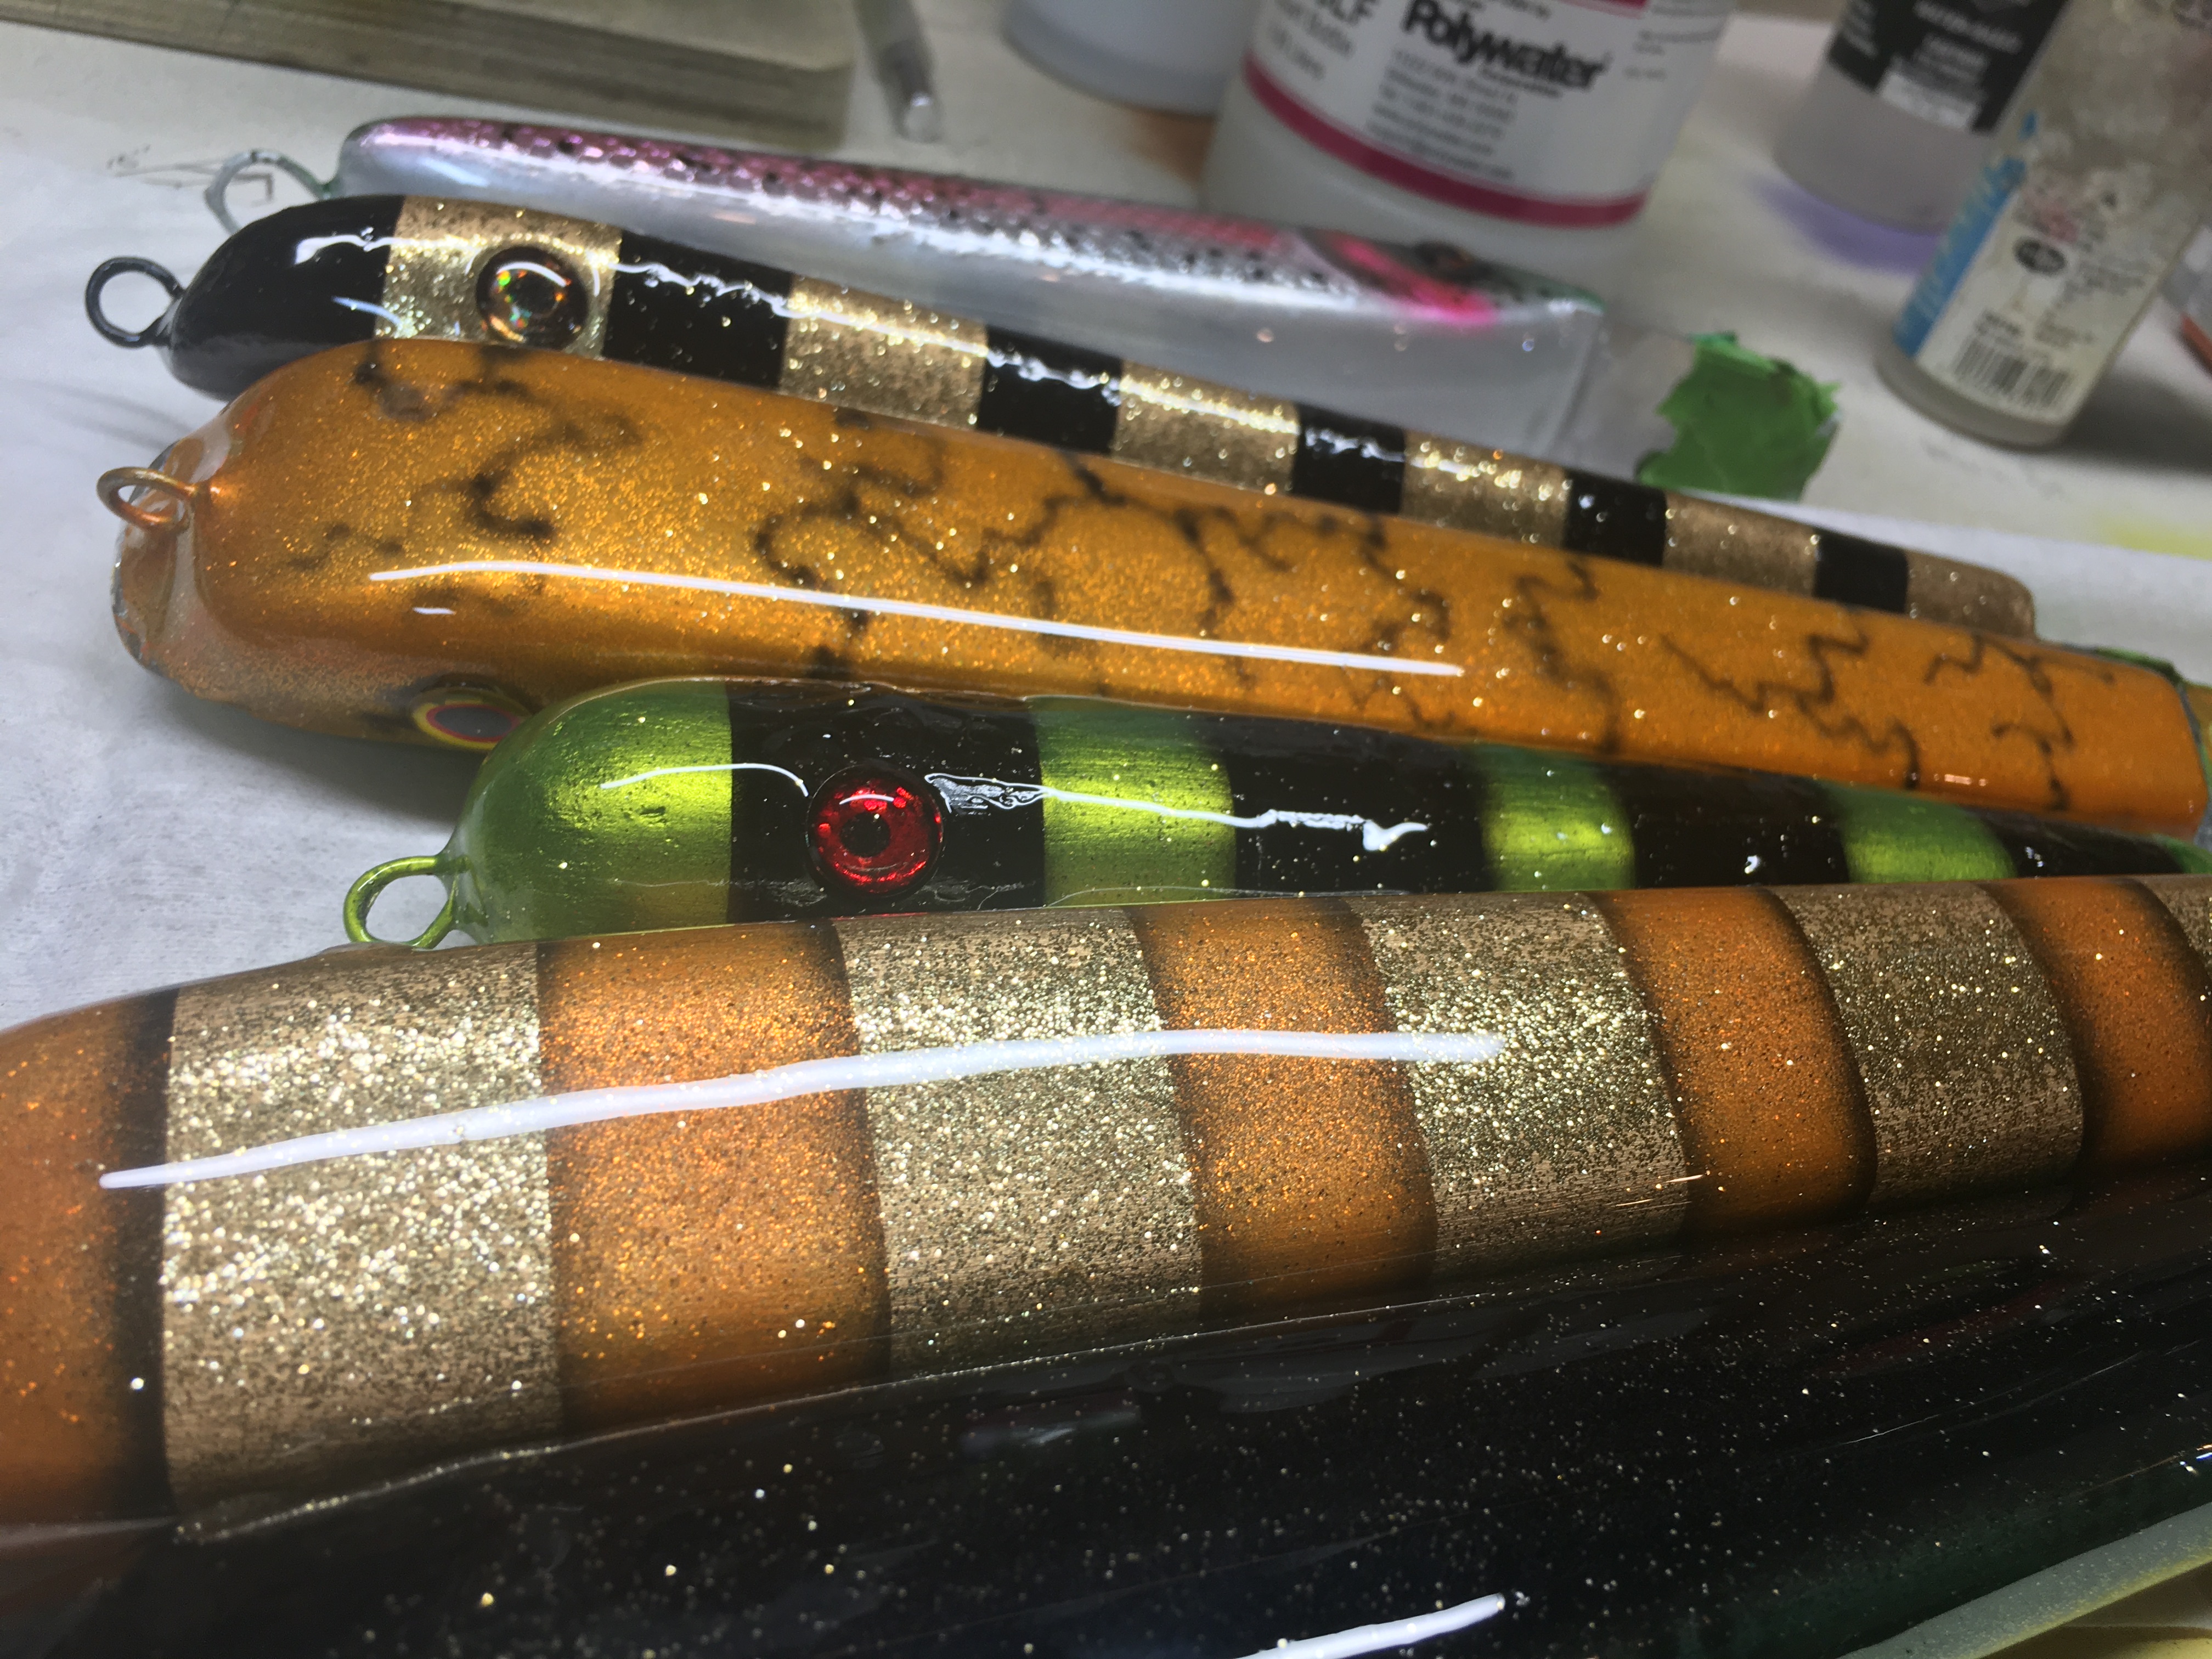
So this is a new one for me. Honestly not a big deal as the lures (not the rainbow trout bottle opener) are just for me to beat up and made with different weights and lips to test. So even the paint schemes were done pretty minimal. I checked on the final epoxy this morning and thought oh boy, I must have contaminated the lure because the epoxy was very blotchy. Especially the second black and green one. I wasn’t particularly careful at all. I also thought maybe I torched them a bit to much? Although I didn’t think I over did it. the paint was dry as it had been at least a day since any of them had been painted and heat set. As I inspected the two bottle openers and five lures I epoxied it was pretty evident that some of them finished very well. Like the two bottle openers (phew, I had spent more time on those for sure). And the two orange lures were pretty much flawless. On inspection, it was clearly only the black areas on the other three lures where the epoxy had been blotchy. It was jacquard airbrush acrylic paint, which I’ve used before. Even the green stripes on the worst lure (second from bottom) was pretty smooth compared to the horrible black stripes where the epoxy pulled away and globbed. Anyway, like I said, I’ll throw another coat on and they will be ready to fish for myself. It really pays off on my quality lures to go the extra step for getting a good finish. Like on the rainbow trout bottle opener, I prepped for epoxy by spraying the surface with polycrylic. And ensuring that once the wood work was done, the surface was kept clean. anyone ever seen this happen?


-
I like the look of a tapered bait like the one on the left. As far as action on a crankbait, I don't *think* it would change much. Lots of flat sided cranks out there. Way way way easier to router and build the flat sided one. Which is why that is the choice for lots of lure builders I would imagine. As far as a glider, I have much less experience. Hellhounds are pretty much flat sided, as well as phantoms, so I could see it that shape working for either one.
-
haha on no! I've been there. I can bandsaw thin shims pretty easy, and use my belt sander to get them down to the right size real quick. And yea I've done it frantically after i've mixed my epoxy lol. Baits look good! As far as the RAS, I have heard that it is a finger destroyer. But it is about as safe as it gets for simple cross cutting. With this jig clamped down, I don't have to even have my hands on anything except the handle of the saw. That is what I really wanted overall. Those guards came with the saw. Pretty neat, but I don't think they would help at all for a quick climb cut into your hand if it were in the wrong spot. I love watching "Frank Makes" on youtube, and have learned how to use a RAS from him. Never have your hand in the cut line, no matter what. Just good practice.
-
@Big Epp this was that jig I made for my radial arm saw.
-
This was asked about on the other forum post, so I figured I'd start a new post. This is how I cut my thru wire slots. Radial arm saw works well for this purpose as I can visually line it up as far as depth. It isn't much of a jig, but it does the job. I just made that all the pieces were perfectly perpendicular to the RAS fence. Then as long as I have one straight side on the lure blank to reference against the small "fence" on my jig, it allows the saw to cut straight along the lure body. I would like to get a thin kerf saw, but RAS saws should have a negative hook blade angle to prevent the saw from pulling aggressively through the wood, and those blades are hard to find it would seem. I haven't ever had that happen, but that would be a surprise I want to avoid. I put some scrap piece under the clamp to just hold the lure blank up against the perpendicular fence of the jig with some pressure. **EDIT** that piece of wood in the jig isn't a lure blank, I just threw a cut off piece in there to show where it would go.


-
Search the form for ballast calculator. There have been many discussions on this in the past about buoyancy and density and weight etc.. Here is an example Epoxy weight and/or density? Buoyancy spreadsheet questions - Hard Baits - TackleUnderground.com If you know the density of the material you are using based on the grams per centimeters cubed measurement, you can use the woods weight in grams, or volume in cm cubed to figure out exactly how much lead would get you to achieve neutral buoyancy. Then you could add/subtract as you desire. This is all based on Archimedes principle which I "understand" barely lol. It's all about the volume - my mind was blown when only even kind of understood that. The good thing is! @Vodkaman has put together a ballast calculator spreadsheet that lets you plug your numbers in and much smarter/technical people like him have done the legwork for math and putting it in a simple to use spreadsheet. I, like a lot of builders, use much more trial and error method. But the calculator has helped me to hone in on the correct number very quickly!
-
Here is a video from solar baits. He shows pretty much exactly how to do a version of through wire. Very talented lure maker. He manages to get a layer of epoxy down before putting the lip in. I would have thought that would have been an issue. But I’ve never tried it that way. https://youtu.be/ECW9f6sNomA
-
I like to saw the slot in the lure while it is still in block form. My preferred tool is the Radial Arm Saw. It makes this task super easy. I'm sure a table saw wouldn't be too hard either. I made a simple jig so I can repeat the same cut with the RAS and quickly line up the center and depth (and keep my fingers outta there). It does allow me to also cut a slot, on a bait while it is formed to if necessary. A flat sided bait makes that even easier. It probably unlikely that most guys have a radial arm saw. That is my other hobby, collecting vintage equipment from the 40's.
-
Yea, I use a small palm sander to do most of the work. But, with practice, you will be able to get it to the point where you only need minimal sanding overall. I think a 1" belt sander would be amazing. That might be my next purchase, or that tiny hand belt sander. I'll use a scalpel to wittle off anything large around the hook hangers if there is. Then a quick sand with my palm sander. Then a bit of hand sanding/light filling to finish. I'll say this too, with bondo or epoxy, sometimes it's tricky to sand just the epoxy down. The filler is often much harder than the wood, so it can be tricky to work the filler down, without changing the shape of the wood too much. Again, do it a few times and it gets pretty easy. If you are using epoxy as a base coat before paint, it fills in and hides alot of little tiny imperfections, and still leaves you with a perfectly smooth base for painting.
-
 I like the use of a logo with the water slide paper. Looks more professional than my messy initials! Nice work
 -
ahhh but I want it nowwww. That is a good idea Hillbilly. I've seen engineered angler do it as well. Make adjustable or multiple tow points, or weights. I should make myself some screw in weights so i could really test a lure out. I really wish i had somewhere to test it through the winter as i usually have to wait several months between building and actual tests. A bathtub is difficult to test a 8"+ lure. I can do float tests, so I'm a best guess kinda guy as well. Documenting all the weights and placement has helped me lower that learning curve. I will also usually build 4 or 5 test lures "quickly" and have varying components to try to hone in on the ideal action.
-
UKandy let us know how these test blanks work based on the differences of weight/hook placement. I'm making a side to side top water (prototype) and just guessed at where the best weight placement would be. I would think you'd aim for a level fall with the weight close to the center of the lure to act as a pivot kinda? But I really have no idea.