Kasilofchrisn
-
Posts
967 -
Joined
-
Last visited
-
Days Won
45
Content Type
Profiles
Articles
TU Classifieds
Glossary
Website Links
Forums
Gallery
Store
Everything posted by Kasilofchrisn
-
These jigs will mainly be used ice fishing in freshwater lakes and jigged vertically. They will not see the abuse my powder painted saltwater jigs will see. While nothing can truly withstand the rocks I have seen pictures of my vertical saltwater slab jigs where the bottom is mushroomed out pretty badly and yet the rest of the paint is holding up fine with no chips or missing paint other than where it is actually mushroomed. That bottom eye is stainless.
-
Well I ordered some DN MCU to try. As suggested i will look for a small cylinder to dip in . My stepson has agreed to help me and so either way it should go quicker with his help. He is 14 and has been wanting to learn to make jigs for awhile now. It's hard to let him help with customers jigs though as mistakes get spendy fast especially when you consider I make some mistakes myself and I sometimes think I know what i am doing. If one works significantly better than the other I will let you know. This will help me decide what to use on future projects like this.
-
The only reason I thought MCU would be better is that I was thinking the dip process of MCU would be simpler and easier. I am planning to send 100+ jigs out to a couple of remote villages. Some to friends in Bethel and some to a school teacher on one of the yukon villages for his class project of fishing. These will be between 5/8 oz and 1 oz slab jigs for pike fishing through the ice. They will be mostly powder painted which only needs the eyes sealed but some will be foiled jigs that need an entire topcoat. I like the D2T but thought the MCU would be quicker and easier. I'm leaning more and more towards the D2T as I have a bunch of it in stock already and I know it works well. I may just have to stock up on epoxy brushes.
-
So I have been toying with these foiled jigs and I'm really liking them. What I now considering is different clear coat options. The D2T works well and I like it. That being said MCU would be thinner and possibly easier with just dipping instead of brushing. I haven't yet penciled out the cost factor yet. I know MCU has storage issues and would require a can of Bloxygen which would add to the cost. What have you guys tried on jigs? Would it even be woth trying the MCU or is the D2T( which I currently have plenty of) be the way to go? Durability is a factor as well and I think the D2T would get the nod for that. So whats your opinion on clear coats for jigs that will require it?
-
I don't know if you have checked out my Foil a jig thread but I have come up with a way to add holographic foil to a jig. It isn't heat shrink tubing but a adhesive binder applied and heated with foil added and pressed onto the jig. You can see pics and instructions in that thread located here. http://www.tackleunderground.com/community/index.php?/topic/27948-how-to-foil-a-jig-like-this/ hope this helps you out.
-
So I decided to do a breakdown on the costs of this project. The foil cost me $21 for 3 rolls shipped to my door.Each roll is 3" wide by 100' long enough for a ot of jigs. A quart of adhesive foil binder was $29 shipped to my door. This is enough for hundreds if not a thousand + jigs depending on size. The vice was $22 picked up at the local hardware store. Carpet sample was $2 at the local carpet shop. They would have given me a free cut off piece but they throw small scraps away and I didn't want to wait so bought the sample piece. I had the D2T and 3D eyes in my shop already.But they did cost a few $$. On the other hand a powder painted jig also uses some 3D eyes and epoxy. So maybe an extra few dollars in epoxy, epoxy brushes,and mix cups for the prototypes. Hemostats,needle nose vice grips,paint brushes,heat gun etc. were all items I had on hand in my shop anyway and are reusable. The binder is water based so you can simply wash and dry your binder brushes and reuse them. So I have roughly $80 invested and have lots of foil and binder left to make a lot more jigs in the future.
-
I also flux in my lee pot. I use beeswax and a table spoon from the thrift store that cost ~25 cents.
-
I tried a powder paint clear over a foiled jig today. It didn't turn out so well. The D2T was a much better option. The powder clear didn't harm the jig but it dulled the foil seriously enough to make the effort of foiling a mute point. I also tried powder painting the jig in addition to the foil and that did work out fine. So the foil will hold up to powder painting. I didn't cure it but I predict it will go over fine in the oven. I used my powder paint airbrush to add the powderpaint. We need to get a few other members playing with this foil so more ideas get flowing and experimented with.
-
Possibly. I have checked into heat presses but not super seriously. What I have found is the ones I have looked at are flat with hard surfaces and one sided on the heat. My jigs are not completely flat sided and I would like to do both sides at the same time. If you watch the original video I posted they do both sides at once and their heatpress is not flat it has some sort of covering over the heat platens that molds to the shape of the jigs. You also need to make sure the one you buy opens far enough to accommodate the jig you have. Some of them open just far enough to accommodate a t-shirt or a ball cap yet others do objects over an inch thick. So make sure you buy one that will work for your application not just because it is cheap.
-
I'm putting quite a bit of pressure with the vice. Probably more than I really need to. The first one I did I just rubbed the foil on with a round metal brush handle.it worked but not as well and was hard to press into the detailed areas. Really what I am accomplishing is the poor mans heat press. Key points heat and press. A food saver bag isn't going to hold up IMHO to the 325*f needed to kick the binder over. I haven't tried it cold but the binder does require heat and i'm assuming it requires heat while the foil is binding. I have to use hemostats to hold the jigs 1) to keep the binder from getting rubbed on my fingers but mainly 2)because of the heat. I'm not sure how it would work getting the hot jig coated in foil into a bag and then sealed anyway. The hemostats get pressed in my vice with the jig out of convenience. But It is also very quick to go from heating the jig with the binder on it to putting on the foil and right into the vice. While the jig and binder are hot the foil gets pressed on. When it is cool the foil is bonded. My vice was $21 and that's AK prices lower 48 should find one a few $ cheaper. The carpet was $2 as an old sales floor sample. I am sure I could have found some free scraps if I looked hard enough. A heat press new is $300 for the cheapest model. I haven't looked for a used one but maybe a guy could find one on EBAY. Shipping would also be a killer on something like that as heat presses are quite bulky. So for now this works for me and is a "poor mans heat press".
-
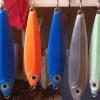
Here are some more pics. As you can see the carpet in the vise makes the foil conform to the jig really well. Almost as if it was vacuumed sealed to the jig itself. Since I didn't want foil in the 3D eye socket I left the glue out of the eye socket and there was no foil there. So where ever you put foil binder you will have foil and wherever you don't put binder the foil won't stick. I start by measuring out the foil so it is as long as I need it. I cut 2 strips one for each side. On small stuff I can cut the strips I have in half or even smaller to conserve on foil. I have found locking the jig in a pair of hemostats for smaller jigs and needle nose vice grips for larger saltwater stuff really helps. I lock the jig in then use that to hold it as I paint all sides with the foil binder. I then heat all sides to at least 325*F to set the binder using my Heat gun. I apply the foil to each side loosely then clamp in the carpet lined vise hemostat and all. When I feel it has cooled I remove the jig holding on to the hemostat so the jig doesn't fall. Remove the plastic foil covering and voila you have a foiled jig. I then [paint the seams with metallic silver paint. I topcoated some with D2T and it worked well and was clear enough the foil easily shines through. I have added 2 sided tape to hold the carpet in the vise for ease of use. In between jigs I re fluff the carpet fibers. It only take a couple quick finger rubs on each side. In the pics the larger jig is 8 oz and the smaller one is 5/8 oz so this works well for all sizes of jigs big or small. My next experiments will involve using my powder paint airbrush to add other colors or to color other parts of the jig that are not foiled. If we can get some more forum members doing this technique I am sure we will all be making some incredible foiled jigs in the future and come up with some amazing designs.. This is after adding 3D eyes and a D2T topcoat. As you can see it is hard to get a picture that does the foil justice. It's just that reflective.
-
Yes I will get them made to send out. I'll put you down for a half dozen 24 oz jigs? I normally get $20 each for them. You can all mail a check to Roust-A-Bout lure company P.O. box.................. On a Serious note have you ever tried to photograph reflective foil? Not the easiest task to get it to look like it does holding it in the hand.
-
I'll get some more pics soon. It's going good overall. I picked up some silver with metal flake rc paint from my local hobby shop to paint the seams. Then I need to epoxy the eyes and the entire jigs as a topcoat.. I'm guessing the pics will not do this foil justice. I am working on wrapping a smaller jig in the foil to eliminate one seam. Wrinkling is an issue there though. One piece of foul on each side works pretty good. I have small and large jigs and they all seem to be working fine with this.
-
The carpet worked awesome. The wood vise helped a lot. It appeared as though the foil was vac sealed to the jig when it was done. I am really liking this foil jig look. I just need to do the paint on the seams and an epoxy topcoat and see how well they turn out.
-
Ok so here is the foil bonder I used. I applied a light coat to the jig then heated it using my adjustable heat gun at ~400* seting. I applied the foil and pressed down on it with a rag and smoothed it out. After it cooled I removed the plastic overlay that the foil comes on and was ready to do the other side. The foil I used I bought on EBAY. It was for a Kingsley foil machine for paper foiling I assume. It came on a long roll about 2 or 3 inches wide. Here is the result. Sure it needs refining but it is bonded completely and only needs a topcoat to seal it on. I have some carpet samples and I am going to try using those in a vise to secure both sides with foil at the same time. I am thinking the carpet will conform to the jig and help it bond properly. The foil wasn't that expensive for 6 rolls. and The foil binder with shipping was $30 for a quart tub. That's enough binder to do hundreds if not a thousand or more jigs. I used an 8 ounce jig for this test as a bigger canvas was going to be easier to work with for the first time. I will work with other sizes later as I get to improving this technique. I may eventually buy an inexpensive heat press but that comes much later as they are expensive to buy new. I will also be applying paint with an airbrush for the head and the seams of these jigs. I hope this helps you guys out.
-
Something I read on here that works real well for me is the 2 forceps/hemostats method. Grip the hook bend with your hemostats and heat the jig over the heat gun. Then using a cold pair grip the hook eye and dip in your fluid bed. Using this method the jig eye is clean and the cold hemostats do not have paint sticking to them. Using pliers/hemostats to heat and dip results in a clean hook eye but paint builds up on the hemostats and becomes a problem after awhile and needs to be cleaned off periodically or it can get on jigs of different colors messing them up. The other method is to heat a needle or paper clip(stretched out) until red hot on the tip and burn your way through the paint. One of my pet peeves is a paint clogged jig eye so keeping things clean from the start work great for me. I also recommend the jig racks TJ's tackle sells. They allow excess paint to run down the hook shank where it is more easily removed. It also prevents you from having nipples on the heads of your jigs from excess paint and hanging by the hook.
-
We'll I got to playing with this today. Third try I got it to work. I used a liquid foil bonding adhesive. My laptop is in the shop and I'm posting from my phone. If we had tapatalk I would post some pics now. The jig does need a clear topcoat. The process does need some refining but I'm confident I can make it work better in the future. At least for my personal needs. Production runs would require more/better equipment. I'll post a better write up later.
-
I understand what you are saying Bob. Sometimes though a person wants a size of an existing jig they cannot find a mold for. I understand a mold maker not wanting to make an exact copy of a Do-It or Hilts mold.But sometimes you want a size bigger or smaller than what is available in a cheap sandcast mold. If I had been able to find bigger molds for what I wanted I might not have ordered my molds from you. Boy am I glad I did order them though. It can also be frustrating to find an old mold on EBAY and sometimes you end up paying more than you really wanted too because someone else wants the same thing. I once paid close to $100 on EBAY for a do-it mold no longer in production that is a very popular mold. It took well over 6 months of looking and biding on and loosing one or two other molds before I finally decided to pay what I did and get what I wanted. I could have most likely had one CNC machined for $150 (it's a fairly simple mold) and had it much sooner.
-
I own a few hilts molds.Most pour just fine but in my Storm sinker molds the sinkers stick really bad. I bought the mold then didn't cast from it until after the warranty was up. My mistake for sure as I wish I would have returned them under warranty. I guess that is something I should do with every new mold. Cast from it right away even if I don't need the castings for awhile. I think I can fix my bad molds with some emery cloth when I find time. Their molds are made in California if I remember right. At least thats their home address. I did one time receive a mold without handles(removed for shipping). The other mold in the box had handles with it. After a couple days of phone tag they sent me a set of handles no charge. I guess it's your call to either take the risk with Hilts or buy a CNC mold from Shawn collins or CNC molds N stuff. http://www.cncmolds.com/contact.shtml I would recommend either of these companies. I have used both of them and have always been happy with them. A bit spendier for sure but you get a great mold and it's exactly what you want.
-
I'm at work on the slope now. Here in the Arctic things are different then where I live in Soldotna. Yes it melts off several times before it finally sticks. I actually love the snow. I wouldn't trade it for the Florida heat EVER. Hopefully I can find time this R&R to get some experimenting done on this foil jig project. More stuff I need to do keeps popping up all the time.
-
I am at work now and we have a snow storm. Slushy snow is blowing sideways and making a mess of things. First snow was August 28th. Can I send some snow your way?
-
I ordered a fewof these to try. Still they don't off the holographic foil finishes many of us are looking for.
-
I think Powder paint would be sifnifigantly cheaper than Alumidust. Is there a particular aspect of the Alumidust that appeals to you? You could also ask the question on the Alumilite forums and get the manufacturers answer.
-
I would but the river has been at or near flood stage for several weeks. Literally our two main local rivers have been extremely high due to heavy rains. I will get some results soon enough though. I did just order some paste glue made for foil adhesion on screenprinted T-Shirts. I am hoping it is easier to apply than the glue type ink and powder I bought. The ink and powder method is used for paper foiling.
-
I haven't yet got around to experimenting with it. I have been busy with putting up fish and berries. Fixing my house up and making jigs for customers with my existing powder paint finishes etc. etc. Hopefully this time home i'll get to it. I work in a remote camp where I fly to work for 2 weeks then fly home for 2 weeks at a time so I am only home 1/2 the time. Of course when I am home I have time normally but summer is a busy season and this house I bought last fall needed a few repairs I had to get done. Like I said I hope to get to it but It is Duck season,and moose season and bear season and grouse season and the silver salmon are in and and and.........