


barrybait
-
Posts
397 -
Joined
-
Last visited
-
Days Won
12
Content Type
Profiles
Articles
TU Classifieds
Glossary
Website Links
Forums
Gallery
Store
Everything posted by barrybait
-
Thanks Moose. I finished out the bait and it looks good. Not as distinct or accurate as the target bait but I think we are very warm as far a figuring out how "to get this effect". A little different material and probably a lot more talent with the airbrush but we are closing in. I first painted the bait dark moss green. I heat cured the paint for durability then I clamped my two aluminum grid shells around the bait with alligator clips. Then I shot the white. Got carried away and nearly eliminated the dark fine edges I wanted to maintain. Then angled the brush with the purple, blue, and then the moss green over a comb. Other touch up stuff but you get the idea. My wife found some other grid which is much finer and a little flatter may be even better. It was in my shop! Go figure.
-
Here is my first trial at this pattern with the gutter guard mesh. It is unfinished, I didn't do the gill plate, just wanted to see if it would work. Tried on a spare 1.5 squarebill which had some texture which made it a little more challenging also but I am still encouraged with the results. Oh yeah, haven't clearcoated either so this is a rough unfinished trial. Now if I only had some airbrush talent and if I am able to get the pic on here it will be good... Trying again.
-
Trinity Lure Company contest entry (Hard Baits)
barrybait commented on TrinityLureCompany's gallery image in Best Hard Bait
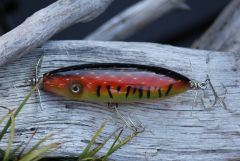 That's a fine raffle win for someone. Absolutely beautiful. I love the scale mesh, looks like the white shines from the inside with amazing consistency. Great job.
 -
Might have figured it out! This morning I was in my Dad's shop and walked past a roll of aluminum gutter guard material. It is basically a 6" wide roll of aluminum expanded metal. It is easily cut with good scissors and shaped to the lure. It has the depth and integrity to provide the distinct pattern and thickness for the angled painting allowing for the white'ish back of the scale to remain and still maintain the crisp pattern. I haven't tried it yet but feel it might be the answer. If you understand what I am talking about it is expanded metal but not flattened. Easily cut with scissors being aluminum you can shape it by hand and it retains it's shape. You can make two sides and clip them together clam-shelling the bait and start painting. It's directional but we can figure it out.
-
The following are lures that I have had trouble obtaining good quality blanks for: I haven't been able to find a good suspending jerkbait similar to the ito vision 110 or the lucky craft slender 112. They look good but don't suspend, they all sink. Latest I tried was Predator Baits was the closest I got to suspending. To get it to suspend I have to use smaller hooks that you want. I have even tried putting the ito vision hardware and hooks on and also the lucky crafts. Got the one to suspend but I had to leave the middle hook off. Lipless crankbait blanks....I have used do-it blanks but they are not as stable as rat-l-traps that I have stripped and repainted. Anyone have a good lipless crank similar to 1/2oz rat-l-trap or the lucky craft LV500? I have all the 1.5 and 2.5 options I need except a deeper 2.5 squarebill similar to the Lucky Craft BDS4 if anyone knows of a good blank for this.
-
Wow! Airbrush recommendations are heavily weighted toward Iwata at least for crankbait size jobs. Sounds much easier than my Badger 150 and save some paint too. That will be my upgrade when I'm ready to shell out the cash. I'm with you on the compressor too (Tek) my 30 gallon tool compressor last a long time, if it does cut in it only takes a minute to repressurize the tank. Looked into the refrigerator compressor idea but afraid it would pass some oil in the air and oil and water (based paints) don't mix.
-
I got my supply of polycarbonate sheets at Tap Plastics. If you have one nearby you might want to check it out. The one near me sells miscellaneous pieces out of a bin by the pound. I got three different sizes of scrap chunks about 1' square very resonable. I think it was 2$ a pound. Fair amount I got to play with for less than 5 bucks.
-
Thanks Gon2long, that makes a lot of sense. I have a 30 gallon garage/shop compressor that I use with my Badger 150. I run the pressure between 20 and 30 psi most of the time but when I am doing some real light fine work I have to bring it down to 6 or 8 psi. I run the compressor regulator at 60psi, run a 30 ft hose to my work station where I have a moisture seperator/regulator at my airbrush hose and the pressure settings I mention above are set with the 2-stg airbrush trigger down for full airflow but not back for paint. Got some good work done but fight it sometimes. Understand I waste some paint due to the cup and if I don't put enough in the cup and it runs out then I'm siphoning air thru there can't help anything. I pretty much work from a water bucket. I'll set my brush down on a hangar to reposition a bait or something but as soon as I have finished with that color I drop the brush in a small bucket of water. Then I crank the air pressure up, remove the paint cup under water and blow the brush and bucket out real good including back flowing by pushing the tip into a rubber pad. That seems to keep me going the longest between disassembling for cleaning. I leave it in water until I'm ready to go for the next color.
-
I have only been air-brushing baits for a couple of years. Mostly self taught and watching you-tube videos. When I wanted an airbursh I asked an older taxidermy friend who does both game heads and fish mounts. He recommended the Badger 150. I got the Badger 150-7 it had all 3 tips included. I started out with CSI paints and just had a really tough time keeping the nozzle clear. I switched to Createx and am doing much better especially if I use the brush cleaner and brush restorer I don't have to disassemble as often but sometimes still struggle maintaining consistency for that light thin paint flow consistently seems like I have to come back farther and farther on the trigger to cut the same amount of paint in then I have to clean. I don't know anything about any other brush since I have never used one. Do I have the wrong brush? You guys with more experience.....am I fighting an uphill battle where I would be better off with a different brush? Also, that refrigerator compressor idea is awesome rhersh. I already have a compressor but a previous compressor electric motor failed and since I already have the tank and pressure switch etc I might just check that out.
-
Very Inexpansive Air Gun (Canned Air) Versus Rattle Can Paint
barrybait replied to joliepa's topic in Hard Baits
Joliepa, I can't tell you how to get started with any less money than you have mentioned but I am an engineer and I just can't stand the thought of a can of air to paint with. It is just compressed air in the can so every time you push the button the air pressure in the can drops so you never really have the same amount of air/paint coming out. Certainly not with a can you hold in your hand. If you do go with canned air, take Gon2long's advise and use a large compressed air tank or scuba type tank with a regulator is the best way to go. It is going to be more money but the regulator delivers steady air pressure until the pressure in the tank drops below the set regulator pressure. If you can't afford that, then I like G2Longs tire inner tube idea. Because inner tubes expand like a balloon, pressure delivery is much more consistent as you use air and you can re-inflate with a bicycle tire pump. In either case, if you go with limited air supplies like this you are probably better off with a single action airbrush because unless you really set up a dual action airbrush it is going to use more air. That's because you start the air and then cut in the paint. Single action just push the button and air and paint come out. Your set-up is probably a step up but only that. I still recomment dual action airbrush in the long run because it is all about control. Also G2L's advise about a pancake air compressor is good. I got started with one of these that I bought used off ebay for 40 bucks. -
I found the D2T at Ace Hardware, Orchard Hardware, and Tap Plastics in my area. In the hardware store I stared at that rack of epoxies for awhile before I spotted it, had to read every one on the row but you are lookking for Devcon 2-ton. It is 30 minute epoxy I think and I can only do 2 crankbaits at a time even with that pot life it starts to thicken. If I try to get 3 baits done it seems like I miss a spot. I use the throw-away brushes from Walmart. $2.97 for a 30 pack. I cut about 1/8 inch off the brush length to stiffen it up a bit so I can spread out the D2T easier/quicker. Don't worry about brush strokes, with the longer pot life it self levels very nicely.
-
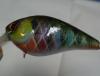
I was able to achieve an effect similar to this with a plastic bait that had a good scale pattern in it. First I painted the entire bait black with a paint brush then I immediately grabbed a paper towel and wiped off all the paint I could. That put a fine black line in every scale, gill, mouth and fin line. Then I painted the rest of the bait normally with transparent paints. That's the only way I can see getting that nice black line with-in the bars on the above pictured bait.
-
My wake/swim baits are hinged with screweyes and I am trying to get the sections as close as possible. I use open screweyes and I am afraid that when bending them closed, I will damage my paint/clearcoat job. This is only a problem when using upper and lower pairs of screweyes for the hinges. After everything else is done, the bait is weighted, sealed, all screweyes installed, and pool tested, then I close the "open" screweyes and never open them again. They are only bent closed one time then the entire lure with the exception of the tail is ready to paint and clearcoat. Tail is painted/coated seperately. The first time I used brake tubing that I had laying around but now I use the rings from craft stores. I don't know what they are called but the double rings that you might use to hold scale netting stretched out for painting or could be used for needle point type crafts. Most are about 8 in circles where one ring clamps over the other but there are larger sizes and they can be made of wicker or plastic. For my 8" baits I am using about a 12 or 14 inch ring. Then I bend some wire of varying lengths with a 1/4" hook shape on each end. Use a rubber band and wrap it several times around the ring and hook both ends of the rubber band to a one inch wire hook you made and hook the other end of the wire to your line tie on the lure. Now do the same thing at the other end of the lure. If you have a pin for the tail use it for the wire, otherwise you have to use the back hook eye. Now it is streched out nicely accross the ring but it bobs all over the place so to add stability, add one more wire/rubber band rig to either the front hook eye or to one of the hinge eyes. Now the lure is nice and stable and ready to paint and/or clearcoat. When painting, if you push lightly on the stability wire, it will open up the joint and make it a little easier to paint without having to touch the lure at all and it makes it easy to hang the bait by the ring inbetween applications.
-
I am new to this also but I have been having good luck coating the bait with D2t top coat and leaving the tape on the bill. When I finish applying the topcoat, I then take the tape off before I hang it up to dry and that solved the peeling problem and left the bill nice and clean. Have to be a little careful getting the tape off without bumping the bait with another finger or knuckle but you can still touch it up. I can only get 1 larger bait or 2 smaller baits coated with each mixing of the D2t so it doesn't hold me up. If I try to do 3 smaller baits the D2t starts to get grainy. I also use brushes from a 30pack of paintbrushes from wal-mart for 2 bucks but I cut off about 1/8" from the bristles to make the brush firmer helping to spread the epoxy.
-
I have agonized over the use of scents for years. Last week I was fishing the edge of a weed mat where the weeds had cleared the water up to the point that I was surprized the bass were not spooky. The bite was on and my boat was blown against the mat. I looked down and seen to LM Bass and lowered a dropshot down with a roboworm on it. Bass tipped up inhaled it and spit it. Made me wonder. Put some scent on my fingers and slid them down my bait and watched the next ones (like 6 in a row) suck it in without spitting it out. Coincidence? Maybe but it looked otherwise and I prefer not to use scents. I'm not sure if it masks our scent or confirms their "prey". There are few enough scents that I have confidence in but Bang and Megabass are two of them. Also I prefer to use a scent that is prey related like shad or crawfish or rainbow trout and I can't understand the coffee, garlic, etc. That's probably just my problem because anglers that use them outfish me and don't overanalyze it.
-
I agree with the curado 200sf being a great all around reel. I am (was) a total shimano fan but as I upgraded my curado's to chronarchs, I found the newer stuff developing problems. Eventually I had 3 chronarchs in the shop and was using my old curado 200sf's admiring them. Now that shimano downgraded their line (including price) I didn't know what to do. Asking the local guides and friends and I am finding that the Lew's reels are working out well. Other reels mentioned are good but Lew's are getting my vote lately.
-
Hello Members. I've recently joined the forum. Got started by making an ms slammer type wake bait and learned there is more to getting them to walk and talk than I thought. Then after breaking some expensive crankbaits I found out I could buy blank knock offs. Taught myself to paint with the airbrush and I'm off and running. Now I'm also making 6-8 inch wake baits and have learned from the forums here. I am the Youth Director of a teenage bass fishing team so I have plenty of kids available to test these baits and they can really get them bit! Fish the California Delta mostly in club tournaments, local tournament series, teen tournaments. Also love getting after the stripers here in the Delta. My Dad was a woodworker and I learned from him but I am an Marine Engineer retiring from deep sea sailing so I also have experience with materials, machining, and hardware. Hope to learn more from the site and also hope I can add some value giving back to the forum with my ideas/solutions/questions.
-
Vandy, I think your trouble is "priming with a spray can of primer". I'm new here but my first two wood baits were MS Slammer type baits and I sealed with wood primer. It didn't take long for water to get in and start cracking the paint. I think if you seal the raw wood bait with penetrating epoxy or even with the Solarez, then paint, then seal with Solarez it will be pretty tough and last much longer. Be sure to use catalyst with the solarez for the prime coat and get it in the lip slot and screw holes. Solarez in the screw holes if you have them will not cure without catalyst because it will not get any of the uv.


