


JunebugsCustoms
-
Posts
27 -
Joined
-
Last visited
Content Type
Profiles
Articles
TU Classifieds
Glossary
Website Links
Forums
Gallery
Store
Everything posted by JunebugsCustoms
-
I certainly didn't intend my OP to sound like it is the be-all end-all for balsa bait construction. I merely posted it as a means to share some of my experiences and to provide an alternative for those of us like me who find through wire processes tedious. I have made countless balsa baits over the years, using just about any means of hardwaring you could imagine. Some worked great, some were abysmal failures. I settled on the system I use because its quicker (for me), more consistent (for me), its incredibly strong, and has little to no effect on buoyancy and action. This is just the system I prefer, and offer it up as a means to lend an opportunity to gain from my many mistakes and years of testing.
-
try looking at nationalbalsa.com they offer balsa in a whole buncha dimensions, and at a decent price. They also do bulk pricing.
-
Ive made frogs shaped like a hollow body frog, with a pair of hooks set in the body just like a hollow body, and gave it a mouth like a popper. I had to set the hooks back some from the rear though, because if theyre directly over the body you will have trouble hooking up. I also fixed screw locks to the sides 2/3 of the way back to accept small ribbon tail grubs for some leg motion. The hardest part was finding the right weight and then setting it in the sweet spot so it sits in the water how I like. too much weight sinks it, not enough weight, or out of the sweet spot, and it flips upside down. I got them down well enough that theyre a regular production item now, and I have 2 sizes...a 1.5inch and a 2.5 inch for those big Okeechobee type fish lol.
-
Ok having read the "vibe" of this thread so far, I have a question as to direction of placement..... In a crankbait, or any bait that relies on wobble/wiggle for action, I would tend to agree, side to side placement is optimal. But with a jerkbait, which is what the OP was posting about, the action is more of a "jerk" toward the line, and not so much a wobble. Would that not make the optimum placement for the rattle to be parallel with the backbone, ie in a nose-tail orientation?
-
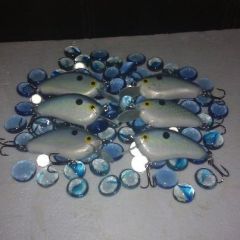
 This Lil Wiggler is cedar construction, 1.75" long and swims at a depth of approx.8-10'. It has an extremely tight wiggle when using med-fast retrieve, and a more lazy wobble at slow retrieve. Bass hammer these little beauties....a regular smallmouth magnet
© Junebugs Custom Baits
-
create is kind enough to sell sets iirc the opaque paint set is primary colors, and they have another set in transparents...although I cant seem to manage without some pearl white and pearl lime green (probably the 2 most used in my palette)
-
I know this is counter intuitive, but in speaking with the guy who owns the company that makes the glass rattles, I learned a valuable tip. Sometimes, fewer rattle balls is better. In looking at your pic in the OP, I noticed 3-4 BBs in the chamber. Given the small chamber size, that many BBs may in fact impede the sound, because there isn't enough room for movement of that m any rattles in the space.
-
Favorite Color Schemes For Top Water Baits
JunebugsCustoms replied to RayburnGuy's topic in Hard Baits
heres a few popular schemes -
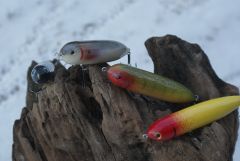 a small sampling of this years topwater baits
© Junebugs Custom Baits
-
I disagree somewhat there Rayburnguy... Rapala has used balsa for years for their SR5 type baits, and I have some that are antiques..
-
Favorite Color Schemes For Top Water Baits
JunebugsCustoms replied to RayburnGuy's topic in Hard Baits
Robala is correct. Because allblack throws the best silhouette, it is easiest to see from below against the daylight from above. -
What my method is providing id a tighter grained insert to screw the eyebolt into. Balsa is so loosely grained and has such soft end grain that it has difficulty holding the threads of the bolt.
-
LOL mine is wayyyy ghetto but it works and didn't cost me anything so who cares. I actually used 2 solo cups, a coffee filter and a couple air fittings I had laying around the shop. I reduce the line pressure to about 2lbs. and hook to my shop compressor. One solo cup has pin holes punched in the bottom and the filter taped over the holes on the outside. The other cup has a hole at the base that is fitted with the fitting. The filtered cup nests inside the fitting cup and is taped together for a decent seal. Basically I mocked it up while studying the idea of making one, and it worked, but Ive been so busy I haven't had time to make a nicer one.
-
Favorite Color Schemes For Top Water Baits
JunebugsCustoms replied to RayburnGuy's topic in Hard Baits
Baby Bass, Black/Chrome, Frog, Black/white, and Bone -
as far as toughness, I don't know but I tend to doubt it. With regard to the dowel, if you threaded through it, it would in effect go through the narrowest point and not be strong enough. Harder woods like cedar and poplar are better suited for toothy fish
-
Yea, seeking, I generally use poplar or white cedar for the muskie lures, when I hafta make them....a decent sized muskie will bite clean through a balsa bait
-
You ready for the show, Rob?
-
the belly hook setup is slightly different. I pour my own ballast weights, using a stick type weight similar to that used on an inline spinner. they are about 1.25" long. I drill a hole for the weight, and once I find the right weight for the plug, I clip it to the right length. I then use stainless steel wire and bend it to a U shape with a radius about the size of the eye in an eyebolt. The tag ends of the U shape need to be long enough to touch the bottom of the hole and have the loop protrude enough for your hardware, plue about 1/8 inch. Bend the extra 1/8 inch over to 90 degrees. You sould now have a wire that the "legs" have feet that when inserted in the hole, rest on the bottom leaving the loop outside the bait. Now insert some epoxy in the hole, and push the weight in. The weight, when pushed to the bottom of the hole, locks the wire in place. Fill the cavity with the putty of your choice and sand flush. When I have a chance, Ill take some pics for illustration.
-
I know there will be some who vehemently disagree with me, but I seldom if ever use a through wire to build balsa bodies. And after building literally thousands of them over the years, I have yet to have one fail when done this way. I shape the body however I want, then drill a 3/16 hole approximately 3/4" deep at the nose and the tail (at the tow point and at the location of the rear hook hanger). I then epoxy a 3/16 diameter piece of poplar dowel into the body and let it cure. Once cured, clip it flush. Drill a pilot hole for your eyebolt. For those who say this can't be strong enough- I tested this hundreds of times.... it securely supports as much as 18lbs both from a dead lift and from a jerked lift. In all my testing, I've only ever had 2 fails- in one, the wire securing the test weight snapped, and in the other, there was an odd vein in the wood which caused the balsa to break. Besides being extremely strong, this method is very fast and far less tedious (imho) than setting up through wires, and the end product is fantastic. The doweling has no ill effects on action. I've sold my baits all over the country and never had one come back for warranty repair.
-
You know, now that you mention it, I honestly couldn't be sure, but that's an excellent point to make....may help save someone a little heartache
-
to cut circuit board cleanly, you need a special roller type die. A linear type die like in a shop press will cause the edges of the lip to crush out and delaminate. A roller type die actually shears the material, similar to the action of a paper cutter.
-
Under the radar with the form 720 will cost you 10k per day when they catch up to you, and from what the auditor told me when I got my FET number was that they have people routinely monitor social networking sites and forums looking for folks selling illegally. When he came out to my shop he said it was really fortunate I had applied because he had already gotten wind of my business when the application crossed his desk. It just isn't worth it to not be legal
-
I make or have made a lot of the machines I use to build lures. Some noteables are: A mini wood lathe from an old sewing machine An epoxy mixer using some PVC parts and a BBQ Rotisserie motor An epoxy drier using a Ronco Showtime rotisserie and a powder coat fluid bed using assorted air fittings and PVC pipe Some, like the lathe, while they worked well, have been since replaced. Others, like the driers and mixer, etc I still use nearly every day. I am far too cheap to spend the silly money these places charge for their stuff when I am more than capable of building my own lol.
-
© Junebugs Custom Baits
-
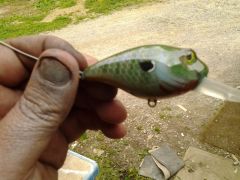
 Shallow running, awesome action. Medium roll w/slow retrieve, and a tight wiggle with a faster retrieve. White cedar construction, circuit board lips, #6trebles
© Junebugs Custom Baits
