


FrogAddict
-
Posts
328 -
Joined
-
Last visited
-
Days Won
6
Content Type
Profiles
Articles
TU Classifieds
Glossary
Website Links
Forums
Gallery
Store
Everything posted by FrogAddict
-
I made a really poor one a couple years ago and then rarely used it since I now tied all my jigs instead.
-
ipt, That's the plan if I can't fix the mold for sure. Mark, Good point. If heat makes it flake off, I'll give er more heat! I don't know when I'll get to it but I'll try to update here when I do.
-
I will attempt to salvage them. The one I'm most concerned about is a rather large mold I used to make some Bulldog style Muskie lures for a friend. It's an open pour mold and I used a soft clay master that no longer exists. It's been with me for several weeks so I'm not sure if cooking it will help. I may have to try and pry away the epoxy (carefully) and reseal.
-
Thank you for the feedback. I'm afraid I may have ruined the molds.
-
I have been sealing my PoP molds with Loctite 5 min epoxy cut with denatured alcohol. All seemed to be going well until the last couple of times I've used these molds. The epoxy is turning blue and is flaking off in places. Has anyone else experienced this? I'm guessing it's the type of epoxy and it's inability to handle high heat. It seems to happen when I shoot several times in a row. I am ready to use Devcon 2ton to re-seal but wanted to check here first.
-
Travis, What kind of blades are those?
-
Eastman, Meticulous is the right word. Every time I get in a hurry, I screw up my process! Just last weekend I decided to skip a step making an RTV mold for a new soft plastic idea and I ended up with a ton of small bubbles in the mold!! There went $20 bucks worth of silicone! Ask anyone on here that has built lures for any length of time about their "rejects" and they'll tell you they have a box or something full of them!. I have one that I was really proud of until the last step and I screwed it all up by dropping it. My wife thought I got hurt in the shop that day cuz I was yelling and cursing so much. Don't forget that you don't necessarily have to drill holes to tank test your ballast. You can just attach the lead to the bottom of the lure with a rubber band at first. Finally, congratulations on catching a fish on the lure you created! It's a great feeling isn't it?
-
 I just ordered it off of Amazon. I can't stand using the little tubes that are attached to each other so I get the bigger 4 oz. bottles.
 -
I'll have to get some. I've been using 5 minute and cutting w/ denatured alcohol. I find 5 minute epoxy isn't very durable comparatively.
-
As Ben mentioned, ballast placement is very critical. I had no idea how critical until I spent many hours on a lure with the ballast place incorrectly, it didn't do what I wanted at all!! That's a huge reason why I like building hard baits with PVC. It allows me to tank test before I paint. I love the simplicity that Dieter puts into some of his designs. No ballast except for hooks is far easier to not screw up!
-
And that's with regular plastisol without micro spheres. What epoxy are you using? I've been using loctite 5 min. and it's flaking off the sculpey.
-

Premium degassed plastic vs economy plastic
FrogAddict replied to Scootalong's topic in Soft Plastics
Maybe it's just me, but I kind of like the look of bubbles in some of my baits. -
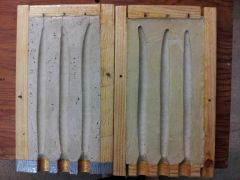 Mark, One other question on the molds pictured, do you frame them after the mold is created or do you pour in the frame?
 -
Mark, Have you ever tried that Vac 50 stuff from Alumalite?
-
I think the stress of deadlines plus the redundancy would equal no joy!
-
Update on this, I was able to pour and they worked well (they float the Stanley doubletake hooks). No field test yet since it's been below zero up here. However, the sculpey insert has cracked and the epoxy is flaking off due to the heat. I'm considering either a wood or a brass insert. Your insert is pine correct? How does it stand up to heat?
-
Ballast is the weight. Doesn't necessarily have to be lead though.
-
What ever you have that fits and will add some support would be great. I just chipped a bit of PoP off last night when injecting. I have been hitting the area around the sprue opening with epoxy when I seal the mold and that helps as well.
-
I found it interesting that I have to have a Fed ID number to even sell at a local craft fair and I then have to pay FET. Makes me want to stay a hobbyist.
-
I've been using the Silica stuff from Do-It and I like the simplicity although I have to admit it is limiting to have all my Senkos opaque.
-
I've benefited greatly from advice given in this forum so I thought I'd contribute. I'm sure most of you experienced guys know this but here goes. When creating a PoP two piece mold, hold off on making any air vents until after your first pour. Your mold might pour wonderfully without it. I learned this the hard way. I vented all my molds at first (probably over vented) and then one day I decided to try and do a vent free mold. It poured great and I didn't have to cut off little tails all the time.
-
The sprue extender was a necessity since my 5 cavity senko mold was sucking in too much plastic (super soft). Now it works great. I only needed another inch or so. Here's a thought, why not use two lengths of copper pipe for the sprue when creating your mold, just plug up the ends with clay. pull out the longer length but keep about a half inch piece installed at the opening.
-
I'm thinking I'll get some regular plastisol and try that but I bet saltwater plastisol is the right solution as long as the legs still have some motion. I basically cooked some sculpy clay in the rough shape of the inside and attached it to a wooden stick and installed that in a two piece mold. I'll be pouring my first attempts with this set up soon. I did get them to float a double hook by pouring two halves and bonding them together but that was tedious.
-
Mark, Based on something you posted once, I started to apply a wood backing to my POP molds. One day I was injecting a mold and it split at the sprue so I decided to reinforce. I've been using whatever wood I have in the garage but I haven't considered fully encasing like you do. I have recently decided to use a short length of copper tubing to reinforce the sprue hole and it seems to work fine. I stumbled onto this idea because I needed a sprue extender for a 5 senko mold I made and I happened to have some 1/2 inch pipe laying around that fit nicely into the existing sprue opening.
-
Hey JRammit, Great idea. I'm working on something similar and have a question. You say you pinched the back "butthole" shut and then poured hot plastic there to close it up. Can you explain exactly how you did it? Are you holding onto it with a gloved hand and then pouring a bit on the butt area? I also was considering keeping the back open like on a Stanley Top Toad....
