HAWGFAN
-
Posts
140 -
Joined
-
Last visited
-
Days Won
1
Content Type
Profiles
Articles
TU Classifieds
Glossary
Website Links
Forums
Gallery
Store
Everything posted by HAWGFAN
-
A-Mac, I haven't used any concrete sealers yet, so I can't say. Seal-Coat is designed for dipping jig heads. A friend turned me on to it, but I have basically no experience with it yet. I glued a twisted wire in a piece of balsa with it, and it seems strong. I didn't test to failure, but I pulled hard enough to slip the drag on any of my reels, and it held. It is about the viscosity of thin syrup. From what I saw on the surface of my raw piece of balsa, It appeared to penetrate the wood a bit. It could also prove to be a good balsa sealer. I don't know how the durability would be as far as a crankbait finish coat. The low viscosity would lead to lots of dripping/running, I assume. Anything coated in this stuff will probably work best on a wheel. In time, I'm sure I'll find some good uses for it.
-
Seal-Coat by CS Coatings could be a good option. It's a water based epoxy that doesn't require mixing and cleans up easily. For your foiled baits, where this coating will show, it's available with UV added.
-
When buying lure lips, the dimension is usually given Length X Width (at the widest point). You can verify by looking at a style that is much longer than it is wide. The dimension should make sense to you. As barr5150 said, the Jann's 008 or 002 (not exactly square) should fit your bait the best. I agree that the body is probably about 1/2" wide. A lip that is wider than your lure at the small end could always be sanded to fit. As for the depth, my rule of thumb is to not have more than 3/4" of lip beyond the line tie. You'll be in danger of overpowering the bait, and can have excessive hunting or even a full roll over. If your bill slot is tight enough, you can actually test without gluing the bill in. This can save some frustration and time/expense. I tend to make my bill angle fairly steep, trying to get a wider wobble. A flatter bill angle could have a tighter action, and might be more forgiving. There are other factors that affect this as well. These are just some very general things to keep in mind.
-
I haven't been gluing. I let the paper lap over the edges and hold in place while I sand. Since I seem to be using these a lot, I may start gluing the paper in place. I may try Elmer's school glue. It should hold just fine, and warm water would remove worn out paper if I wanted to re-use my block.
-
Another way to make a radius sanding block, is to drill the appropriate sized hole in a block of scrap wood, then saw in half.
-
I use the gravity feed Neo airbrush and recommend it as a good place to start. I use a Harbor Freight pancake for my air supply. It has a built in regulator (I usually spray at 30psi), and I did add a moisture separating filter. Createx and Wicked paints are a good way to go. For most patterns, base coat with opaque white, then use transparent, fluorescent, and pearls. For transparent patterns, no base coat. You can experiment with reducing your paints to get the viscosity and coverage that works for you. Use some type of small disposable cups for mixing colors and reducing. I also like alligator clips to hold baits. Instead of dowels, I use pieces of wire coat hanger. They can be bent if needed. Drill holes in a scrap 2X4 to make a base for them. I use envirotex lite for my clear. It's probably not the best, but it works and is affordable. The search for the holy grail of clear coats seems to be a constant topic of discussion around here. Stencils and masking tape can help a lot. I've tried everything from heavy paper to plastic stencil sheets. Pre-molded ones are available for a lot of the blanks out there. You can vacuum mold your own. Check youtube for videos on this
-
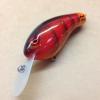
It's basically just an oddly shaped wake bait. It wobbles like a crank, but doesn't really dive. At a moderate retrieve, it gets just inches below the surface, and leaves a cool wake on top. The bill also acts like "brakes" when you twitch it. It will walk and splash, without actually moving very far. It helps keep you in your target area longer. It looks very promising in testing, but I haven't actually fished with it. It's not one of my normal offerings. A friend asked my to try and design one for him.
-
Depending on the hardness of your balsa, and how heavy your seal coat is, the bait is sometimes still fairly soft. I've pressed in eye sockets using the blunt end of a drill bit. If you want to drill the socket, a pilot tip bit could work really well. It has a pilot point to keep it from walking, and makes a flat base hole. I have no experience with this, but drilling a flat hole might try to tear the wood a little instead of cut.
-
Looks awesome! I bought a roll myself, but haven't tried it yet. What are you using for your scale pattern?
-
 The tail is tarred sein twine. The big tooth on the bill would look pretty funy!
 -
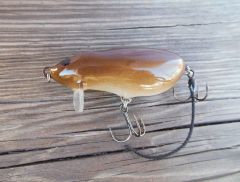
Here is a balsa wake rat I carved. If you move the eye to where the ear is, it's a frog. With the trebles, it wouldn't be weedless, but it looks like some guys are using different hooks. I'm sure you could even find a way to attach legs. Soft plastic grubs might work. I'm sure you could have hooked wires coming out the back to hang them on.
-
Hand carved balsa wake rat
-
If it happened along the seam, you may have had a leaky body. The sealer would've displaced some air from the body cavity, causing the bubbles. If you over-heated and cracked the body, it could happen as well. My other guess is that your paint wasn't fully cured, and created a gas under the sealer.
-
I like the aluminum epoxy mixing pans. You can bend a pour spout in the edge, if you want. I usually draw my paint out with a plastic pipette, and drip it in my airbrush. The pans are inexpensive, and easy to clean. The pipettes are also cheap, and usually flush out with water to be used again without contaminating your next color.
-
I have the same airbrush, which I purchased new, and it has developed the same symptom. I've tried cleaning and the beeswax trick, with no luck. It appears that I may have deformed my nozzle. It no longer is a perfect cone, but is getting a slight "trumpet" shape on the end. This is my first airbrush, and I'm sure I have seated my needle too hard at times. I've heard this can also cause the bubbling in the cup. I have a new tip and needle ordered. Hopefully, this fixes my issue.