aulrich
-
Posts
535 -
Joined
-
Last visited
-
Days Won
12
Content Type
Profiles
Articles
TU Classifieds
Glossary
Website Links
Forums
Gallery
Store
Everything posted by aulrich
-
Foiling vertical lead jigs with etex and holographic nail foil
aulrich replied to jcool3's topic in Wire Baits
For the most part I was just playing, and the spray gave a much shorter cycle time. This weekends experiment only had one lead jigging spoon and I just put it onto bare lead, with an e-text top coat. For myself I see me migrating to the heat transfer for the jigging spoons I will want flash on , at this point I am figuring out how to powder coat and I think the hot tranfer matches up well. I am thinking I could pull it out of the curing oven and just drop it onto a high temp press to transfer the foil. One question would the hot transfer stand up to powder clear or would it just be better to epoxy clear coat. Does someone have a link to hot transfer foil that they like. -
Foiling vertical lead jigs with etex and holographic nail foil
aulrich replied to jcool3's topic in Wire Baits
So, under the heading "I need to properly clean up my work area", I found that I actually had a can of 3m super 77 and for this application the 77 is better than the 90 mostly because it goes on thinner. I have not tried the e-tex method yet, I suspect if you hit the sweet spot of sticky but not soft I think you will get cleaner coverage. The challenge I found with the spray was getting the bait fully coated with out getting it too thick and having spots where the film pulled the foil and glue off. Has anyone tried spraying both the foil and the bait, because typically when you are using contact cement you put glue on both surfaces being laminated. I did play with base color, and putting pearl silver under silver foil hid any missed spots better, white was OK. Black is interesting but you can see every missed spot. But on the blanks that I was foiling (a lipless rattle bait. The places I missed were around the gill plate fin and scale texture. The plan with that one is to paint it a very light(candy coat) perch. I think the contrast should produce an interesting looking bait.- 35 replies
-
- 1
-

-
- vertical jigs
- lead jigs
- (and 3 more)
-
Foiling vertical lead jigs with etex and holographic nail foil
aulrich replied to jcool3's topic in Wire Baits
I saw a video of someone hot pressing plastic baits, i'll see if I can dig it out of my FB feed(Brotherhood of custome crankbait painting). I think the machines purpose was for stamping cards, the press time was something like 10 seconds. I did a look around alibaba and a machine is not that expensive. But as a hobbyist it's over kill especially since the various glue methods do work. And if I was going to get another tool/toy any time soon it's going to be a 3d printer. The 3m Super 90 should just be a stronger 77 though maybe its thicker -
Foiling vertical lead jigs with etex and holographic nail foil
aulrich replied to jcool3's topic in Wire Baits
So I picked up a spray can of 3m super 90 , getting it thin and even seems to be a challenge. Though as it set it did seem to smooth out but does anyone brush it out. Also has anyone tried, plain old brush on contact cement. -
On the do-it forum I have seen 2 ways "around" that problem. One guy made a jig and just cut the bait and shot another color or two The other was e-core where a rod is put in the mold and after the first color is shot the rod is pulled and the tail cut off. you put the bait back in the mold and when the second color is shot it goes through the tube to fill out the tail. It does make for some interesting bait possibilities. I don't own a dual injector but these methods are at best "work arounds"
-
I keep telling my wife it's "young at heart" not immature
-
My usual e-tex procedure is to fist mix a thinned batch 1 part resin, 1 part hardener and one part denatured (mix the resin and hardener first let it cook a min or 2 then thin). Give a light coat and put on the spinner. Check the baits every 15 min for and wet any areas that have dried out any end grain will tend to absorb more resin. After the first hour mix a second batch of e-tex but not thinned. Apply to the baits and spin like normal. When I first started I would do 2 coats of e-tex , apply, spin, sand, apply, spin ,sand and even if I am johny on the spot that was a 2 day turn around. I found that the newer procedure gives the nice base surface basically in one shot with out getting too heavy. Lots of guys swear by warming baits before applying the e-tex, I have not tried it yet but I do think the theory is sound. What kind of baits are out making, Wisconsin and ceder makes me guess muskie.
-
What about the various wood "hardeners", now the 2 parters are likely epoxy. But supposedly Minwax has a brush on, though I have never seen it on the shelf. I mostly just use e-tex, I have been threatening to tint it white to skip the under coat stage. As I understand it the salt water guys just use thinned spar varnish on their big turned lures.
-
Shot my first few yesterday, it's going to be a killer bait. Too bad I can't make it onto the ice for a few weeks. Now the problem is that I need a couple more molds so I don't have to re-heat plastic so many times.
-
Looks like an e-tex like product, so you should be golden.
-
I had not looked too closely at what the business model was, I was not too interested in getting 3d printed masters , but I was interested in an easy to use drawing program to start fooling with carving a big swim bait sort of like (youtube's) solarbaits does. And hey it's only 5 months until the water gets soft around here, so I have an outside chance to get one done by then :). Is something like sketch up the most commonly used
-
A very thin strip of hot melt at either end, as thin as you can get it to flow.
-
I just blundered into this today Even though it is in Finland, it might be useful even jsut for printing out carving pattersns
-
I am not so much concerned about shiny, but on the do-it forum a guy had posted core shot baits and he had mentioned the the core was not showing through as well due to the surface of the mold. The first thing I thought of with the core shot bait was a clear body (silver and black flake) with a flo pink core /tail and call it rainbow trout. A more subtle version could be a clear with ( blue and red flake) with a pearl gold core shot call it brown trout. But I would agree anything solid color "shine" is irrelevant
-
I found the video, that is a much simpler solution, thanks
-
Just got the ES version of the ripper mold that has 3 cavities. it does have the rougher sand cast finish , one thought has struck me has anyone taken metal polish to the inside and tried to improve the surface finish, as I understand it the surface finish makes it about impossible to get clear baits, with the ES version.
-
Actually it's not really a mod it's making it like the version I should have bought. I bought the do-it Shad jigging spoon with out the top hook hanger, so I am at the point where I want to make the mold I have look like this one. https://store.do-itmolds.com/Shad-Bait-LurebrSz-34-1-1-12brHk-35517-or-3551brCollar-NA_p_998.html I do have the bigger version of this mold and the insert slot is just cut into one side , it's hard to judge from the picture but I think the same may be true for the smaller since the insert wires are a much lighter stainless steel vs brass. Also what sort of dremel head to do this job. Part of me is wondering about putting a router bit into my drill press and slowly cutting a flat bottomed hole. At this point I am open to suggestions.
-
I got these from a online course from Greg Vynal they work like a charm I mount them up and don't actually touch them again until after clear coat. The trick to them is buried in the handle , there is another bolt but with a spacer 1/4 the way to the clamp end between the bars to build in a gap for the clamp end. The clamp assembly is then glued into the PVC. Though I would say for big lures use steel vs the aluminum I used. You will get more clamp pressure. Just for reference these were a prairie boys attempt at saltwater poppers for a Mexico vacation 6" some were as heavy as 3.5oz
-
Something that just hit my radar is a chatter bait (bladed jig). the flash/thump from the blade and a big soft plastic trailer should be a winner I will give them a try this ice season I think I would use a smelt trailer vs soft plastic. Typically as a pike guy you get use to ignoring bass gear so that is my excuse for coming late to this party.
-
For me one downside to rattle can primer is it seems to be easier to over wet and run the first layer of color coat. has anyone else noticed that?
-
Generally I am the guy getting into a hobby with the minimal outlay and for the most part you can get by , yes if you were a pro you would buy the 2000$ table saw but you would be surprised what a homer you can do with a bench top built into a table. But an airbrush is one of those things that getting something good pays off, it can be frustrating enough without throwing cheap into the mix.
-
Look up John Skinner Fishing on youtube he has lots of stuff for stripers, And a book on bucktails I am a land locked fisherman 4000 miles from the US north East and I still like to watch his channel
-
That is on the to do list I also have heat transfer vinyl.
-
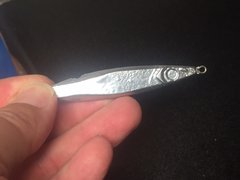
Here is what the chrome powder looks like.
-