


aulrich
-
Posts
535 -
Joined
-
Last visited
-
Days Won
12
Content Type
Profiles
Articles
TU Classifieds
Glossary
Website Links
Forums
Gallery
Store
Everything posted by aulrich
-
Thanks, I should have been more clear. I am looking for a screw lock that can be worked into a casting. I am designing a lead head for an external wire swimbait rig. At this point I am using the do-it clip screw lock on a football head and there is a bit too much movement and the rig has a tendency to hook itself.
-
I am guessing you mean something like this? https://www.amazon.ca/Automatic-Stirrer-Portable-Stainless-Eggbeater/dp/B0BMYNK9CN/ref=sr_1_17?crid=24KBKL1JG2SDT&keywords=automatic+pot+stirrer&qid=1692628074&sprefix=automatic+pot+stirrer%2Caps%2C134&sr=8-17 I can work with that.
-
No volcanos are not normal with most powders at least with the right amount of flow, adjusted properly it just fluffs up. I gave up on Princess Auto (Canada's HF) pretty much right out of the gate. One thing that just came to mind is, has somebody found a better bottom membrane IIRC my DIY fluid bed used printer paper the last time I did a batch of jigs was 4-5 years ago. Has there been any improvement in the las few years. One thing that has come to mind is shop vac filter bag? The airbrush compressor idea was I am not sure if I just need more flow or more psi or both. I know with good powders things work better. I had expected better from the brand, the white does work. There was a different chrome maybe I could do a quick exchange. With luck I do find my old stash of powders there was a chrome in there that actually worked there is a down side to doing 5 years of jigs at one time, stuff just wanders off.
-
At this point I am using the standard aquarium pump diy fluid bed. But some powders mostly automotive don't fluidize. The other day I got two eastwood powders white and chrome the white behaved like normal, but the chrome would just not move a bit of volcano'ing but that is it. I was thinking about replacing the aquarium pump with and airbrush compressor. Would that work? Another option is to do a mechanical fluidizer like Engineered angler has built with a palm sander.
-
Smooth-on Mold-max 60 is what I will be using for proto typing a swimbait head. As I understand it you should get at least 25 casts out of it. I'll know more in a month or so once I actually do it and not just what I see on youtube.
-
Hi folks I am looking for a screw lock bigger than the do-it screw lock. Its intended purpose is to get molded into a lead head.
-
Speed has never been an issue for me, set up a print and after work or when I wake up they are done. I get rid of most layer lines with a coat of CA glue and a bit of sanding so in reality I am just trading post processing tasks. Leave it to The Handmade Fisherman to come up with clever ideas but I think my first resin lure will be knocking this concept off. I love the use of the grub screw as ballast it solves a couple of issues the biggest being cleaning the cavity of uncured resin. Using the old school hook hanger was a nice touch too.
-
It's probably time the enclosure floated up the project list, it's not like building a box is hard. Even PLA warps on me on bigger prints so I can anticipate problems when trying to do a big mold and keep things flat. On a happy note it looks like my local print shop has a PC blend filament in their house brand if it is a PC/PTEG blend then I'll give it a try. Your filament is available on Amazon.ca but I do like supporting the local guy if possible.
-
Do you need to have your printer in an enclosure, that has been something I have been avoiding/procrastinating. if yes, do you have the power supply and electronics outside or inside the enclosure, I got this thing against running electronics unnecessarily hot. But that does highlight the one thing FDM has VS resin a bigger variety of filament
-
Another channel I just ran into https://www.youtube.com/@yauckoutdoors I think the guy must do CAD as a living, to my eyes he makes Fusion sing. His Fancy bluegill is going to be the basis for my whitefish soft plastic. But he is Also more of a mold maker. My printing temperature problem is solved, I go a vat heater and at about 75% power the resin got to 30c in my 20c basement (we are having heat here too and I don't have AC). Up until this year I have been doing OK with PLA lures but this summer i did notice one go soft but it did not warp. There is still a lot of real world testing and tuning to go. I think now that there are more folks taking the concept serous the issues will get identified and hopefully solved. For me I think resin printed lures will be next winter's project,
-
One thing that could be a game changer with resin lure is if someone figures out how to make non-pia 2 piece construction. What I mean by PIA assemble is that invariably assembling two annoying since the half tend to warp and its difficult to keep things properly aligned. I am thinking some sort of snap connection. This is the workflow that is spinning in my head. Print your two halves. post process (I am not sure if I would finish the cure at this step or not) assemble the lure hardware in one half Snap the other half on (IDK if this step would be better if the halves are soft, fully cured or somewhere in between seal the seams with CA glue Full cure if you did not before
-
I have no doubt it can be done, finding the right resin and dealing with cavities are the big ones in my mind. But once that is worked out the ability to print a tray full as fast as you can print one will be a game changer. As the resin printer get more popular folks will figure things out. I am assuming you have seen this channel https://www.youtube.com/@WMBayouLures For me the first fishing projects for the resin printer will be soft plastic molds. The first lure will probably be ice fishing jigs
-
I wonder if a good primer would be enough to stop the over cure? Here is an odd thought for UV protection I wonder how much UV reactive powder you would have to add to a topcoat for it to act like sunscreen. The other option is blending resin I have not done it yet myself but it’s common practice for miniature makers to mix in 10% flex resin into standard resin to make a tougher miniature. I have a thing for clear/ translucent bibs, I was hoping to use the resin printer for printing them, so toughness has been running in the back of my mind. I just got myself a vat heater so I can start using the fancier resins. My first try will be with Siraya Tech blu which is supposed to be on the tougher side already.
-
I have not done a resin lure yet myself only FDM till now I mostly use resin for DnD miniatures it's my experience that the stuff takes paint great (at least the ABS like stuff I have used so far) so I don't think there should be any compatibility issues with any of the normal top coats. One possible issue could be off gassing IDK if the curing process fully driven by UV as I understand the process the UV breaks a chunk off of the resin molecule which triggers hardening and considering how bad the resin smells as it is curing it clear something is off gassing. I just trued UV clear coat for the first time and that stuff stunk for at least 24 hours but did eventually go away. I think it is safe to say a resin printed lure should be treated like a cast lure, either heated to 150f for an hour or two or left for a few days to finish curing. The UV topcoat(craft store) was easy to put on in a thin layer it had OK toughness (nothing really stands up to pike teeth) if you are after bass or something else not toothy it would work fine and you already have a uv curing light. What kind of resin are you using the ABS like stuff seems brittle.
-
I have done a printed hinge it worked ok no where near as free moving but did work on that lipped lure
-
The hinge is just twisted wire screw eyes. The way pike can flop around the boat some times can break a lure but it took the beating and stayed together so far. It took me a while to figure out how to work it but it did catch fish. I am new to this style of bait I was surprised on how shallow running it was on a straight retrieve. To keep it down I had to work it really slow. The sink rate turned out to be about right the standard 1 foot per second. Considering the pattern this time of year is generally big plug’s moving fast it’s a good sign. There are plenty of times where the shallow running will be useful , especially later in the season when the cabbage is tall and thick I should be able to work it right above the weeds. I will try a double wire connection to see if I can get a better glide that is a nice advantage of cad multiple versions are easy.
-
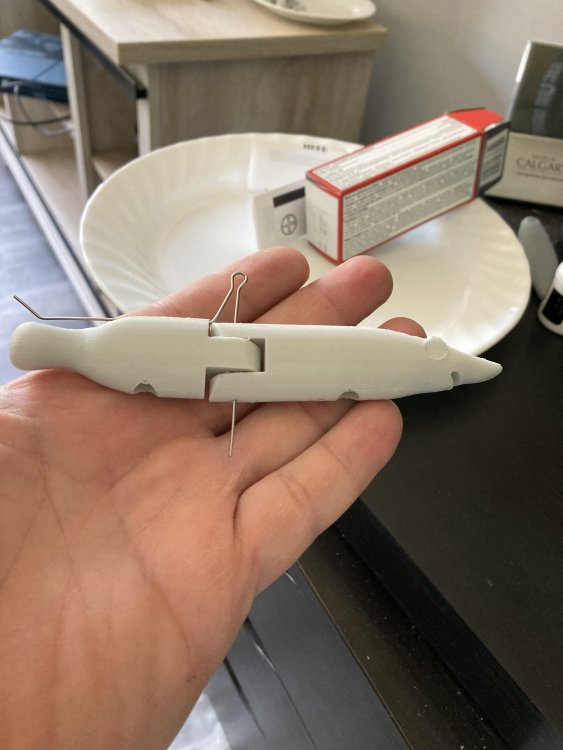
as per usual it's the night before vacation and I am putting together a lure. After a few tries I finally got this shape to swim. then I added the fancier details. The paintjob is still a bit ham fisted but it was the first paint since last summer. At this point I only have one wire on the joint so with luck it holds up. After I bondo'd the ballast in it ended up a bit nose heavy so the next one will have wood flour and ca glue for the front ballast hole instead. Print time is a bit long at about 8 hours but I was shooting for a density of maple and at 35% infill it came close but without top coat it was sinking a bit fast but we will see how it fishes. I am still thinking about adding a tail and dorsal fin but I am not sure. This shape will be morphed to a soft plastic that one will have a full set of fins See ya'll in a week hopefully with fish pictures

-
What uv lights are using for curing resin?
aulrich replied to Hillbilly voodoo's topic in Hard Baits
I use the same light to cure my resin 3d prints -
PPE is never a bad idea, that said what sort of UV matters UVc is nasty stuff and should be avoided. it's used in sterilization for a reason. The UVa and UVb are less so I don't think either could be used for sterilization (but idk for sure). both are still damaging to an extent A light leak in the shop is not really an issue since light exposer is governed by the inverse square rule double the distance and the exposure is 1/4 so baking your fingers at under an inch away from a bulb is a lot different that arms length. Still considering that the curing bulbs are so low powered how many nail jobs does it take to make a measurable increase in UV exposure compared to everyday sunlight. Eyes would be the big issue and for mostly just guys who don't wear glasses plain glass blocks UVb and at least for the last 30 years UV protection has been a standard coating on plastic lenses that I have gotten. Don't run your curing box open, if you need to spot cure use a flashlight or something directional and bobs your uncle
-
This maybe a little out of left field. But one of the winter's projects has been a new set of deck chairs for up at the cabin. when I made my first set my next door neighbor gave me leftover cans of Cetol SRD the stuff is awesome for outdoor wood the 20 years since it's called this (at least in Canada) http://www.exclusivepaints.com/shop/stain/sico-proluxe-srd-re-wood-finish/ 20 years of abuse and the chairs are broken down but the finish is decent(remember 0 maintenance) We have some that had plain Varathan and those are only 10 or so years and the wood is grey mossy and not a flake of finish on it. Judging by a chair I just finished it is a curing finish, so with a light sand it should take paint Did some looking and it is a boiled linseed oil variant
-
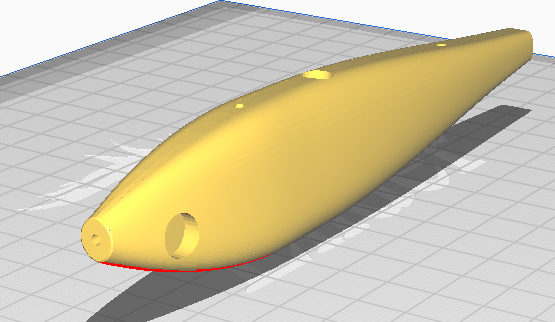
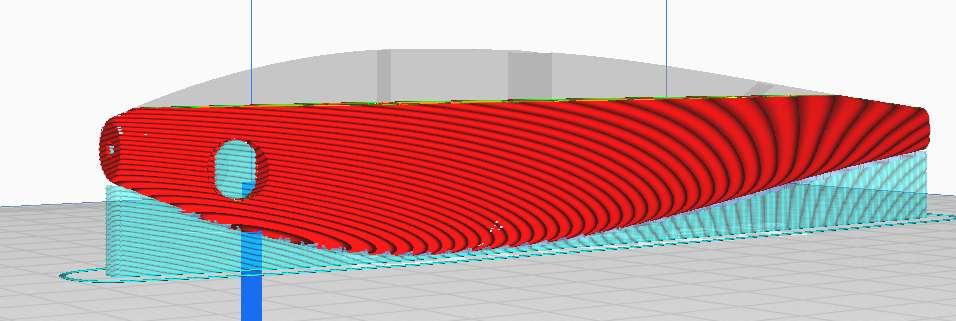
I print the holes, I try not to do any but filling and sanding after the print. 3 walls and 10% 2 line infill. So the inside of the bait is mostly air. To date I have not had a lure body break, but I have lost the of lip or two to bad glue up. The biggest issue I need to fix is how to do a rattle. I don't think having a hole for a commercial rattle will work because oddly the hole would end up adding weight high in the body ( I think) messing with the action. Think I should be able print in a rattle. But It will double the cad work. since I would have to design the support and stiffening members on the inside of the bait. Then during the print job, I can trigger a pause so I can drop in a ball bearing or some other rattle or ballast. then finish the print. This is how I lay them out to print For scale the big hole fits a .25 ball bearing total length 6" I was going to take a dud body to the bandsaw then I remembered preview mode on the slicer red is outside surface green is the inside wall yellow is support even like this I could pause the print and drop a bead or 2 in one of the little cells for a rattle The blue here is external support the interface between the support material and the body is where 95% of the sanding is.

-
Oh one more thing I found interesting filaments while going down the 3d printed RC planes rabbit trail. they are foaming or pre-foamed filaments. I use the pre-foamed stuff the filament floats https://www.amazon.ca/dp/B0B1DGSRR4?psc=1&ref=ppx_yo2ov_dt_b_product_details Sometimes 3d printing a shape can give it a weird weight distribution i noticed that with the few thingivers lure that I tried a first and they all failed. The floating filament gives you a bit of buffer for that. IIRC Larry Dalberg has a video showing the weight distribution for different actions of glide baits
-
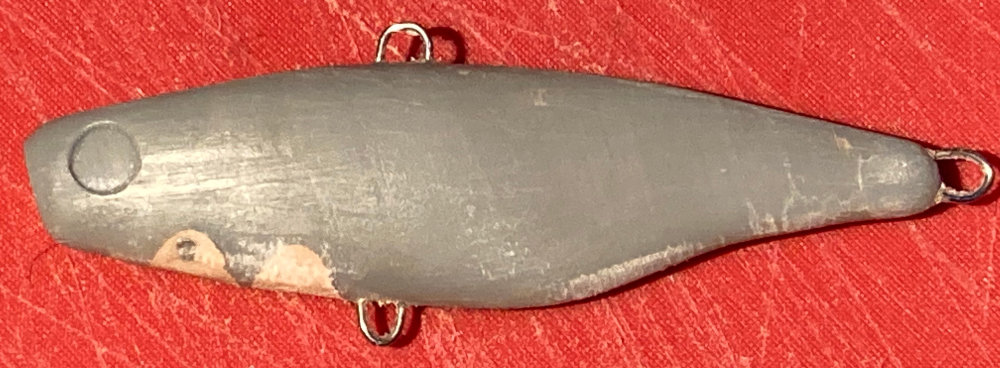
I an not sure you will get the action you want with a flat sided bail ( I am about to start my own design thread)and I am just guessing but it looks like you are printing 2 halves and gluing everything inside. For my stuff I have been avoiding 2 part baits like the plague. With my lures what I try to end up with is a 3d printed equivalent hand carved lure blank. This shows the idea reasonably, this lure was printed belly up. the wire harness is a slot filled with CA glue and baking soda the ballast are two 00 buck lead shot. I have used steel slingshot ammo too. The back does take some sanding but a layer of CA glue and some sanding get rid of most of the layer lines and marks from the supports. I have used both thru wire and wire twist eyes and twist eyes seem to stand up to the pike I fish. So for now they are my default. % infill is another tool that is really useful for floater divers I just use 10% double line infill. With sinking lure I use at least 35%. With my whitefish project I am planning to print it so it it has the density as if I had made it from maple.

-
Yea the metal powder is probably a really bad idea if it did not destroy your FEP it would get flushed to the side of the tray as the build plate cycled. One possibility is to print the mold like a shell and pour in some thermal conductive epoxy or using thermal conductive epoxy to attach an aluminum heat sink. I have run into some interesting advancements in metal FDM printing but I don't think SWMBO will approve of a sintering furnace. https://thevirtualfoundry.com/ The surface is still to rough at least on the pictures so not quite ready for prime time The commercial metal printers look to be really pricy, but could be useful in mold making on a commercial scale. From the pictures I have seem the surface finish would be in between Do-IT ES and a CNC. But it would be just like the ES and would need milling to flatten the mating surfaces. And to be honest if I won the lottery I would probably go CNC anyway.
-
A grow tent and a heater is one of the other options, I don't really have the bench space between my FDM printer and a loading press, though the fume control would be easier you can just hang a carbon filter and fan in the tent.


