aulrich
-
Posts
535 -
Joined
-
Last visited
-
Days Won
12
Content Type
Profiles
Articles
TU Classifieds
Glossary
Website Links
Forums
Gallery
Store
Everything posted by aulrich
-
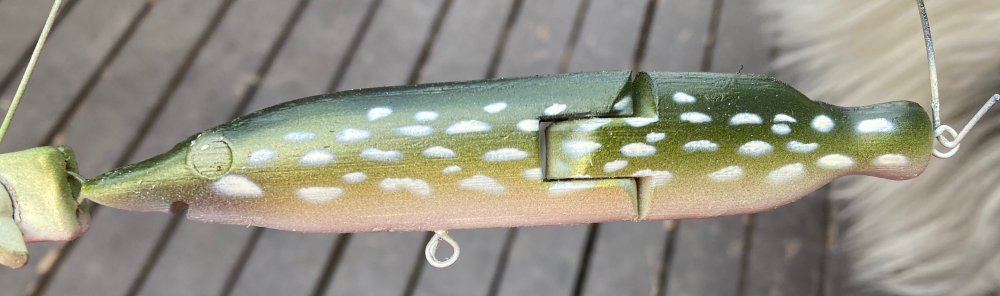
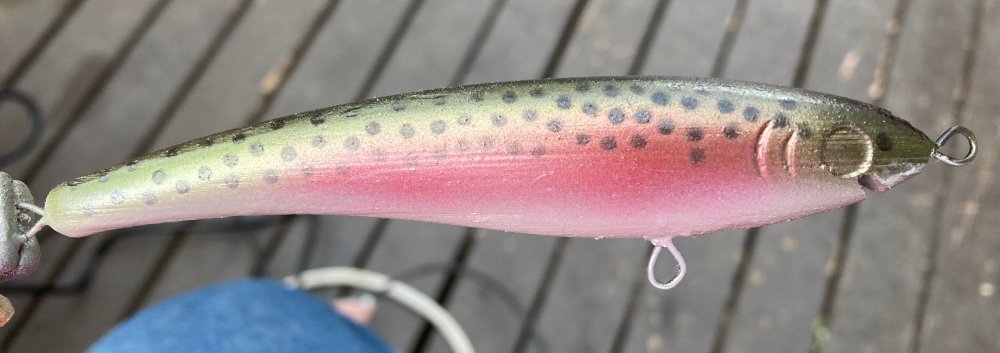
So I finally gave the lures I had made a proper field test and in general they performed well if not always as expected. Durability I had no bodies fail and they stood up to the small and medium sided pike that we caught, nothing over 36" but oddly the bigger the pike are the easier they are on the lure body little 20-24s will shred a lures finish. I did break lips but I am not sure how there are no rocks to bounce off so a redesign is in order I'll need to learn how to model a lip that is more like what is on an injected molded lure blank. Another option is to make a standard Lexan lip I could probably print up a template and go/no-go gauge easy enough. I had none of my twisted wire hook hanger fail so that will likely be my default unless some other consideration dictates otherwise. I will try gelled ca glue since 5 min epoxy is a pain and wasteful. I did have some paint adhesion issues but I think I can lay that at the feet of a batch of lures that I used a rattle can primer. The lures I just cleaned and painted with normal acrylic seem to be fine. How the lure performed. Meadow Mouse reproduction To be honest this one did not get much development yet the lake I was fishing has almost no topwater bite I have been fishing it for 20 years and I have only caught a couple of fish on top water but lakes closer to home do have good top water bites so I will take the one clear strike as an indication that I should paint the test lure and add a tail. 8" minnow or as my nephew named it "the meme" It swam well and actually manage to put a 29" walleye into the boat which was a thing since the bay was loaded with 2-3 inch whitefish fry and the fish in general were very size and color specific this trip. It dove too deep for the place we were fishing most of the time and it does take effort to cast it. But it should be a a killer when we are trolling deep weed edges so I will have to print out a few more. Jointed Pike This one swam well and did catch fish but since the fish were so color and size specific it under performed. I only had a natural paint job version so I think I may have to have an unnatural firetiger like paintjob in the box as well. The lure did land a couple of 30"+ pike and the joint seems to be fine so other than stiffening the lip this one is winner. Bomber Long A KO This one I had in both a printed version and a cast version (Smooth-on Smoothcast300 10% micro spheres by weight) Both caught some fish the 3d printed version seemed to have a snappier action but with those bodies I just dropped the ballast into the mold and hopped the best. and the ballast seemed to move around so maybe if I use a splitshot on the wire form it would preform better. All of these lure had paint problems but the cast lure shed the pain almost instantly. In an alumilite video they talked about painting the mold so you get a chemical bond to the undercoat. Has anyone here tried that? Since the jointed pike worked a jointed version of this is on the list. 4" minnow This one did not perform as expect but it was certainly a Bob Ross happy accident. As it turns out what I though would be a run of the mill 4" floater diver turned out to be neutrally buoyant and dead flat with a steel leader. I do want a true floater diver but this version is a keeper. I will have to stiffen the lips on these hopefully it does not effect the buoyancy too much. 3.5" lipless This one performed decently but sufferd from the bad paint job, like most slower sinking lipless the swim is effected by a kinked leader but as it sits it should be killer through the ice. a little wiggle and noticeable forward motion on the drop. it caught well on a rip and fall retrieve while the paint lasted. The stencils are off the hook awesome I will have to try 3d scanning a commercial blank there could be a business opportunity there. I have ordered what is call light weight PLA folks use it for printing RC planes it is regular PLA that either is pre-foamed or it foams as you heat it. I am getting the pre foamed type it supposed to be 35% lighter and should help me with lower volume floater diver lures I tried to make a lazy Ike KO and it was a complete dud.
-
Probably, though I have yet to get flexible filament to work for me (yet), it's sort of like playing pool with a rope.
-
The process it’s self is pretty easy especially since the lure body was something I created in fusion. If you had a commercial blank, you would have to 3d scan it and import it into fusion then the steps should be about the same. Once you have a lure shape that you like, back track in the fusion timeline to where you have the shape but no eyes scales etc. Make a copy of that body. Split the body on the side view Using the Shell command make an outside shell for me 1.5 mm seems to work well with my type of printer Add clearance on the inside of the shell using the offset face command I have been using .3 mm . Add fillets to the inside edges. draw a sketch for the tabs and extrude/join to the stencil Add fillets on the tabs too the print is much stronger and the tab is less likely to break off (don’t ask me how I know) Using the pipe command and my existing hook hanger sketch I make clearance for the hook hangers. You have a basic stencil blank To make a stencil Copy the stencil blank Create a sketch and project the lure body on that sketch this will give you a basic outline of your lure on the sketch. On the sketch draw the opening in the stencil, in the case of my “trout” stencil I created a 2mm circle then copy/pasted a bunch of times Select all of the holes in your sketch turn on the copy of stencil blank and extrude/cut the holes out. Mirror that body to make the other half Export and print the stencil To give credit where credit is due this is where I learned how to do this, I learned a ton from this channel i do need to change some thing since I have a different style of printer but it mostly applies. https://www.youtube.com/watch?v=fivat0XayUQ
-
So following Gulfstream outdoors example I made some classic patterns for my baits. the Pike stencil is version 3 and it's close enough for now I need to refine the spot color first. Please excuse the ham fisted air brushing these are the first lures in a couple of years and I was never that good in the first place. The process is pretty easy make a shell from the body add the tabs and draw the pattern then extrude the holes. My version of pike I need a good cream color for the spots A variant of fire tiger And a version of trout this one is a bit ham fisted

-
Hey now I have a use for a 3d print that fails and leaves me with a build plate full of noodles interesting idea regardless
-
That is a good thought, I was thinking there may be a bit too much drag s much as I like the flowy nature of a zonker strip. Too much kitchen renos the last two weeks and not enough fishing.
-
If you just want to practice painting, you can also use PVC pipe, if you have some kicking around the house
-
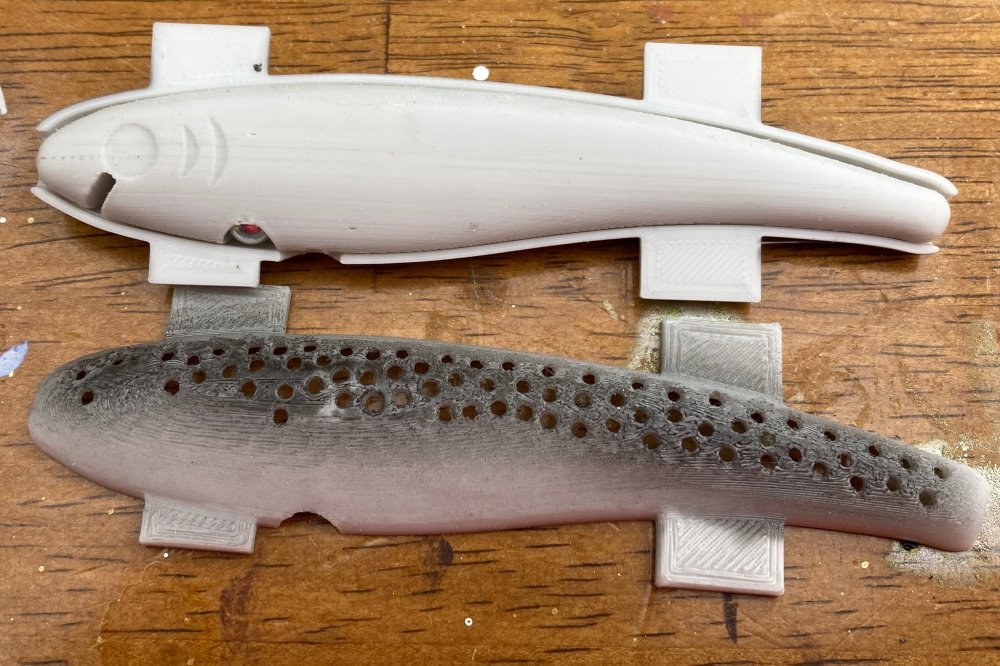
A couple of updates, I tried printing a mold and yes I could get it to fit together quite nice getting the wire harness in and the mold closed was way to fiddly for my taste. So I tried printing a mold of a mold, it looks to have worked quite well. The only issue I have at before I cast a bodyi is that I make the mold a little thin another 3-6mm would make it a bit more ridged. The other thing I was not liking about printed lure was the lips, I just did not like the look of a solid color lip. And the plastic I was using, PLA, is not rated for outdoor use untreated at least. Another common printing plastic is PETG And I found myself some "Translucent" it's nowhere near clear but clear enough to work for now. Just to test I am printing a body in this material PETG is not known for taking paint all that well what I am shooting for is a "ghost minnow" sort of look so a bit of paint top and bottom with everything else left clear.

-
https://www.canadiantire.ca/en/pdp/bondo-body-repair-kit-0475653p.html#plp This is the stuff I use. I have never timed the workability and it will be hugely temperature dependent. I did some looking and it looks like the first 30 min after the initial cure is what they call the green stage where it works really easy. so it is a light touch to get to 90% then let it sit for a while and you can get the rest of the way. There is a wood version of bondo, it uses wood flour filler vs whatever is in the automotive stuff is filled with. I would suspect it is softer in the final cure
-
I have been using bondo and as long as you catch it fast it before it is fully cured bondo is is really easy to work. what I do is put it on heavy you wait a few and if you catch it right you can cut off most of the excess wait a few more any you can gently sand it flat. the next day it's hard as rock I just started casting and I was shocked with how soft and easy to sand it was. But looking back I should bot have been surprised since the micro balloons are used to extend, thicken and make the epoxy easier to work. The last time I was getting resin, I also got wood flour I had heard you can use it with CA glue just like baking soda and it does work the same though it seems to get hotter in the reaction. But that is more of a ballast hole wire slot filler. 50/50 wood flour and epoxy should work the same as the micro balloned resin but I have not personally tried that yet.
-
the eye on the manatee is the look I want. I think I might add a little now with mono whiskers too
-
It passed the tub test with luckI have rabbit strip in my fly tying stuff. A lake test later this week if the weather agrees.
-
I hear you, today I finally figured out how to move a feature like a ballast hole and not break the time line. I also took the time to go back to a video and finally model a lip halfway correctly. The last half is shaping them so they cut through the water like a thin lip but are strong like a thick lip, I also want them to be shaped so they self align when you install them.
-
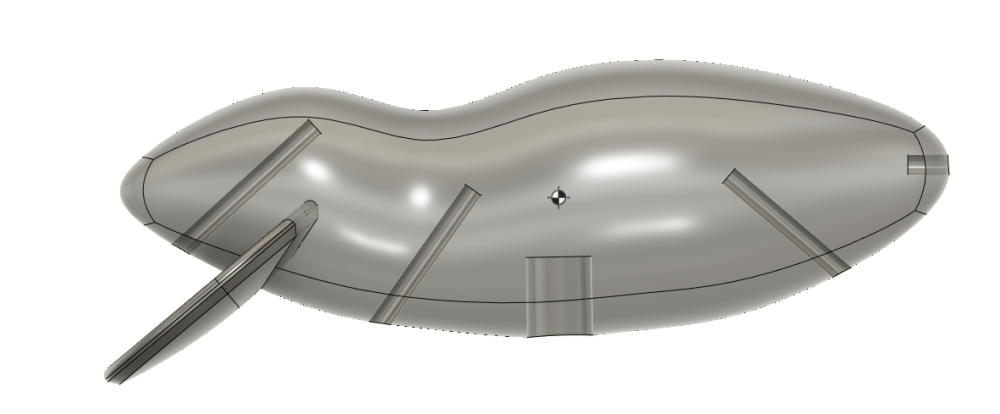
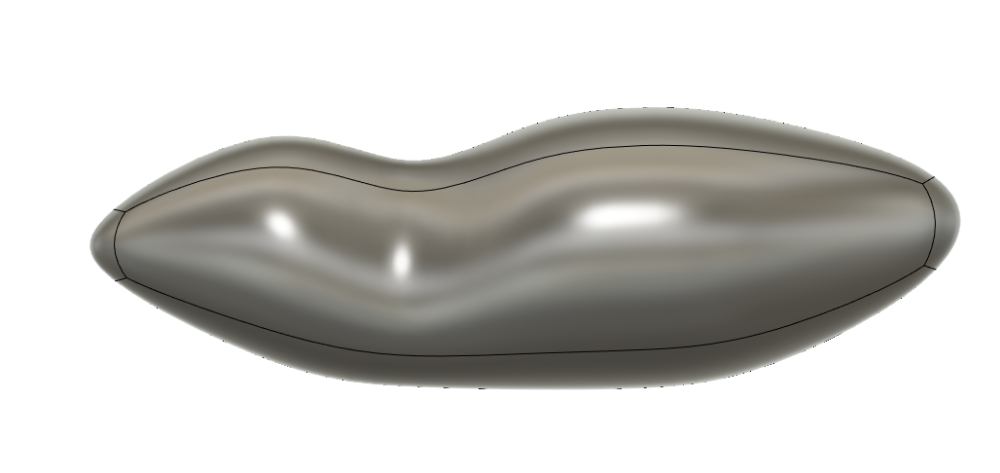
A little further down the design road, there we straight lipped and concaved lipped versions. Because I am crazy I picked concaved, it only took 4 hours and 3 YouTube videos. I had the ballast in front of the hook hanger but for some reason it looked wrong so I put it under the center of mass. I don't think I will try for the textured look since one pike will likely take most of it off. As for the tail I am going to use a zonker strip (a strip of rabbit fur for pike flies). I will just mount a stud to try the strip to. Now to figure out how to model the eyes and ears The lip looks beefy but it is only 2mm thick at some point I need to figure out how thin I can get away with with a printed lip.
-
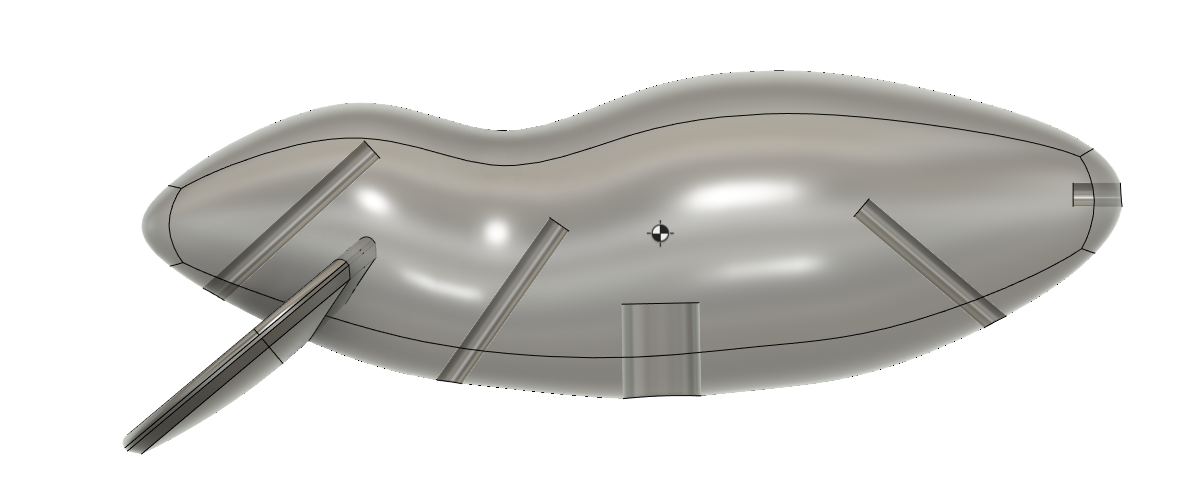
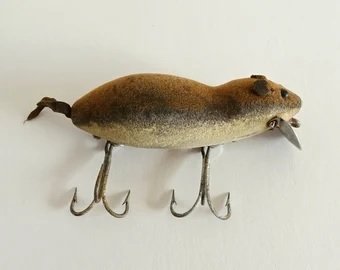
So on a local forum a topic of "Best Pike Lure" came up and in that thread a person mentioned loving the old Heddon Meadow Mouse. Since I want to add some top water lures to my inventory I looked it up. the first thing that struck me was, hey I did not know that wake baits were invented in the thirties :). So I decided to try my hand at reproducing this lure. Since this has all external hangers I would bet there is no formal ballast or would hooks be good enough. My initial though is to add a bit either just in front or in back of the front hook hanger. this is the shape so far the bottom may need to be a bit "rounder" but I have this shape on the printer to make sure I have the scale right.
-
While most plastisol floats there are specifically formulated floating mixtures, I have not tried any but the concept has been on my to try radar for a while.
-
Forgot to put index features in the first half of a mold
aulrich replied to aulrich's topic in Hard Baits
Yea regular kids modeling clay does interfere with curing, my resin supplier had the right stuff. You got to love spray mold release, the mold popped apart with no stuck bits. -
Forgot to put index features in the first half of a mold
aulrich replied to aulrich's topic in Hard Baits
Yes it is RTV, I think for this one I will just take a scalpel and cut wedges out of the edges. Its also not perfectly flat so that should help in this case. I really need to get some Lego. -
As the title says I forgot to put index features in the first half of a silicone mold what are my options to fix this. Or how best do I cut the index feature into the existing half.
-
I was mostly just wondering about infill , I was not sure if you would need to increase infill for heat resistance. 10 -20% should keep things reasonably flat (ish). My bed has a bit of a dip in the center it even telegraphs through the mirror I use as a build plate. I have a BL touch upgrade pending that should help with build surface irregularities. A resin printer is in my future too jut don't know when.
-
One more question are those specialty pins or just plain bar stock that you ground the nose on?
-
@RideHPD if you don't mind what sort of print setting do you run for molds. Specifically infill %, Layer height is always the balance of need for detail and patience
-
I say that about carving
-
I use emvirotex and for the first coat I do thin, I find it wets out better but I have found that you need to mix first let it cook a few minutes then thin with denatured. I found if you thinned before hand it does not cure. When I had batches to do I would do the thinned coat right before bed, then before work I would do a straight coat while the first was mostly firm but still sticky. if you have added any details with a sharpie do an acrylic clear first (don't ask me how I know)
-
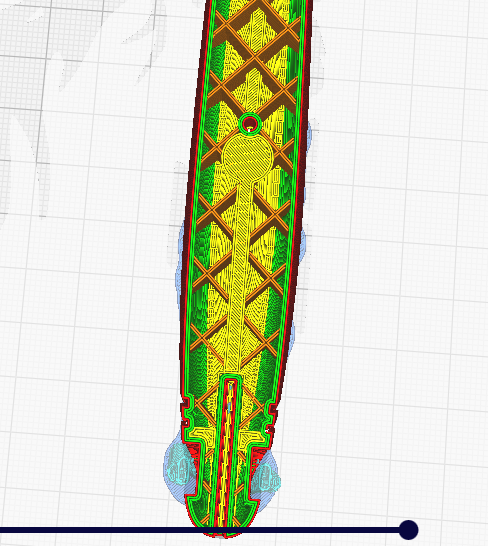
Just incase folks that don't 3d print here is a screen shot from my slicer showing the tool paths for laying down the plastic. A FDM printer is essentially a CNC hot melt glue gun . The red line is an outside perimeter the green is the two inner perimeters the yellow is infill and the blue lines are support material. Support material is required when printing overhangs it provides a surface to print on. The is support under the lure and some that will go around and support the rim of the eye socket.