aulrich
-
Posts
535 -
Joined
-
Last visited
-
Days Won
12
Content Type
Profiles
Articles
TU Classifieds
Glossary
Website Links
Forums
Gallery
Store
Everything posted by aulrich
-
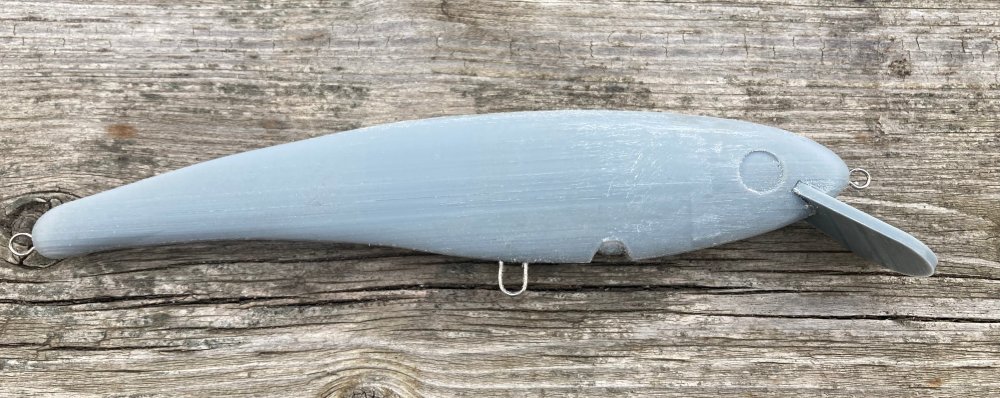
SlowFish I am using PLA at this point, ABS and most of the higher end filaments have couple of challenges mostly revolving around ambient temperature. My printer is in my basement and it's 65f or cooler pretty much year round. I expect I would be fighting poor bed adhesion and warping. I could fix that easily with a heated enclosure and a rebuild of the electronic housings so the brain and power supply stay in the cool, but that is a project for future me :). I could use PTEG but there is some question on how paintable it is so it's questionable how usable it is. I do have some so I will try it eventually. PTEG could make a better lip but would it glue in OK. When I started down this path I was expecting to print prototypes get a shape to 99% and make a mold leaving the finalization of how much and location of ballast. Though now I will be using some printed lure just to see if they can stand up. PLA is not an outdoor plastic but I think 2 epoxy top coats should help with that. Big pike should test the strength at least for fresh water. RiverSnallieguy Through the prototyping process I have been watching the density of my lures. Fusion gives me the volume and my slicer gives me an estimate on how much plastic it will take to print, at this point I have found a setting that replicates pine.
-
When I was carving lures I made a lot of firewood, I just had a hard time making things swim the way I wanted. If I had to guess I was probably being too cheap with my wood trying to get away with a blank that was too narrow and not getting properly centered and symmetric lures. About the time I had turned the corner with my carving skills I discovered pre-made lure blanks and painted a couple of years worth of lures. After that it was and still is soft plastics but now that my hardbody lures are in short supply I have circled back. I have had the printer for a while but mostly I printed stuff for tabletop gaming I did print some lure I found on thingiverse but I could not get any to run right. So when the bug bit me to make lures again I went down the printed trail. There is no replacement for a carved lure and I will probably circle back, I am a do what works for you sort of guy. Hillbilly, the material does sand but I don't have a lot of material to work with. The pike body above was printed with 10% infill, so after the first 1.6mm 4 lines from my .4mm nozzle it's air and a grid pattern. I did manage to find a bit of water that was close, open of ice and for fishing. The lure above swam pretty good but I do have the clearance in the wrong spots. With that print I had the clearance on the shaft of the rear portion thinking the drag would keep the clearance open and it a certain extent it did. The next version I will take most of the slack out of the shaft and put it into the sockets. The slack in the shaft lets the rear half twist and bind up randomly, I also think I need more room for paint and top coat. The other lures that passed the tub test passed the casting test too the one I was really hoping for my bomber KO actually swims better than the original KO lure body. So that body gets made into a mold and cast, I need lots and fast since I was out of that body and May long is just over 3 weeks away and IIRC 3 kayak in June. Hopefully the ice will be off at my cabin (Dory lake SK) but I have my doubts this year might not be able to get down the driveway lots of snow this year.
-
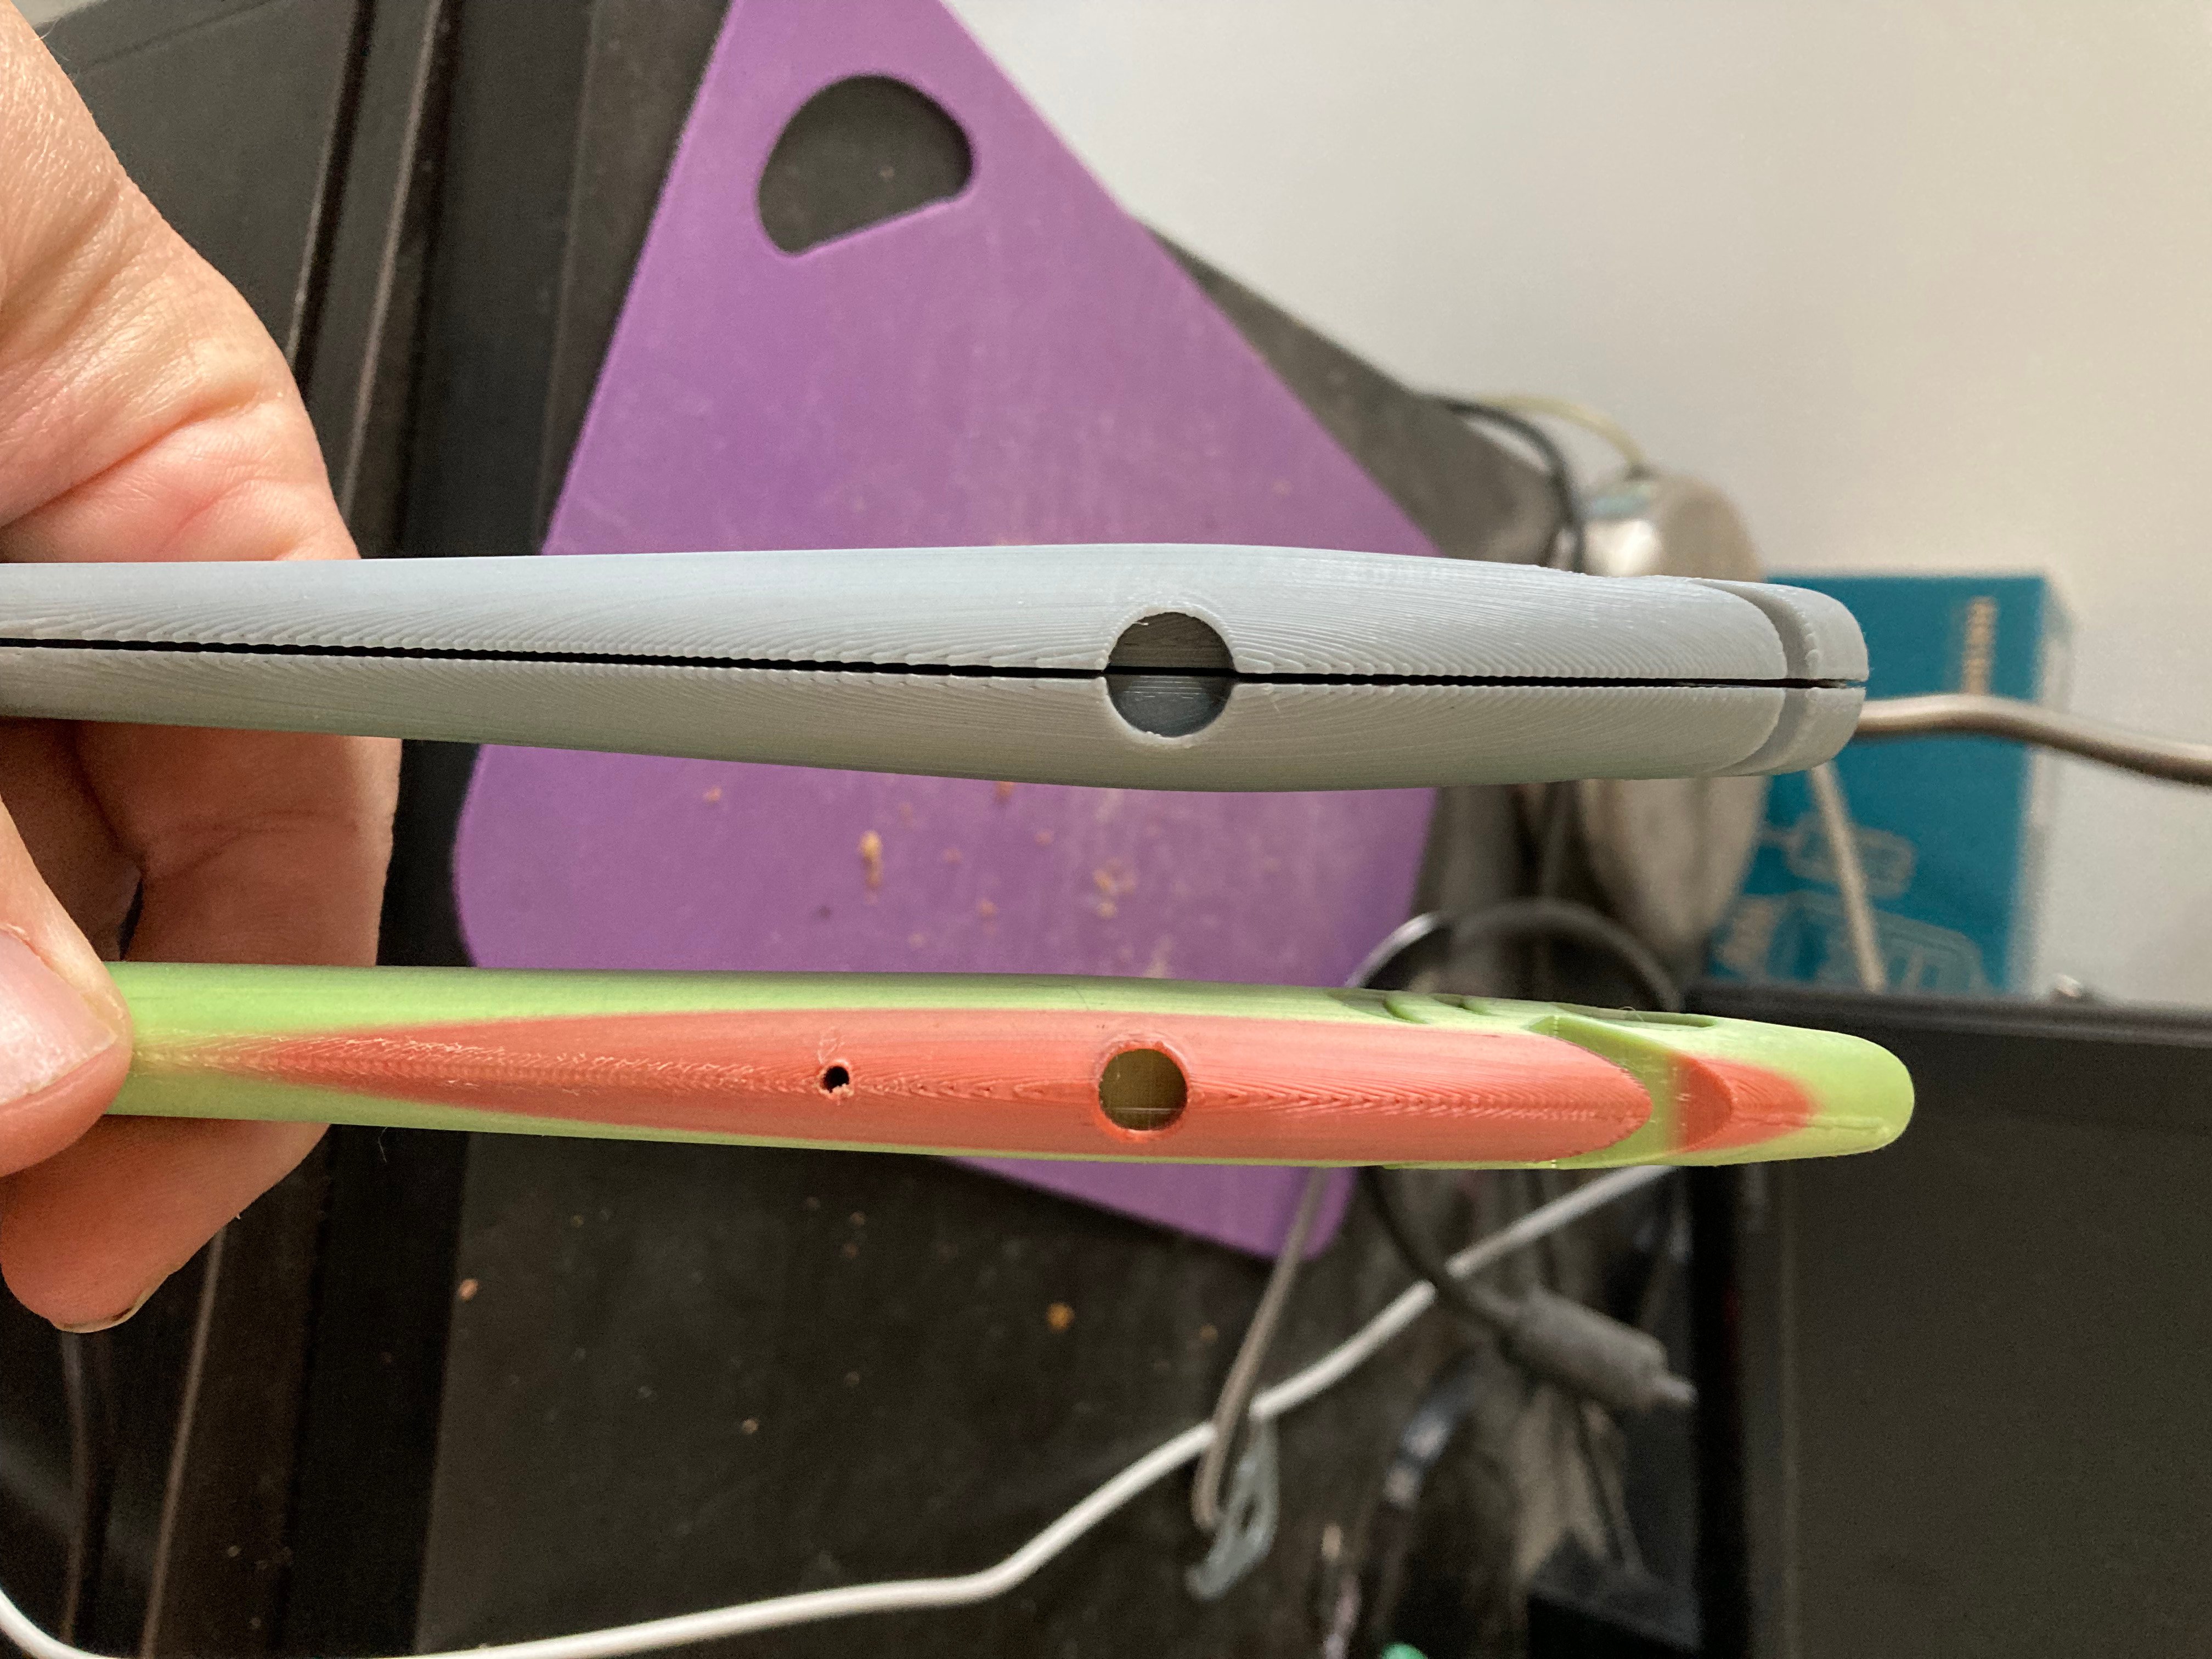
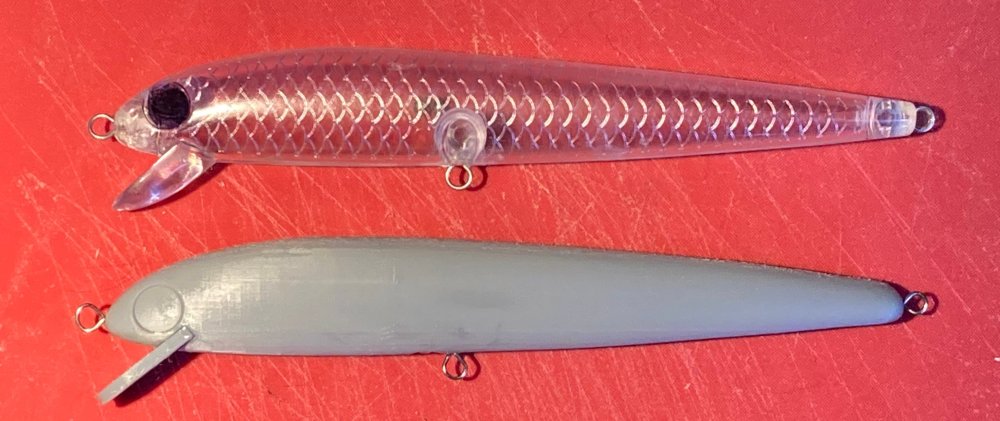
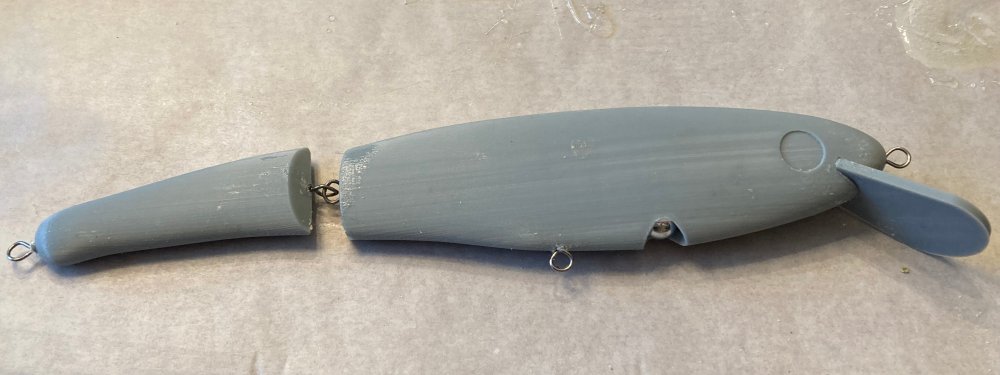
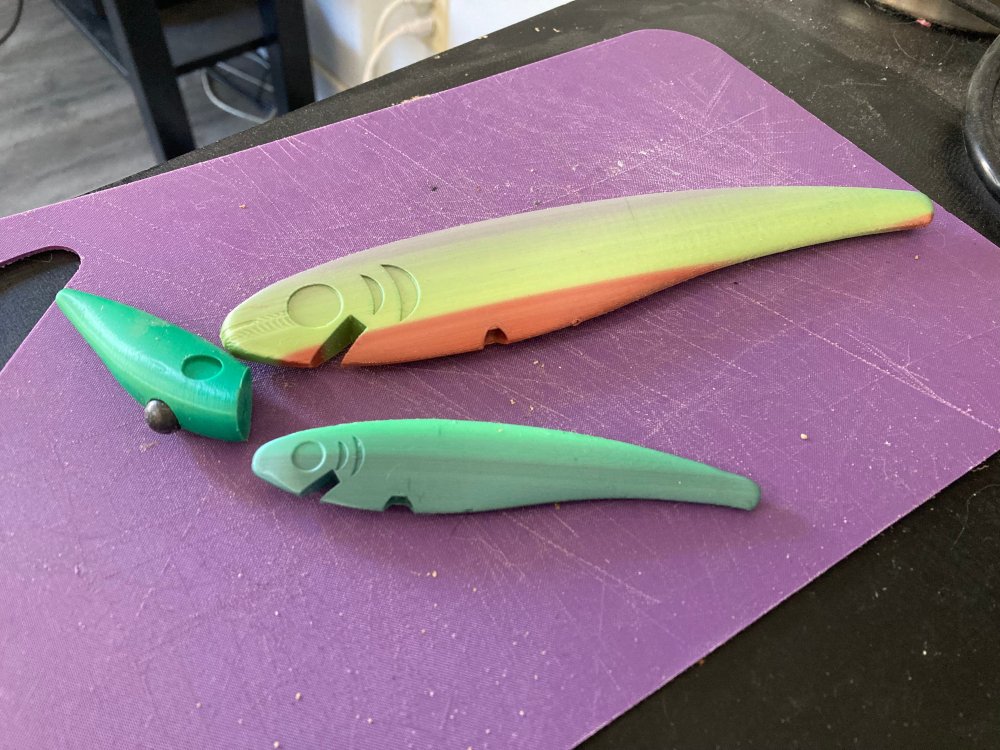
That is a nifty body shape maybe this will show the joint I am trying. I think I have seen this style a few times most recently a marling baits video. The top bait is the dud no swim whatsoever , the bottom bait swims nice. this is how I did the joint. 1 Create a sketch from the top view. 2 Draw a construction line on the center line ending to where you want the joint to be. 3 On that end point draw two circles one that is just bigger than the body and one sized to fit your pin . 4 Use the split body command using the big circle as the tool. 5 Use the extrude command to cut the smaller hole through the body 6 Turn the front and back bodies off and split the remaining cylinder in to three pieces I did 25%/50%/25% 7 Joint the middle bit to the back and the top and bottom bit to the front. 8 Use the offset command to build in clearances. I suspect I need to add more clearance in the next version to get a wider and freer motion though it does swim nicely.
-
I had turned a couple of needlefish type stick baits for surf fishing those do get moved to the freshwater box they do work these ones may be a bit heavy for fresh water they were primarily used to skip back at high speed like 55" per turn and as fast as you can fast.
-
I have used CAD systems off an on for just about 30 years so I have some back ground. But I did buy a Udemy class and that helped but the Youtuber Gulfstream Outdoors tied basic CAD to lure design. But at this point I am just playing with pipes not doing proper CAD. There are plenty of topics that I need to learn that will really raise my game. probably the biggest is parameters you can set things like max width is at 40% lure length. It looks annoying at first but it lets you scale a lure up or down and not loose what made it work. The upside of pipes is you can get a quick success and that motivates you to dig deeper. Lofting is the next step, right now I import a picture of a fish or a lure scale it, then draw a pipe and manipulate it until I get the shape I want. But that method while fast and good for cranking out something lacks real control, if you are looking for a precise shape lofting is the way to go. FYI don't buy a udemy class unless it's 20$ or less, the first time you search a subject it will want some silly price wait inevitably they go on sale. I think the first price you see if for folks who have a company credit card and just had something new dropped in their lap. Another option is linda.com but typically the best way to access that is with a library card, or at least my public library has unlimited access to linda.com but I expect it's common practice.
-
I will probably do a mix of printed and cast lures, my bread and butter lures I will cast, especially since I need at least 20 of the bomber in the next month(I have 3 tackle boxes to restock). The kicker is do I make a mold the usual way embed a lure in modeling clay and us silicon, or do I print a mold, the OP of the current glide bait thread has done that, Or do I print a mold for the two mold halves pouring silicon into those to make the mold. I'll probably end up trying all three. If I had a resin printer, rather than a FDM printer, printing all of the lures would be feasible since you can print a build tray full of bodies as fast as you can print one with a resin printer. Though as I understand it printing lures on a resin printer has it's own set of challenges. Every few years the wife and I head to Mexico and I have made much of what I use to play on the beach those I'll probably just print since I only need a couple of any body style. For me the big issue is learning the basic dimensional rules of thumb for the different lure styles. Fusion makes me cry on a regular basis
-
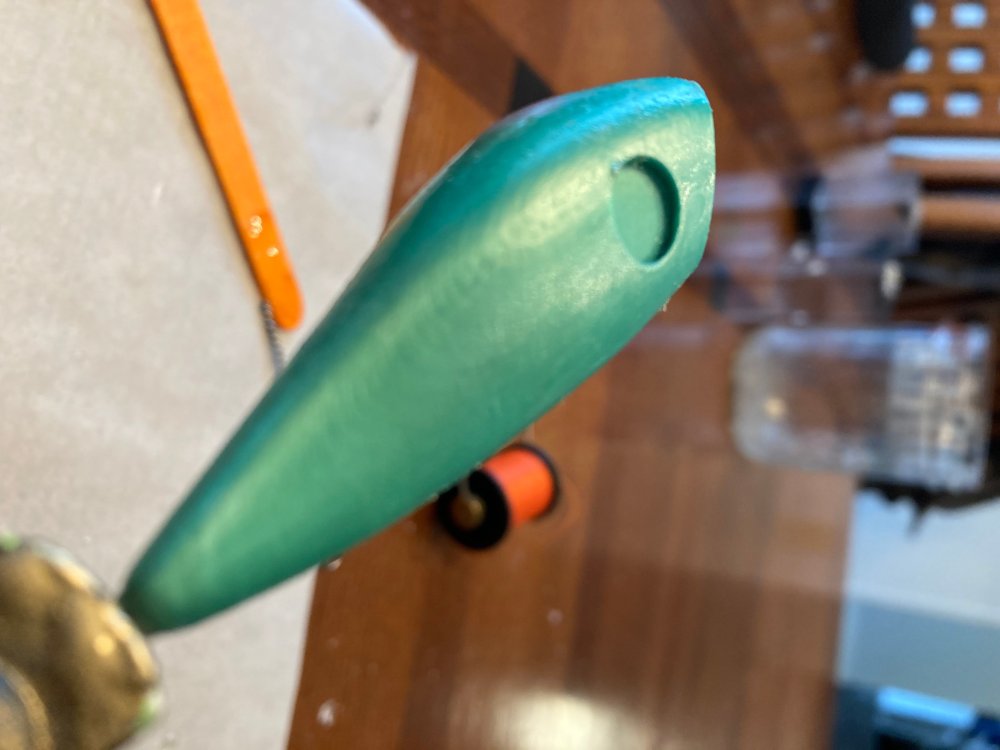
Did some bathtub testing since the weather is not cooperating. Some hits some misses and a couple of close but need some tweaks. The two out right winners the super critical bomber KO and a lipless no-rattling rap. Both of the deep bodies minnow baits need adjustment the 8" needs the ballast adjusted it swims but it's tail heavy. The 4" version of the same shape looked like a dud and I had sort of expected that since the lip was in the wrong spot and it was printed on the heavy side. but I bent the line tie down and it started to swim. so a couple of adjustments and that should be good. the basic lipless the green one above was a dud some action but not much I think I over ballasted it, I'll lighten the ballast and try again. I also tried my hand at a jointed swimbait shaped like a pike. I worked out a pretty interesting joint (I think) . But there was no swim at all. I dropped most of that idea and switched the shape over to lipped minnow. that version is on the printer now. That is the joint 2mm hole top and bottom and 3mm for the middle to provide clearance. the 2mm holes when they are printed give a good slip fit with 1/16 tig wire.

-
That looks very interesting, I was thinking that you could print a kick ass wiring jigs. How is it getting the bodies out, I would have thought the layer lines would hold on to the casting.
-
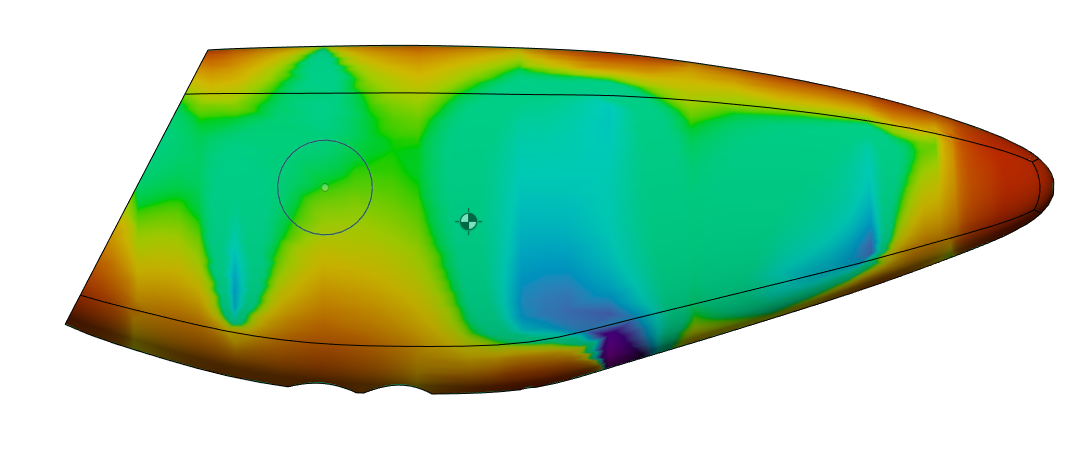
In fusion one tool I am starting to use more is the curve analysis tool. Just this morning I pulled a prototype of the printer and it had a weird dip near the tail on the spine of the bait. The curve analysis did show a blue area at that spot I adjusted it and this is the corrected look. There are two other really useful attributes Center of Mass and the Volume of the body. This particular body displaces 62 ml so I need more than that to have it sink, I am using 4 00 Buck pellets they are about 14 grams no reason just pulled it out of the air. Here is where 3d printing shines, I can control the density of the lure body by adjusting the % infill I adjust the final print weight so that when I add in the ballast I end up just shy of neutral. Hardware paint and top coat should push me over 64 grams. One attribute that I have not found but I think would be very useful is the center of area for a profile view. I don't think the center of mass mark here is the same. As I understand it, for glide and swimbaits you want the line tie on the same level on the y axis as the center of area. I think it would be possible to model a glide bait and get it over 95% right just on the screen even if your end goal is a resin bait. First you need to determine what infill % you need to print at to get the same density as your desired resin formula will pour at. I think this is important since I think you want to minimize the amount of molds you make during prototyping. Then model everything you will need component wise and if not a accurate visual representation at least something of the right weight. For hooks and split rings I would just make something that looked like a kettle weight. Once you have the model you will have an idea on how much ballast you will need. If I had to guess if you place the ballast so the the center of gravity is on or under the center of area but inline with it on the x axis you will end up with a lure that sinks level. At this point you have a basic shape with maybe a eye socket but no other decoration you want it swimming first then add the gingerbread. I would print another lure after you add the decoration to ensure it's still behaving. Warning this is pure theory/speculation it's me thinking outload so it is far less reliable than my usual low reliability of what I type. So the usual take everything I say with a pinch of salt should be a handful of salt Now it's time to translate the printed lure into a mold I am not sold on a printed mold ... yet. so print out another lure and fill the ballast holes. Give the lure body a coat of CA glue and sand smooth add the screw eyes and mold like you would for a carved lure. While the mold is curing go back to Fusion and model a fixture that you could drop the lure into that has drill guides that match the ballast locations. Once you have a cast lure you pop it into the fixture drill out the ballast holes and finish the lure. With luck the ballast location won't need adjustments but if needed you can move the location of the drill guide holes or sizes and reprint the fixture and not have to make a new mold.

-
Very good point, I am not a musky fisherman I am just a pike guy who likes bigger lures so the .031 is fine in general for my normal pike gear. I run .024 on smaller lures. The Thru-Wire versions should be plenty strong I am not at all sure about the twisteye versions I am not sure if epoxy or gelled CA glue is better I really should rig test for that somehow Just recently SWMBO has imposed our return to the west coast of Mexico next winter. The last time we were there I had turned some pencil poppers, needlefish and conventional poppers. I have 1/16" wire for that sort of stuff. There is a whole list of things to try with travel in mind but the lure with the most cross over are stickbaits Stick baits are an interesting lure I like a lure class that scales from trout to GT, I ran into a youtube channel by this guy from Africa building lures and his size of stick bait is sort of interesting https://www.youtube.com/channel/UCgj7rzp5SnESrndnMddZLrg/videos a little heavy duty for pike but it could work
-
That's for next weekend. Springtime and a lure got me my PB 24" Brown. This time of year to runoff is my favorite time to fish the bow. But I have not fished it much since getting a hunting dog. Training then just walking the dog took the place of hitting the river after work, FYI it was worth the trade . This week I will be busy painting, but I keep getting side tracked with ideas I fought Fusion till 1am and still had to adjust after the first print. This lipless was from a thread in 2016 A guy was looking for a discontinued lure, I liked the profile and and it has been spinning around my head since then. All I had was a crappy picture so I expect that other than profile it's nothing like the original. I did float test some of the bodies I have made, Ironically I am out of big hooks so that was all I could do. But the 4" version of the minnow might be a happy accident, with paint hooks and clear coat it may end up near neutral. So I Think I had accidentally made a jerkbait :). Hopefully I did not delete the GCode for that print.
-
Suick ... I need to make one, never used one but they look interesting Not 100% but close enough for a swim test
-
Ah good'ol marketing wankery
-
Sorry the original vendor was Wlure, I am currently printing my own KO of this KO. I am just wondering if this lure is considered a jerk bait or not, the distinction is fuzzy in my head.
-
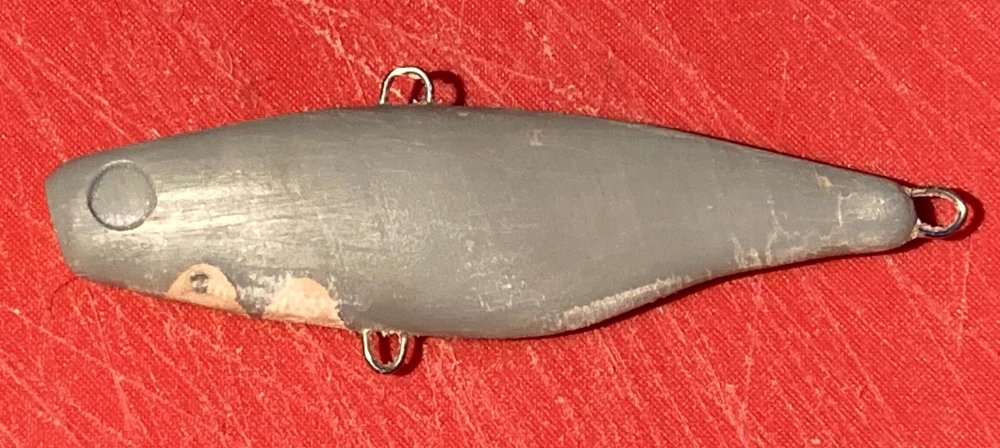
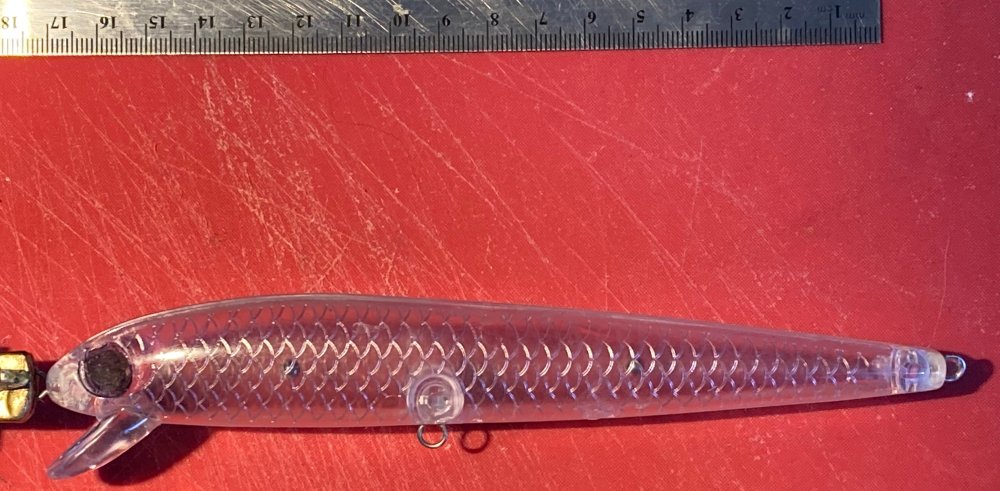
Bought this body years ago from wlure mostly as a joke since at that point I thought it was comically huge. As it turns out this body ended up being one of my most productive lures I never saw the body for sale again. So out of curiosity is it a minnow bait or a jerk bait.
-
@BTL I had a bit of a Bob Ross moment This weekend I have been putting the baits together. So after I had things glued and bondo'd I hit th baits with CA glue to seal because prints off of my printer are not water tight. But what I was not suspecting was how well CA glue deals with layer lines it pretty much erases all but the deepest and the surface is much easier to sand. So a nice glassy smooth master should be easy to get. And after a few min in Fusion a version that is jointed. The upside of the printer is as I sleep the lure body is made. I think that I may need to have two wires at the joint but we can see what happens. And apparently stainless MIG wire is too stiff to get the twist wire loop very small. And with this body the hook hangers and tie on eye are glued in twist wires.
-
It's looking more like a lure. In keeping with the printed lures I printed the lip it took 25 min to print but that is to be expected when you go for solid. The stuff it surprisingly stiff. Added the wire harness and the ballast (3/8" slingshot bearing). Still need to do a top coat on the wire slot with bondo. Then seal it and a swim test to see if it is worth painting.
-
No, fusion has an export function that makes a shape file and then I take that shape file and use a program called cura and that program "slices" the shape and generates gcode (the standard code for any CNC type operation) and then print it on my printer. There are printing services but printers like I have are pretty cheap now.
-
Sorry to hear of your losses, my condolences to you and yours. An 8" ribbon tail I'll have to look that up, there has been a couple of epic mold I just about pulled the trigger on. Pulled the last version of the printer last night, the front of the bait was too narrow so I did an adjustment and V9 is on the printer. I did a little poking around in the properties of the model and once printed the body has the density of the light side of the pine range. With luck this body will be worth water testing so the next todo is printing some lips. With luck my style of printer won't suck too much for printing lips I am hoping I can get away with a dab of hot melt glue to tack in the lips so I can cycle between styles and sizes.
-
Absolutely Hillbilly, what kind of molds? I have the 8 cavity do-it ripper mold that Santa brought me. But between my reno's and my kids reno's my garage is in an serous state of disarray (think tornado) so I have not shot it yet, never even managed one ice fish this year. The next version is on the printer now, to be able to go back in the timeline with CAD and adjust stuff is very powerful. Just need some soft water for testing. I am actually thinking that the first lure may still work, the basic layout is very similar to a grandma lure
-
So I modeled up a new version, and it's a lot thicker with a noticeable taper, but I did mess up the taper on the tail and ended up with an edge. The wire harness slot needs to be at least twice as thick. I designed in a bigger weight hole sized for a 3/8 steel slingshot. At this point I am trying to use really common items for ballast since I want to post finished designs. The nice thing about CAD is being able to go to a save point and fork a different version Hillbilly, I will be doing a bomber long a KO for a more traditional shape, I am currently on a deep profile kick.


-
The Aussies I had totally forgot about them, as I understand it fishing for barramundi is very similar to fishing for pike, now there is another rabbit hole I have to admit I will be going down more natural route as well once I get a bit better with CAD I am planning on a whitefish profile since so many of the lakes we fish have whitefish. I am using this drawing as a template

-
Riversmallie thanks for the response that gives me a lot to work with. The bigger of the lures is not fully flat sided but top to bottom it is certainly on the flat side of oval and along the length there is only about 1/10th of an inch taper though if I fatten it to the magic number it would be more like 3/10ths. The short one has a lot more taper in both directions it has really beefy shoulders and a narrow belly, it's probably one of the beefier 4" minnows I have seen. I hate to admit it but the whole jerk or minnow bait is lost on me. To me if it looks like a classic Rapala it's a minnow bait and if it has a smaller lip at a shallow angle near the line tie it's a jerk bait. For my usage the baits will either be cast or trolled so for now I will be shooting for a minnow bait rather than a jerkbait. Looking at the book where I got the profile from I do have the lip slot too far back, the original uses a screw on metal lip so the lip slot should likely be between 4 and 5 o'clock on the eye. the nice thing about CAD is that change is a couple of clicks away. FishermanBT I got most of the CAD hints from Gulfstream
-
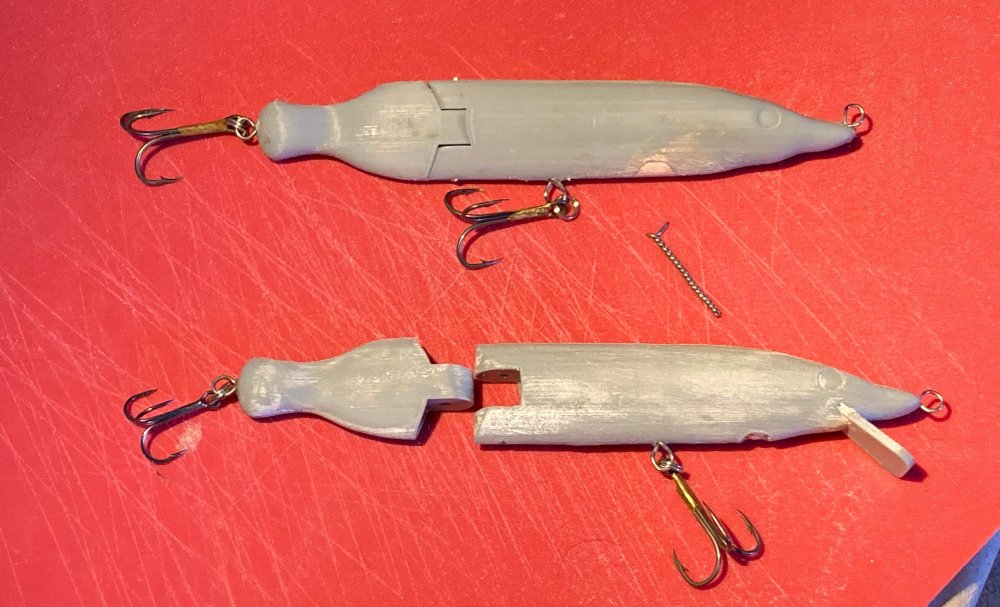
So after way too long I finally got some lures modeled and printed. Oddly enough the lure profiles are out of the book Making wooden fishing lures. The little one is a sinking lip-less , a 4" floating diver and an 8" version. At this point I think I have probably over printed them (the big one too nine hours to print) but we will see, there is still the option of making a mold and just casting them but we will see. A resin printer is in my future but not in the budget right now. But a resin printer is the way to go long term it is better for lure making so it will happen. So while I find 2k or so in the budget( the printer, resin and extras) my 300$ FDM will have to do The issue I am dealing with right now is lip design, and it is all the basic questions. 1. is the a general rule of thumb for length and width based on the lure profile 1-1.5* lure width or similar 2. how far into the body should it be. 3. And the lip angle differences between jerkbait, crankbait and wakebait Another general design question I have is there also a rule of thumb where the thickest part of the lure is in relation to the length. With the minnows I have the thickest part of the lure about 1/3rd from the nose. As for construction at this point I am shooting for one piece print. I had given a quick try to printing them in halves but it was a little too finicky. I am using screw eyes for these first lures but I will likely work out a way for thru wire. The simplest my be how the salt water guys do theirs just a hole through the whole bait and a hole to capture the belly hooks. I can also model them with a belly slot that is just big enough to take the thru-wire just like if you had sawn a slot into a wooden bait. Painting them will be about the same as wood, seal with at least CA glue but probably one layer of thinned etex as well to get rid of some of the layer lines. Youtube channels I should give credit to https://www.youtube.com/c/GulfStreamOutdoors https://www.youtube.com/channel/UCYG9GiKTixJbbJ_777nNJXQ
-
Don't tell me that the bottle of accelerator is just water.