


Fishermanbt
-
Posts
165 -
Joined
-
Last visited
-
Days Won
4
Content Type
Profiles
Articles
TU Classifieds
Glossary
Website Links
Forums
Gallery
Store
Everything posted by Fishermanbt
-
In my opinion I don’t think the offset is going to be the culprit problem. If you want to see if it is try shimming up that side of the mold with some black tape so the block sits flat. I’d just put small cut pieces on either side of the sprue. I will second the aforementioned post in that my 4 cavity and single cavity fluke from other companies than yours do the same thing.
-
I believe you might be able to add some raw plastic to it and mix it together really well. Just add a little plastic at a time until you get a good consistency. A power mixer would make life much easier.
-
I second burping it even if the injector is full. Hold injector as near vertical against the cup and slowly shoot some plastic back into your cup. I would try backing your hold times down too. Try 5 seconds and then try none. That is, shoot until the mold is full and cautiously keep feeding plastic as you back the injector out. Keep it topped off as it draws down.
-
Having same air pocket issues myself on a custom made mold. I’ll give your suggestion a try. Thanks
-
I found these to be a pretty nice fit on smaller jig heads. aliexpress.com and search for JonStar 20pcs/lot S/M/L Stainless Steel Swim Jig Blades M,Shakee Blades,Jig Dancer Blades Manufacture,Diy for jigs
-
https://store.do-itmolds.com/Sprue-Extender_p_1257.html https://fatguysfishing.com/sprue-extender/
-
I regard to me mentioning adding a touch of white to the purple I just found my color wheel. I tried to post a picture but I can’t get it to resize to be able to post. Anyway, adding white to purple or blue-violet will get you close to the bait color you’re wanting.
-
I will second that. Those look pretty darn good. Have you tried easing up the drop count on the purple to see how it looks letting your glitter and the white do the work rather than the purple? Maybe even the end of a toothpick dipped in white mixed in to the purple then add a drop of purple at a time to get the shade you want? On AI open pour swim baits I’ve noticed that the top color if left on the heat will start to migrate into the belly color. In the alternative, you could experiment with hand pouring the top half way up or do a skin pour then shoot the belly color see what that might look like. That skin pour would save some time if it works.
-
Not sure I can help matching the color. To save plastic when I’m trying to dial in a color on a multi cavity, I will shoot the mold a few times with reheated scraps to get it nice and warm. Then I will clip off the baits leaving the sprue blocking off all but the top cavity. Mix up a half cup or less plastic and shoot the one cavity. I start light and add a little color to the next shoot then compare with the first to see where it’s going. As for getting the bleeding effect as in the pictured bait. Use aluminum foil sandwiched between the mold halves as a laminating plate to split your mold in half and shoot the belly color. Remove the foil and the top half of the bait. With the belly color in place put the mold belly down on an electric griddle set to 250-300°. Mix up top color and shoot the top. You must use gloves for this. Next lay the mold belly down on the hot plate and turn the heat up to around 350° not sure on time. Some experimenting should get the top dominant color to bleed in with the belly color rather than having a pronounced crisp line.
-
Worst case scenario if you can’t figure out a fix-sharpie marker.
-
I have had some acceptable success in coping jig heads using two part silicon to make a two part mold. https://specialtyresin.com/product/cast-a-mold-platinum-food-grade I just use Lego blocks to make half the box and fill it with molding clay. Place the jig to make an outline then remove enough clay to get half the jig embedded. Remember to smooth out the edges around the head. Same for the sprew I use. After making indents in the clay as indexing pins add two more rows of blocks. Mix and pour the silicone in a small steady stream just to cover the jig(s) itself. Let it sit so air bubbles release then finish pouring the rest in a small steady stream in one corner of the mold. Once cured, flip the mold over and carefully dig out the clay. Spray release agent on silicone and mold sides and repeat the above. Once cured remove blocks and peal the mold halves apart. A vacuum chamber or pressure pot would help cut down air bubbles but I don’t have one. Stuff stands up pretty good to hot lead. I use rubber bands to hold it together. I’ll usually set my Lee bottom pour on 4-5. Not as pretty as an aluminum mold but it works.
-
A buddy of mine’s dad has asked me to pour him some tubes in Strike King’s purple he says is discontinued. I have no idea what it looks like, nor have I been able to find a reference picture. Any chance someone might have a pack I could get a picture of or link a decent internet picture? Thanks.
-
I too remember the post mentioning Elmer’s glue being mixed in with the sand
-
All the molds I have or have had do not need excessive clamping pressure. They just need the right amount of clamps in the right areas. Try this and see what you get. Clamp up the mold(s) firmly but don't try squeeze them hard. Shoot your plastic at 320° then try backing the temp down 5-10°. When you find the sweet spot on the temp that the mold doesn’t flash use a sharpie marker and write that temp on the mold. Slow down your injection plunge. If it’s a mold that requires holding pressure to fill appendages or antenna back off on the holding pressure.
-
Use what ever color name brown you have. Just go real easy with it. If it were me I’d start with a 1/2 cup plastic heated to 350° then I’d add glitter to your liking. From there I’d add a drop of red and a small dab of of brown on small screwdriver or something like that. I usually use the tip of my probe thermometer. Adjust with colorant from there. This way you work up your color around the glitter instead of fighting the glitter after your color is dialed in.
-
I checked with my neighbor last night. He only ever knew of the name being put on the bellies. He also mentioned that the makers of the bama and Crain baits have had some health issues and may not be making them anymore.
-
I went back and looked. That is Bear’s recipe. I’m guessing that the brown in the pumpkin mutes the red colorant to give it that off pink look.
-
Made right here in almost heaven West Virginia. Not sure if they have a Facebook page (I do not do social media) but you might try reaching out to them there if you haven’t already. A neighbor has several of these baits. Let me see if he knows what it means.
-
If you’re only doing a few and then taking it out just use some model clay packed in to the keel. I’ve never tried the air dry but it might work too. Quick, cheap, and easy to remove. My second choice would be high temp RTV gasket maker found in automotive section at Walmart.
-
Glad you were able to find what you were looking for. Post some bait and catch pictures.
-
In addition to user feedback, I would recommend contacting them. Victor is/has been great to communicate with. Let them know what you’re looking for like size, the layout and number of cavities, and if you are wanting stone or aluminum.
-
Maybe a Mister Twister SinSation that had the nose cut down? https://bass-archives.com/mister-twister-1977-catalog/ Page 15 of catalog.
-
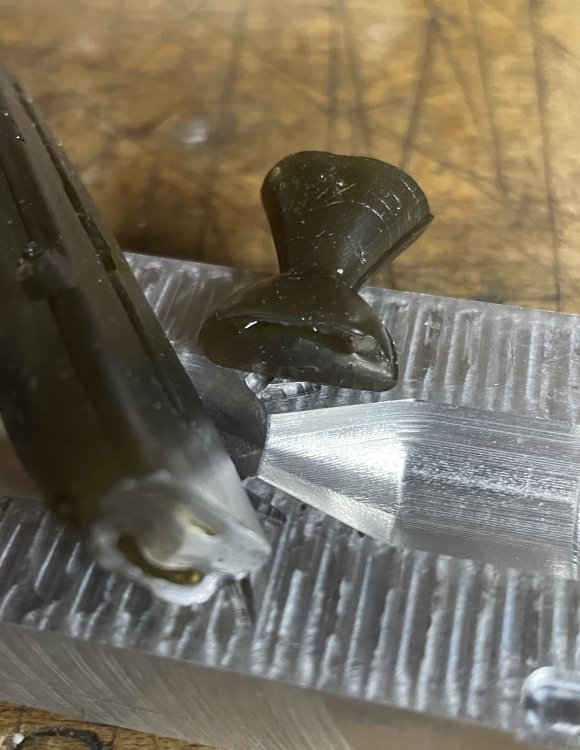
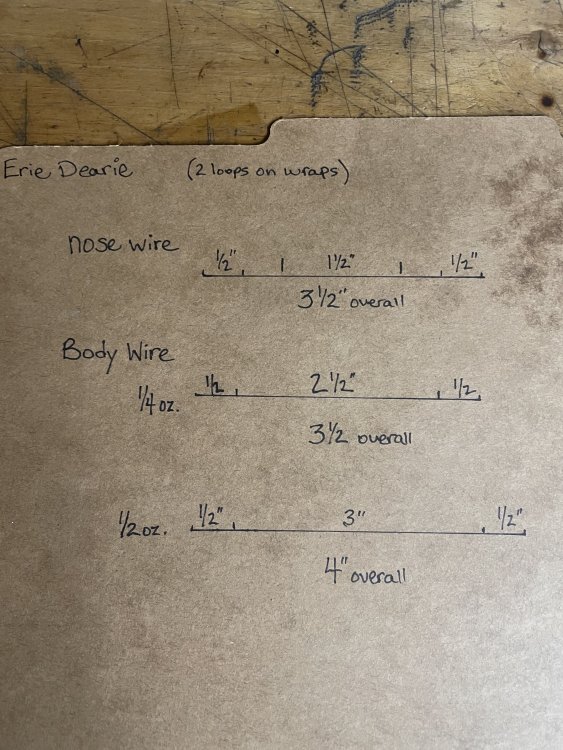
For my 1/4 and 1/2oz mold I found that the loop formed on my twistech (think it is the magnum) made the loop eye too big to fit in the mold. The Hagens small die did a better job but I had to do some adjusting with pliers. If I remember correctly I think I was using .030-.032 wire from a 1/4 pound roll. The nose wire I was never able to find the exact length of it so I eyeballed it best I could. As for the blade the #2 French blades in my opinion looked better than #3 on the 1/4 and 1/2oz weights. I will attach my cheat sheet for the wire form in case it might help. I did 2 wraps on each loop.
-
Poly Sol owns Bait Plastics and mix their plastic in house.
-
262 med/hard. The 242 med is good but the 262 is firmer to handle hook keepers while still allowing appendages to move freely.


