Fishermanbt
TU Member-
Posts
165 -
Joined
-
Last visited
-
Days Won
4
Content Type
Profiles
Articles
TU Classifieds
Glossary
Website Links
Forums
Gallery
Store
Everything posted by Fishermanbt
-
There are several different suppliers out there and several different brands of supplies. With that being said, there are many different opinions on who to buy from and what brand. To be honest they’ll all be right because it’s what we’ve used and it either fit our style of pouring or it didn’t. I would take a look at Lure Parts Online, Lure Craft, Do It, Dead On Plastics, Barlows, and Zeiners to name a few. Shipping costs vary. So do some price research between them before you buy. The cost of shipping is only going to get worse I suspect. If you sign up to receive emails from most of the above stores they sometimes will have holiday specials with free or reduced shipping on a reduced minimum order. Presently I’m using Dead On Plastic; glitter from Lure Craft; and colorants from MF (non bleed), Lure Craft and Do It .
-
From what I read on the Let’s Resin website they suggest if there is tackiness to put the project out in the sunlight to get a full cure.
-
I too have been using the Chinese uv resin. I have not ran into any tacky issues with it. To me it sounds like it just needs more time in the chamber. Check to make sure the lights you are using are the right wavelength for the resin. My question is how are you applying the uv resin? Dipping, brushing on one thick coat or are you brushing on multiple thinner coats between drying? if you are having trouble laying down a thin coat I would suggest the following. Get some warm water from the sink in a container and then place the uv resin bottle in the water. The heat will thin it down greatly and it applies much easier.
-
I suspect Apdriver is spot on. Ck out Engineered Angler on YouTube https://youtu.be/4rW1mJk51fc
-
A trick I picked up from another board to address hard pack is add a little bit of softner if there’s room then scrape the bottom and shake/stir. I have also found that those small paint mixers on amazon work great for getting smaller bottles completely mixed. Time and hand cramp saver
-
Not 100% on this but the part where the injector goes in is the spur. The part where you top off after injecting. The channel leading to the baits is the runner. The size of the runner tends to be determined by the size of the bait. This is because as the bait cools it is drawing hot plastic from the runner. This keeps the bait from denting. For example my Jacobs 3” silver fish has a 5/16” runner. It is a thin profile bait. Where as I have a 3.5” grub mold that has a 5/8” runner. It has a thicker body. As far as mixing plastics I don’t have a straight answer other than trial and error.
-
Help!!! Why are my tubes tearing open like this?!? so frustrating.
Fishermanbt replied to Fern's topic in Soft Plastics
Personal preference varies but let them set overnight then test things out. DOP is what I use and I have noticed they firm up pretty good by the next day. I shoot the AI double dipper so can dip the rod then shoot a cover color. Never had a problem using do it tube jigs. -
Help!!! Why are my tubes tearing open like this?!? so frustrating.
Fishermanbt replied to Fern's topic in Soft Plastics
Those are some nice tubes you poured there. Slowfish replied as I’m typing and said exactly what I was going to. Looks like you’re not getting a solid bond due to low plastic temp. Essentially you’re asking two very thin layers of unbounded plastic to hold up to that big lead head distorting it. I doubt that it’s the brand of plastic. Shoot a few in one color at a higher temp. Let them sit overnight then see what happens when inserting the jig with worm oil on it. If that helps move back to the two colors and try the same. Please let us know how it goes I’m intrigued. -
If you have access to a food vac sealer that welds the bags shut you could try what I did to save a few bucks. Side note, most of my plastic is in the 2”-4” range. I found large 12”x4ish” sized 4 mil zip top bags at a decent price. Made a reference jig and cut them in half-so 6” each. Meaning that I cut them from the bottom up through the zipper. I then placed the cut side in the vac seal and just used the heat feature on the vac seal to weld the cut side shut. Depending on the zipper thickness you might have to heat up a flat screw driver and flatten the cut end of the zipper before welding the cut end. I therefore doubled my stock and have only had one fail so far. To load them I put baits in a plastic container with a few drops of scent and a few drops of oil. Shake until baits appear coated. Using a flexible cutting mat cut to fit inside the bag I arrange baits on the mat. Slightly bow the mat and slide into the bag. Flip the bag over on the table and the baits usually release allowing you to remove the mat again using a slight bend. Now the baits are nice and neat in the bag not all bent or distorted. Hope this makes sense.
-
I know it’s one more expense but alsworms gives some good advice. I started out with kitchen ziplock bags and drowning the baits with oil/scent. I learned fast this was not the way to go especially for long storage. I started using some 4 mil bags a while back and they are a night and day difference. I also just do a lite coating of oil/scent. It will not seep through a 4 mil bag, thus you will not need as much. If I’m stockpiling I will forgo the plastic bags and just use a plastic tote with a decent lid and no oil/scent. I just stack the cured baits the best I can and add to bags as needed.
-
I know I’m not the right guy to be answering this due to my work habits but let me just say this. Being an explosive technician (I apologize if that’s not the right title) is dangerous but it all comes down to what consistent measures one takes to be safe. It sounds like you’re on the right track and I like that you added the mechanical dangers. A few additions I would mention is where are you venting the fumes from the fan; where are you pouring at in your residence and are you using equipment dedicated solely for this fantastic craft?
-
Try using a digital thermometer that you put into the plastic. Heat plastic, stir gently, take temp. Just don’t let the thermometer rest on the bottom of the cup. Hold the tip slightly off the bottom. Note the temp and then try your inferred thermometer and compare your readings. I’m curious if you’re getting false readings.
-
Back you temp down to around 290-315. The molds will let you know if you’re to cold. Jot down what temp gets a complete bait for each mold. This should help the problem.
-
That is either a piece of graphite or carbon I suspect. There is a plant about 15 minutes north of me in WV. Used to make high heat high wear molds https://agmwv.com/products/grafstar/
-
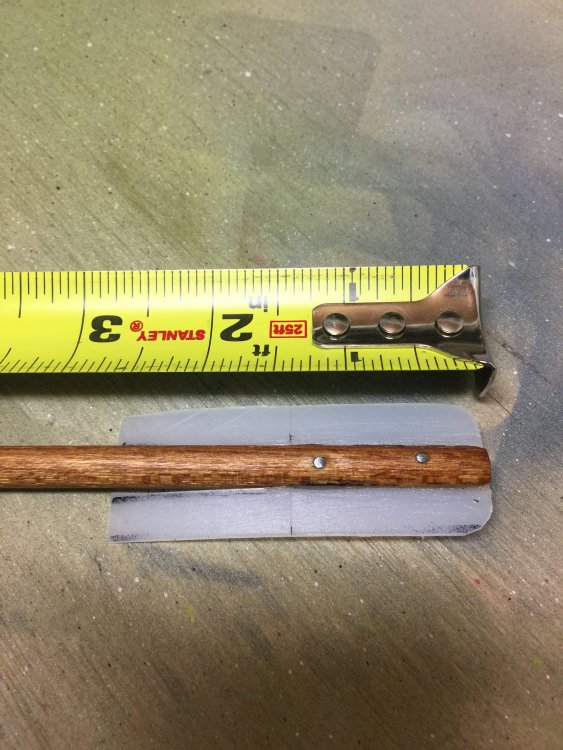
I made a stir stick to mix up my Dead On gallon jugs. Chuck it in the drill and mix away. Beats shaking the guts out of it. I used a 12” long 1/4” wooden rod with a groove cut up the center about an 1 1/2”. I then inserted a piece of plastic milk jug cut just shy the opening width and drilled pilot holes through the wood and plastic. Then I applied glue and used finishing nails as holding pins. All that’s left is to trim the corners up, cut the nails off, grind them down flush and wipe it down with isopropyl alcohol to remove any debris.
-
I scavenged my motor from a junked microwave. It is the turntable motor. It is listed as a 5/6 rpm and seems to be a good speed. Not hard to extract and a breeze to wire into the power cord cut from the same microwave. I have not had any trouble thus far but I will say it is not as robust as a rotisserie motor. It however was free. Just a thought.
-
I have never seen the set up your looking for. If my memory serves me correctly I remember reading a post one time pertaining to this topic. Someone had mentioned it most likely comes down to cost. Most fishermen would rather drop a few dollars on a few bags of different color tubes rather than the cost of an intricate machined mold. Jacobs Molds sells small tube molds 1 1/2” and 1 3/4” with core pins. You just have to cut the tails. Not hard to make a tail cuter with razor blades, washers for spacers and a couple bolts.
-
Glad to hear you got the lead pot dialed in and working for you. Just use caution when it starts to drip with the gate shut. Seems to happen to most of these Lee pots over time including mine. A small can like a cat food can will catch the drips and keep them from splattering onto you and the work surface for the most part while allowing you to access the spout.
-
I’ve never made any crank baits before but I do pour jigs and have a lee pot. What number do you have the dial set to? Sounds like you have it set way to hot. Most of the time I keep mine at around 4-5 for molds and that’s with junk wheel weight lead. I watched one of those videos you mentioned where he was doing belly weight pouring. If I remember correctly the stream of lead was somewhat broken (not a fine, thin consistent stream if that makes sense). This causes me to think he had his temp down just hot enough to make the lead liquid.
-
I’m wondering if the uv epoxy is shrinking or expanding some following the cure and the adhesive backing on some of the eyes are not strong enough to maintain their bond. Thus, lifting the eyes up? Just thinking out loud.
-
I just started airbrushing and am using uv epoxy to top coat. I built an enclosed turner with uv lights inside that I removed from a nail drying lamp. I then lined the inside with aluminum tape for reflection. Still need to fine tune some things but works pretty good if I do say so. Thinking about adding another 4 lights. I’m getting tack free baits in about 30 minutes but I’ve been going for about an hour just in case. I try to put on lite/medium initial coat and then a second coat if needed. Just have to make sure to pop the air bubbles prior to curing. I believe the closer to the light source the faster the uv will cure. This epoxy has been great for making eyes too.
-
Large stick on eyes for mojo trolling jigs (stripers)
Fishermanbt replied to catsmeow's topic in Hard Baits
have you tried making some? I ran across this YouTube video and started making my own. a little bit of a learning curve at first but after a few mess ups things came together. Now the possibilities are endless. -
Post your pics of your work station and/or man cave
Fishermanbt replied to Socal399's topic in Soft Plastics
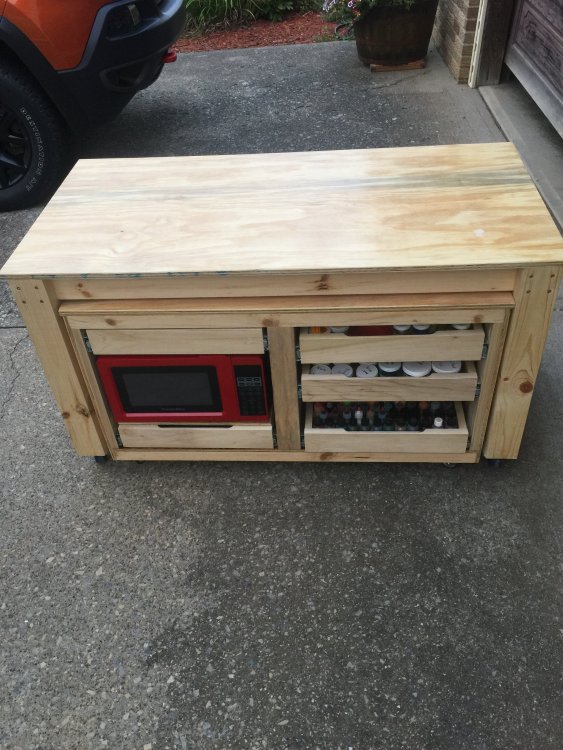
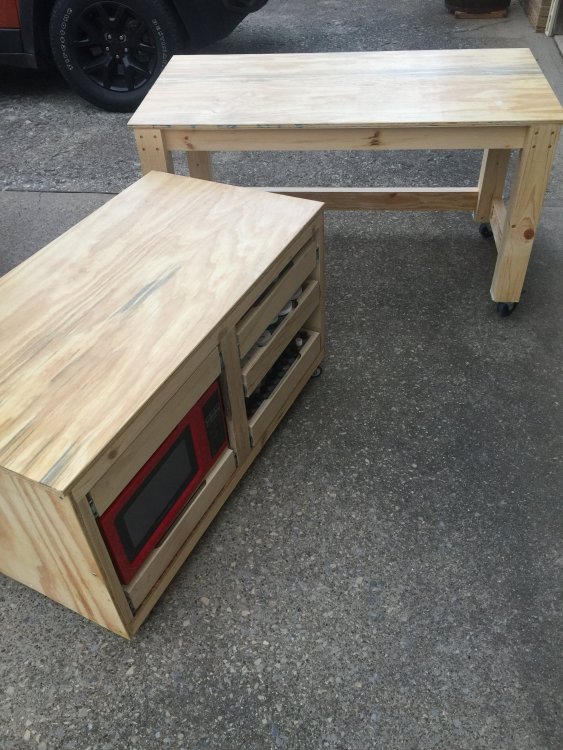
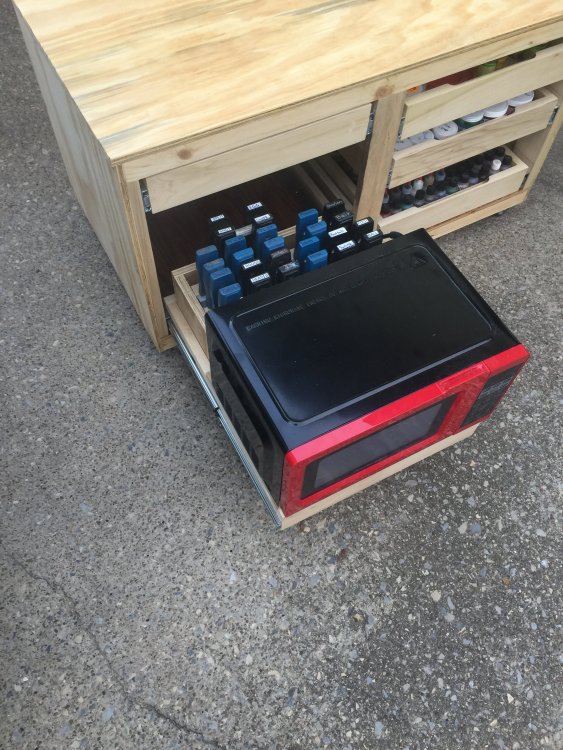
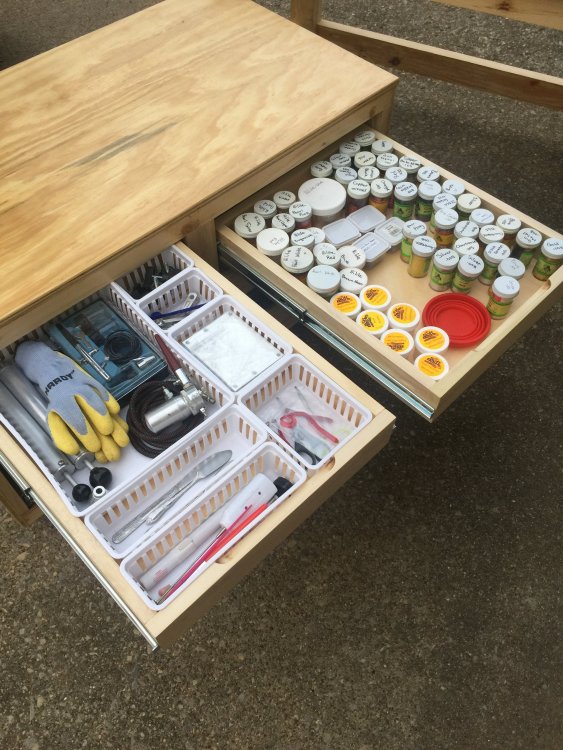
Here’s my mobile set up for the garage. Didn’t want anything permanent since the purpose of the area changes frequently. Still have a few other things to find a home for but that’s another mobile cabinet to build first. -
I took Smalljaw’s YouTube tutorial (search TU for Powder Painting Spinnerbait Heads) on spraying powder paint and adapted it to my present setup. In his tutorial his air eraser uses a pick up tube to feed the powder. I have a Paasche Airbrush (ER) Air Eraser - Etching Tool that doesn’t have a pick up tube in the aluminum jar. I got the threads dialed in and 3D printed a working model. I left threads off the jar end of the adapter. Now I can use a verity of jars by simply sacrificing a few lids by cutting a hole in them and epoxy the adapters to the top.
-
I was fortunate enough to have found a used Bosch heat gun like this. Super handy w/o a trigger and an adjustable base.


