SW Lures
-
Posts
1,258 -
Joined
-
Last visited
-
Days Won
22
Content Type
Profiles
Articles
TU Classifieds
Glossary
Website Links
Forums
Gallery
Store
Everything posted by SW Lures
-
You can get glitter from Lure Parts Online and others. Some here have other suppliers. I just want subtle reflections. The smaller size is best for me. When the clear is still wet I tap the glitter on the bait. Let it dry, tap the bait to get the lose off and put on another coat. I do shot smaller glitters through a .05 gun that I have, but not often because of chemicals in some of the clears. The tapping works good enough for me. Especially after learning how to get some control of the glitter. I also use certain colors for a certain paint schemes. Like if I'm painting a shad pattern I use silver or a fire opal. This is just one opinion, Dale
-
Yep, Wicked and Auto Air paints are made by Createx. Stay with Createx it's a good paint. As you go a long you may look toward other paints for different schemes. Go to the Createx web site and read up on the difference about the paints. I suggest that you do this with any paint you go with. I hope that I didn't confuse anyone, but I don't think so. Dale
-
D2T (devcon two ton) is a great clear coat that would be good for you at this time that you are at, and yes 30 mins is a must. Make sure to mix properly. There are many good clears that can be used. In time you may want to change to one of them but for now I would tell you to stay with D2T. As far as paints, BobP gave you some ideas. Read up on what can be used over what. Example, water base over lacquer or visa versa. I decided to branch out to different types of paint and some do not like others. I'm not sure the right rules for them so I'm not going there. Createx is a good brand but I had some issues so I switched to Wicked. Wicked is more manufactured for what we do in making baits, but many here uses Createx and I do at times. Like Bob referred to, taxidermy water paints are something that I am getting into. Enamels like Testor is another that I'm playing around with. Remember that ALL paints have health issues with them some more than others, treat them with respect. Even water base paints leave droplets everywhere. Wear appropreiate safety protection equipment with them respectively to whats needed. At the least a dust mask for water base. Some may say glasses too. I hope this helps, Dale
-
I true my trying to understand what your problem is, a bait or just a tail. A picture would be helpful. I have some idea's if it the tail only. You have to have a glue in area I would think. That's where to look at. Like using two pieces of wood clamped down to hold. At that point you can vise it down. If it's the bait I know how to. Dale
-
Purpose was servered Gliders. It was a good lesson for sure. I started paint some ten plus years ago and it was around then. I just wasn't sure, I started reading some write ups or videos about the painting technique, maybe in the last 6-7 years. The glue question was just curiosity. I've seen some pretty cool patterns. Will these schemes catch fish as well as a natural scheme, who knows. I'm going to give the glue a try and I'm going to get some manufacture compounds. Just to see what will work better. Dale
-
Ok, thanks Mark.
-
No issue Gliders. It maybe the just to make a different look. Or the paint got pulled by a clear or something. Then they tried to duplicate the look. The video refers to why I used it originally. I've played around with on baits, but not very much. I used paste on furniture. I see solutions being used by most then I read white glue being used. Being courious I thought that I would ask and see what the differences may be. I have to do some traveling and may not be able to post for a few days. If so I'll read when I get back. Thanks for the replies, Dale
-
Times 4 or 5!! Keep up with all info. I have infomation about every lure that I have made and will make. I also know all mix colors that I have made. Cookbook for paint schemes. Why do I do this? Because I didn't in the beginning. I made a color on scheme and could not reproduce it again. I've got info on a spreadsheet in the computer. I got info on profile patterns that I shape my baits with. You are not going to remember something! Dale
-
Edited, I got carried away below about booths and didn't say anything about poly and clears. I have a 3 part poly that was given to me and I know why it was given to me know. The measuring is a pain in the proverbial buttocks. I have very little time in this hobby and going through this is not worth it. Ever read up on KBS? I dip it at the moment but I am going to start shooting it. I am tired of having paint droplets all over my work area so I decided to make a paint booth and while doing it I might as well make it capable of using any paint. (End of Edit) I'm going to build a booth in about a month or so and have read up on this at lengths and have talked to custom car painter/artist. I also have heard of auto clears from members of TU. Woodie is one off the top of my head. All car painters are high on using HVLP guns (no pun intended). I picked up one up that is a mini. The motor/fan needs to be intrengent to exploding from fumes.....this is a most!!! The next thing that I have learnt is to make a chamber between the filter/fan and the work area with a baffle system. The baffle chamber will create an even draw across the work area. The next is to draw from the bottom but you need at inward draft also. The fan(s) need to draw at least 400 CFM. You can make a adjustment release to control the draw, The exhaust needs to allow the movement of air, no restrictions and keeping all clean and clear of obstructions. Remember and warning, making a paint booth must be done properly. Their are some that would say buy one because of insurances. They have something to it. You really need to know what's going on with explosive paints, etc. I'm going to use pig board (sortta) as the area under the bait work made of aluminum. Then the baffle chamber, a filter that will catch paint and can be removed and another put into place. My lighting will be intrengently (explosion proof) safe. My exhaust will be 6" PVC and it will be grounded because of static electricity. My dust colecting system is grounded also. Am I going overboard?........Nope, me and my shop will be safe. And yes my insurance company knows what I do in there. If you are not using a paint/clear that does not have corrosive or explosive properties you can do things a tad bit easier. I will still wear a mask and goggles that are appropriate for this. There's a little more to it than most think. Most don't realize what these paints/clears can do. Good luck, Dale
-
I was doing some reading and saw where this person used a white glue rather than store bought crackling solution. I was wondering if anybody uses glue and if so how do you apply and clean up? I know, how it's applied sounds dumb but I want to know how it's used totally, not assuming nothing. Thanks, Dale
-
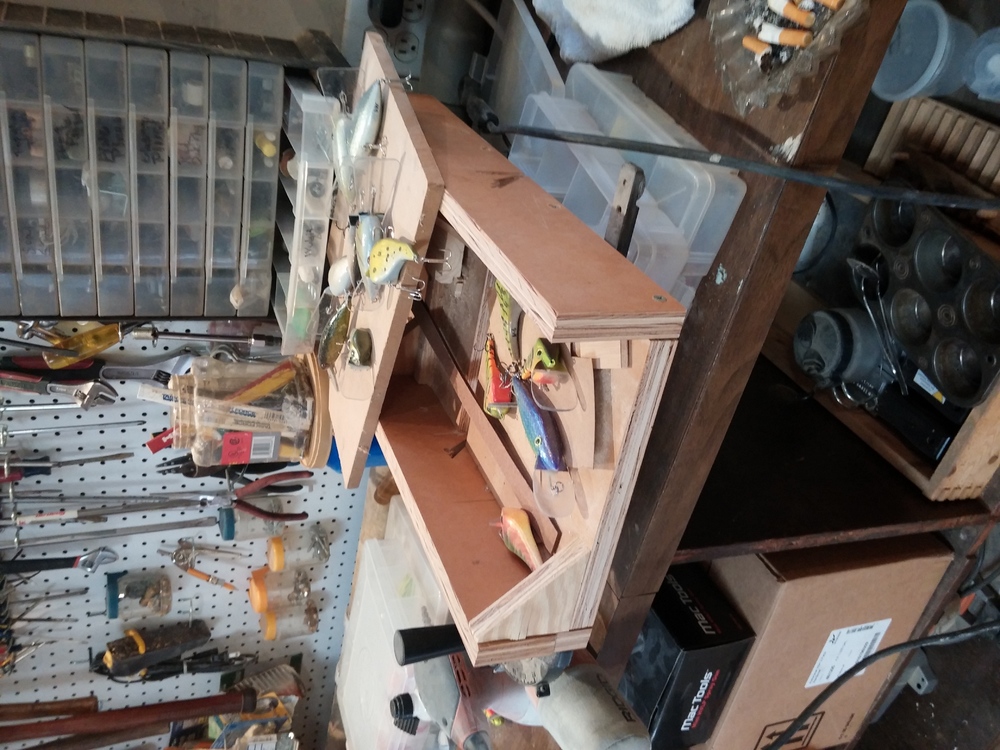
This is the sleds that I made. Its setting in a miter slide gauge. I use this one for more than 45° which is not often. Sorry for the clutter, I'm change old tackle boxes to new ones. This is one that I use most for baits. The blade in the saw is 1/16". I can put a fence on this one and cut quite many at a time. As it is, I can cut 7-3/4" blanks at a time. This one adjust in as many directions as you would want. All position locks down for safety. I thought this could give you some ideas. Sorry about the pic's being side ways, I've got to figure that out. First time that I could send an pic from my phone. Yipppy!!! Dale
-
This is a screw set up in the tail drill hole. Try this one that I've seen and use when I need to turn lures now. I even use them for painting now instead of helping hands. Depending on your eye size use a exacto knife handle with a adpter glued on the bottom if the handle by thread or thread the handle (maybe). You can do your painting using the handle, locked to the belly eye and do your top coat then place it on the turner. Very useful way to do baits. It's a little pricey to buy a lot at first but if you buy as you go it's not bad. Dale
-
Nice work Gliders, I have one like that. Not As Nice, I just put plywood together and boards. What I put in one of my post is that I have blocks/stopping that will adjust. You can do that here too I would think. I also have mounted clamps to hold the block in place, this keeps the fingers out of the equation. I'm wondering what angle wedging would do for you. The problem with that is the wedging would need to pivot. Suggestion; put marks on the fence closest to you which would be degrees of angles that you will want. A square block of wood being placed in the same spot, then can be pivoted to the desired angles and clamped. Dale
-
Yes I cut and drill in the retagluar shape once I know where everthing goes in the bait. I dont use a band to cut anything over a 1/32" or what circuit board thickness is. Circuit board fits tight and perfect for me in the cut. Your comment Gliders got me to thinking about a resaw blade that I have for 1/16" or 3mm cut. The teeth are off set and wore down some, but the blade is 1 1/4" wide. For cutting the slot that would be fine. The band saw is the way Gliders, thanks for getting me to think about that. Dale
-
Tell me if I'm wrong, you would want the vortex to be created on the sides, top or bottom of the bait. This is where the swim comes from. The vortex had already been created before what the drawing shows. As the water comes over or around the bait, the vortex is created before the the the tail area. This drawing of the vortex maybe just for a visual reminder only. Not needing to be an exact drawing. It gives the idea that Mr. H had. Dale
-
X2, it's seems a short answer by Gliders but he is dead on. After you do the reading and need a detail answer........go for it. Dale
-
I really enjoy reading this. I also wish I started doing this hobby ealier. Something that I notice while the upgrade was going on was that for a second once and awhile I saw Asian writing on the screen. Is there a TU site for different languages? Better for communication I would think. With being stated how did you learn english Nathan? You being from another planet in all! Dale
-
I tried cutting lip slots after shaping and at a angle using stop blocks and a sliding fence against the sled fence. These all had issue's like what Travis describe. I then thought to just go as simplistic as possible. Mark was commenting on drilling ballast before shaping, because I had blow outs on the sides of the bait. So I thought why not just do it all at that time. My sledd can be adjusted all the way to straight (vertical position) out of the nose of the bait cut. Remember I know where I want to cut it with my paper template glued to the block of wood. No matter what Gliders I hope you get it the way you want it. Dale
-
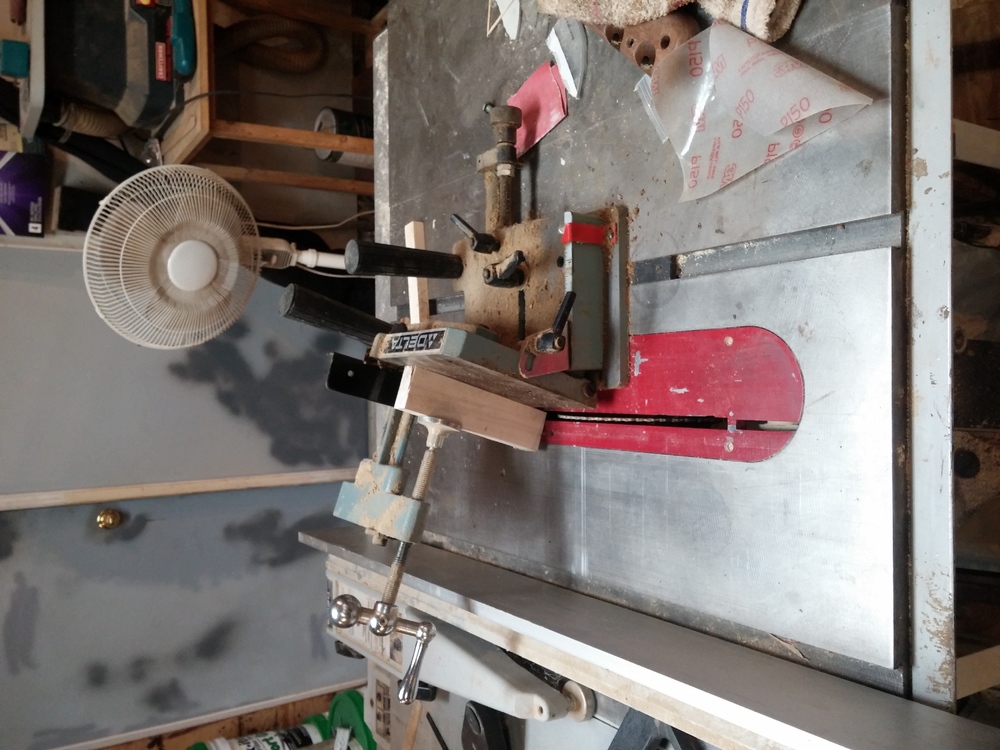
I'm like Mark, sense he suggested it to me some time back. I just have a end block that moves to except any length block of wood up to 12" in length. I have a few wing nuts to tighten. I took a old metal rule and glued it to the cross piece of wood. I cut it right on every time and to the depth I want. I have a gauge for blade height. It just slides over the blade and all I need to do is the math, but I already have the numbers on a sheet for all degrees that I use. Dale
-
I haven't ever painted this before but I'm wondering if I have ever seen this color. I cant remember anything but I do like the pale yellow with the green color. I would differently start with transparent mixing the two colors. I would also try over laying the colors. A white base coat would be my choice also. The yellow seems to be a flat color with the green showing subtly thru. Maybe a taxidermy color could be used. Good luck, Dale
-
That's is very true Monte. If its not whats new it is over looked. Just to help out someone down the road with any bait with blade(s). This what I did last night, I took a Q tip and silicone and smeared it over the areas on the blade, shaft and grommets at the ends of the bait. im letting it set up over night. I was thinking about what Fshng2 was suggesting and came up with this. Once dry, which will be tonight ill dunk it in sealer. I'll clean it up and hang it up, still leaving the silicone on. Once painted and a clear to opp coat I'll remove the silicone with little to no problems. Thank you for your ideas and conversation. The bait will have another chance to get another one. Dale
-
I'll do it Fshng2. I think you are right about giving time to get the sealer soaked into the wood. I'll tell you what about the bait it's a go getter for bass period much less peacock bass. The old ticker gets to motoring when a swirl engulfs the bait. You know you can't beat a top water strike. Its the ones I remember the best. Dale
-
The eyes were painted on Monte. This is a thru wire Mark that bends from the nose/tail to the belly eyes I believe. You can't move them at all. Barry this about an 1" in diameter. The body is 6" long. The hooks are a heavy galvanize that gives the bait ballast. These hooks needed to be removed. I weighed them and will compensate for them. I'm worried that may change the way it sets in the water. I'm going to try to fine some hooks that are comparable. Dale
-
Thanks, that's what I was worried about is the blades. I wish that could change them out, but I can't. On this bait they came up short IMO with the soft aluminum. I wish that I could turn the blanks, I would make more. Thanks again Fshng2, Dale
-
I am refurbishing an old Luhr Jenson Woodchopper (top water). This is a bait that I have caught a many fish on. If you have ever had a bait that you just can’t do without you know where I’m coming from. This old boy has caught a many very nice size fish. I should have took a picture before I started removing the tap and eye’s. I have got the front propeller repaired and straightened. In this pic you can see the end grommets they are con vexed/cap. These will be an issue when I seal the wood. These are a little lose but not much. I need to do some fine sanding and I am ready to seal. Here you can see the belly eye’s and these are concave into the wood. I am thinking on just thinning the sealer down and let run into the voids and sealing them off that way. The through wire is really not in the category of a wire it’s a rod. LOL Yes that front eye is twisted and I am not going to bend it straight, a big largemouth did that to me in a down tree ..... I got him tho! The hooks originally were mounted to the eye of the through rod. No way any pull outs on that or split ring failure, line breaking is another story. Ugh....... I don’t even won’t to think of that! I was wondering if any of you have tried sealing this type of bait and could give me some better ideas on how to get this seal as best that I can get it. Thanks for any thoughts, Dale