-
Posts
906 -
Joined
-
Last visited
-
Days Won
45
Content Type
Profiles
Articles
TU Classifieds
Glossary
Website Links
Forums
Gallery
Store
Everything posted by Chuck Young
-
I tried applying nail polish before fishing. Fish didn't seem to mind - but my skirt kept getting tangled on the trolling motor.
-
Put a top and a fan on that sucka and you are good to go. You can vent it through a dryer vent or window. The lures look good. Top coat will bring out the depth in your color. Use 30 minute epoxy, not 5 minute. Normally pictures showcasing ones work are posted in the gallery with a link in forums. Noobs should get a mulligan, imho.
-
You can also spray light fluorescent colors, then mix GID powder in the topcoat. I bought the 7 pack from glow nation. sometimes I dab a spot of darker GID /epoxy mix on the top. It makes a great washed out effect on jigs. Createx also makes a glow base and flo white, but I have not tried it. It is mostly sold in auto paint sources.
-
There are a few videos on you tube on these. They are good for coarse work only. Plus you are very limited on colors. But I think they work on soft plastic. But for me nothing beats an airbrush. You can mix any color you want. You can spray for coverage or small spots and thin lines. Colors are more durable. Check craigslist - sometimes you can get a whole setup pretty cheap. But stick to the brands recommended on this site.
-
How muck Flex Tape did you use?
-
-
-

3 Way Hairball Crappie
Chuck Young commented on Chuck Young's gallery image in Best Homemade Hardbait
- 2 comments
-
- hand carved
- dives
-
(and 2 more)
Tagged with:
-
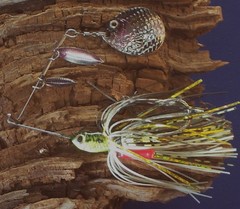
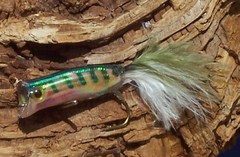
Ultra minnow spinner bait with three fish detailed spinners. UV purple highlights and scale detail on all blades. Very light paint with plenty of shine left. Willow leaf spinners counter rotate. The # 4 colorado blade has roller bearings. Body of bait has 6 different layered materials, some tied flat and some flaired. Red rattle chamber with room for a second.
-
- uv
- counter rotate
-
(and 1 more)
Tagged with:
-
-
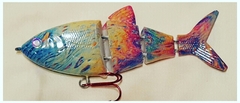
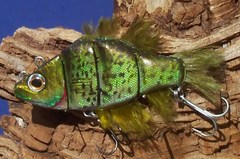
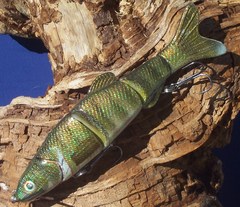
3 Way Hairball Crappie Bodt length: 3-1/2” Overall length: 4-1/4” Weight: 1-3/32 oz. Hooks: #2 and #4 VMC trebles Paint: Createx paint applied by airbrush, sponge, and brush. Buoyancy: slightly negative with a level orientation in water. Sink rate: 2 seconds per foot . Construction: carved birch, dual hinged, 4 dual “v”section swimbait, Through wired to both attachment points with .041 wire. Wood is sealed with superglue, finished with 30 minute epoxy. Fins and tail: split maribou epoxied to topcoat (can be easily replaced). Innovations: True crappie profile 4 wide profile sections in 3-1/2” length swimbait. Dual “V” shaped wooden sections do not allow light to pass through the joint between sections. Through wired hinges and attachment points. Innovative holographic finish (my invention) resembles scales, provides great highlights, and generates a slight color shift. Pictures do not do it justice. Split maribou fins and tail cannot foul on hooks, compress when lure is retrieved, extend and flutter on pause allowing for great life even at rest. They do not inhibit the action of the lure like other materials. Dual attachment points Front attachment: It hunts side to side as jerkbait. It holds depth all the way to boat from 1 to 2 feet. It swims with casual action on retrieve. Rear attachment: Lure hunts side to side and up and down as a jerkbait Lure holds depth all the way to boat from 3-4.5 feet It dives quickly to 3 feet Vigourous swimming action
- 2 comments
-
- hand carved
- dives
-
(and 2 more)
Tagged with:
-
-
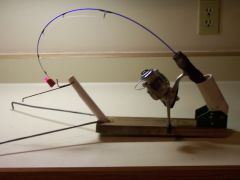
Not a chance. The rod holder is pvc pipe held in place with a 10-24 bolt going through it and the vinyl frame. The 1/4" rods on the front are drilled through the 5/4 in pressure treated lumber. A welded washer holds them on the base. They swing out around the side of the hole and extend beyond it. The tips are turned downward and pointed, so they actually melt into the ice a bit. In fact, they are a little hard to pick up at the end of the day. The tip of the rod remains centered on the hole, well behind the tips . So far it has held up to 17-1/2" trout, 7 pound smallmouth, and some pretty big largemouth. The rod can be switched out for bigger or smaller prey. They are not going anywhere. The only limit I see is the size of the hole.
- 4 comments
-
Use createx airbrush restorer for end of day cleanup. Do not thin your paint in the bottle - it forms clumps after a while. If you save any thinned paint for later use, use a separate airtight container - like a test strip or drug bottle. Use airbrush paint. thoroughly rinse before cleaning - including backwash - with water. Back wash your brush - spray airbrush restorer through, put the cap on the front and blow crud out backward. Sputtering is usually caused by paint supply, not air supply.
-
Use airbrush paints - pigment size matters. Use the createx thinner to match your paints - it is sooo much better. Get a regulator for your compressor if you do not have one (most of my detaiil sprayng is done in single digits psi) and a fine tip and needle. Use a tank or a 15 foot piece of polyeurethane 1/4" airhose after your regulator so you don't get a pulsing effect when your compressor turns on / off. Get createx airbrush restorer for end of day cleanup (worth its weight in gold). Some of the best painters I know apply some detail with a hand brush thinned to 1 or a few bristles. It is the best way I know to get a sharp red gill line.
-
Great link. There is nothing like a side by side comparison.
-
Most polishes contain carnuba wax. How do you prep this for paint?
-

Symmetry When Making Crankbaits/lures
Chuck Young replied to Ultimate Predators's topic in Hard Baits
Using a preformed sanding block to round out top and bottom of balsa lures helps greatly.- 10 replies
-
- 1
-

-
- symetry
- craknbaits
- (and 4 more)
-
You can paint a scale pattern over the applied holographic tape. Apply a scale netting - something thick like a bath sponge. Make it tight. Then spray your lure from an extreme forward angle. You get a graduated scale image. light in front, dark in back. It also works well on a 3d foil scale pattern (without the mesh). The picture is candy black over white. Sorry about the photo quality. My camera is a piece of junk.
-
Try using a wider brush for application. Thin out the bristles to 1mm or less thick. This makes application of epoxy much faster and smoother. If you also thin with denatured alcohol the thin bristles break up any bubbles real nice. http://www.tackleunderground.com/community/topic/31822-a-better-epoxy-brush/
-
Any news on the 2016 lure contest? Where do we look for the notification and rules?
-
Drill a small hole and inject a drop or two of epoxy. Roll the ball around until it is well coated. The prop it up to put the ball in the forward position. Then seal the hole. Rattles in lipless lures were origionaly the result of an accident. The ball was fixed in place at first so they were silent. Evidently some got broke in shipping or when being used. They were so effective with the rattles that fishermen were taking the lure out of the box and banging the nose on the store shelf to free up the nose weight. The next thing you know, the manufacturer was getting all these returns of lures with broken noses. When the manufacturers contacted the dealers and discovered what was going on, they decided to make them that way on purpose. Now we have rattles in almost all our lures.
-
Lately I have been wondering whether matte or gloss really matter that much once a lure is in water. Isn't a finish is matte because an irregular surface diffuses the light. The difference between light reflecting properties of the finish and the air are very high. The comparative difference between water and the finish are much less. Dip a matte finish in water and it has the same wet look of a gloss ( for some strange reason). It is worth considering. I bet if you submerged two lures ,one gloss and one matte, you would not be able to tell the difference.
-
I cut out and sand the profile to shape. My paper has the joint lines on it. Apply a reverse copy to the other side. The first cut to the center is made with a coping saw on those lines. I cut toward the front to achieve a double V joint. Then I sand to even with a belt sander and files. The front of each section has a steeper angle. That is done with a belt sander as well. Next I put in the hinges and finish the shaping. Wraps around the hinges can be used to hamper movement.
- 13 replies
-
- swimbait
- wood working
-
(and 1 more)
Tagged with:
-
I think the length of the segments is off. Maybe cut the rear section into 2 sections. I read somewhere on this site that the proportions should be 2:1:1 or 1.5:1:1. In other words, the head should be 1-1/2 to 2 times the length of the rest of the body segments.


