-
Posts
906 -
Joined
-
Last visited
-
Days Won
45
Content Type
Profiles
Articles
TU Classifieds
Glossary
Website Links
Forums
Gallery
Store
Everything posted by Chuck Young
-
heat transfer foil..pdf I am still new at this process. But I have had some good results. Hopefully this will provide a foundation which we can build on. Please let me know what you think. If you think of something new, please keep me posted .
- 4 replies
-
- 1
-

-
- heat transfer
- chrome
-
(and 1 more)
Tagged with:
-
I have a lot to learn about chroming lures. But this info should be helpful to many of us. heat transfer foil..pdf
- 2 replies
-
- chrome
- heat tranfer
-
(and 1 more)
Tagged with:
-
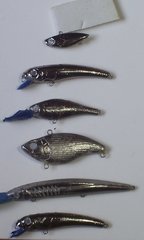
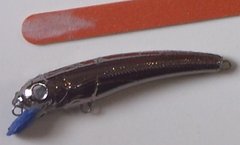
I have been experimenting with heat transfer foil and epoxy. Pictures are in the gallery. A tutorial has been prepared and I hope to download it soon. Let me know what you think.
- 7 replies
-
- chrome
- heat tranfer
-
(and 1 more)
Tagged with:
-
- 1 comment
-
- chrome
- heat transfer
-
(and 1 more)
Tagged with:
-
-
- chrome
- heat transfer
-
(and 1 more)
Tagged with:
-
-
- chrome
- heat transfer
-
(and 1 more)
Tagged with:
-
If you fish in salad, you can even go to single hooks. Search Siwash hooks.
-
The filter you used on the camera really highlights the shine.
-
I prefer the red.
-
Great product, Great prices. Great service. The two letter reply was accurate, concise, and wasted little time. If you try them, you will be very glad you did.
-
I am a big fan of holographic films on lures. The big trick with either of these patterns is getting the scale pattern. There are two ways of accomplishing this. For the mostly white lure, I would apply paint in this order: Entire body - O white Entire body - Createx F white (fluorescent white under clear holographic film has both fluorescence and reflection) To apply scales using nail art film, I would apply the adhesive, then lay a scale mesh over the lure before applying the nail art film. Apply pressure with layers of craft foam in a vise while it dries. Do both sides before removing the film and scale mesh. This should leave you with the holographic scales with blank spaces where the mesh was. If you use clear holographic film, the fluorescent white will show through even where the film is. Finish the lure by using a gill stencil. the color used for the gills on the lure is Folk Art neon blue. You will have to thin it if you want to spray it. The kill spot (black) is generally applied just above the lat line and just behind the gill plate The second method for applying the scales is to use Thinned Wicked pearl silver sprayed through a scale mesh. Apply a thin coat only - you just want to get a hint of reflection. The other lure you showed is a Citrus shad. After applying scale effect, spray F yellow along the entire length of the bottom. Then also just above the lat line - not all the way to the top. Apply scale mask, then spray Folk Art neon blue to the top. Fade it down on the sides over part of the yellow, but do not cover all the yellow. The kill spot shown is also neon blue. Personally, I prefer a black kill spot. I also like to put a touch of F sunburst to the belly. I wanted to post a link to a gallery pic. But I was unable to access it. Only a few are available to view .
-
Tate Aldrich was the origional vocalist. Amyl was kicked from the band for making an aceTate. I still have no idea how to use Amyl acetate with heat transfer film.
-
Amyl acetate is a solvent. What does it do? Does it interact with the heat activated adhesive? How do you use it? Do you apply it to the foil or the lure?
-
-
I am looking to start carving cedar musky lures. What are your favorite sizes, patterns, actions, etc. Attach pics if you will. I am not looking to copy what is out there. Rather, I want to develop some new ideas to improve what is out there. What kind of action should I look to create? What would you like to see?
-
-

How to get matte finish on baits like wiggle wart
Chuck Young replied to Rnd101's topic in Hard Baits
Great job with this thread! -
Great video. You might want to post a link to homebrew tools. The great thing about this design is that it will work great with jointed baits as well.
-
Zooming, over-zooming, and cropping are low tech ways of reducing file size.
-
I got some chrome heat transfer foil. Now I am trying to figure out a good way to apply it without a heat transfer machine. I bought teflon sheets, .31" silicone pad, and I have an iron. So far, this will not work. I have tried a few different adhesives in a soft foam press. This has led to some interesting effects. I have also tried vaccu-forming the foil over the lure with a heat gun after applying adhesive. Then putting it in a press till it cured. This has led to the best coverage. Adhesives used so far: 1) Elmers craft adhesive 2) Four drops Devcon 2 ton reduced with 2 drops Denatured alcohol. I also will purchase some 3m spray adhesive (probably 90, since it handles heat better and has the adjustable spray).
-
I have tired that. When I finish my experiments, I will post some pics for comparison. So far I have done nail art powder brushed to the topcoat, over: 1)rustoleum metalic silver, 2)aluminum foil, 3)white 4) wicked silver. also I have mixed it with topcoat over; 1) painted lure 2) white blank 3) foiled and painted lure.
-
I know little about Musky lures, and nothing about musky fishing. Although if someone wants to educate me, I have a few road trips left in me! That being said, most musky baits I see are made of much stronger wood. Mark is definitely right about the weight needed to strengthen balsa to withstand a large toothy predator. Additionally, to achieve the right buoyancy (if you are making a diving bait) you have to add a lot of weight. That would also counteract the properties of balsa. A stronger more dense wood might be recommended. I am sure more experience members have some recommendations.
-
I learned a lot. Great vid. Greater b8.
-
Turn an avid 2" frog into a mouse. Fold paper and draw ear pattern as shown. Test fit on blank. when it is right, unfold it and mark stencil plastic where you want the ears cupped. Punch holes in a piece of 1/4" craft foam where you want the ears cupped. Use a heat gun to vacuu-form the ears. Fold the plastic to match the two indents. Lay your paper pattern on the fold, putting the cups in the best looking place. Cut them out then attach to frog blank using the fold line and the seam on lure as a guide. The beginning of the ears should sit just behind the eyes. Painting does not require an airbrush. 1st coat as follows: bottom - Createx T med gray. Sides - o white. Top - T dark brown. Apply the second coat sparsely, leaving plenty of brush strokes showing the first coat. Bottom - o white. Sides - T dark brown. Top - T med gray. Tail: Lay some black, brown, or grey maribou fibers flat on a treble and whip finish. The eyes were made with a thin coat of wicked P black sprayed over silver eyes.
-

How to remove cracked bills From wood baits?
Chuck Young replied to stumpjumper16's topic in Hard Baits
I wonder if repairing the lip could be repaired with superglue, then an epoxy topcoat more easily.


.JPG.18b4ced1eb75780bfb6bba32f8d48d5a.JPG)