Will Wetline
-
Posts
87 -
Joined
-
Last visited
-
Days Won
1
Content Type
Profiles
Articles
TU Classifieds
Glossary
Website Links
Forums
Gallery
Store
Everything posted by Will Wetline
-
Welcome to TU, SMBLifter! I lift a few smallies myself, and quite a few good ones this season with the Midwest Finesse ("Ned") jig head attached to them. Since 2012 when Massachusetts prohibited the use of lead jigs and weights weighing less than an ounce, I have been experimenting with bismuth/tin alloys. I've settled on 88% bismuth/12% tin for some molds; ball jigs are fine with this as is Do-it's Herring Head and, yes, the Midwest Finesse ("Ned") jig head. Since you're just getting started, let's look at your first concern: Be safe! Wear goggles and gloves. Work in a quiet environment and only when you're clear-headed, not after beers with the boys or with playful children, pets, or agitated adults around. And do not rush the process of casting molten metal. Please forgive the lecture; although casting, once you've got the hang of it, is fun and satisfying, it's got to be serious business to avoid painful injury. Also in this photo is Drop Out release spray which is helpful with everything and a necessity if you want to get a bismuth/tin casting out of the mold! It's available from barlowstackle.com. Now let's look at the devilishly-difficult-to-handle wire forms (bait keepers) for the Midwest Finesse mold: After fumbling and cursing trying to settle these little parts into the mold for the first couple dozen pours, I experienced an aha! moment: find a small magnet. Simply orient the wire form on it properly and, using your thumb, push it off into the mold. Place the hook next to it and then nudge both together so all is properly seated. Yes, this does take time and patience. I'm sure that cadman, whom I greatly respect for his expertise and generosity in sharing his knowledge will back me when I say be patient with your work and practice. Then practice some more. Onward to tools: L -R: tool handle with magnet on end, lineman's pliers and slip joint pliers. I use the linemans to grip the head (not the sprue) of the casting and pull it up and out. Use both to remove the sprue. The alloy, https://www.rotometals.com/lead-free-bullet-casting-alloy-88-bismuth-12-tin/ is hard enough so you wont mar the jig head. If you're wondering what's with the big screwdriver, that tells me you haven't read the instructions that came with Lee's Production Pot IV. (Presumptuous of me to assume that's what you've got for a melter, huh?) It really helps to stick it in the slot at the end of the plunger and turn it to stop or at least minimize dripping. A batch of Midwest Finesse jig heads in various stages of production: There are 1/16 oz, 3/32 oz. and 1/8 oz. jigs pictured. I've read that the above linked alloy is about 85% the weight of lead. I've used the 3/32 oz. probably 95% of the time to get to my smallies at depths of 10' - 20'. What else? I've had no problem with the hook keeper loosening in this alloy, even in the 1/16 oz. head. Give the mold another coat of Drop Out after 3 - 4 dozen pours. From Wikipedia: "Bismuth expands 3.32% on solidification." Even though the Owner 5313, size 1/0 hook is far more expensive than the Eagle Claw "Lil Nasty," I prefer it because the points don't turn nearly as easily when retrieved through rocky habitat. That all may be more than enough for now so I'll close by once again welcoming you to Tackle Underground.
-
I've been using one for several years now and like it better than the other skirt making tools in its price range.
-
I tried the high temp red silicone recently and it worked well.
-
I bought this oven thermometer in a supermarket for about $6.00.
-
That was my question a couple of years ago when experimenting with Rotometals' 281º bismuth/tin alloy. Here's a response from Kurt Urban of CS Coatings: "Unfortunately powder paint needs a minimum of about 275 degrees to achieve the chemical cross-linking for a complete cure. You may see some hardening at 225, I would just test some cure samples and see if their durability is acceptable." "There are slight gases from the polyester and coloring agents that are released during curing, so I would not advise using an oven you cook in." What I'm doing now, using 288% bismuth/12% tin alloy, is getting a full cure in the Eastwood set at 350º -which is actually 300º - and baking for one hour. (At least my Eastwood's timer works properly.) I broil my burgers in an Oster until they're medium rare.
-
I like the roominess of the Eastwood oven but the thermostat is way off - set at 350º it's slightly under 300º. I checked this by placing the same oven thermometer in my almost new kitchen oven which showed a temp of 355º. I baked at what on Eastwood's dial read 350º for an hour and then tried the whack-a vice test and the bounce-on-loading-dock test. Results: the paint is fully cured. Note: The temps you see on the dial on the oven and on the thermometer were set for a lower temp alloy but were still off quite a bit.
-
I'm having this problem with Chrome. It's a bit of a rigamarole to sign in but not a major issue.
-
I Googled the manufacturer of the Hot Pot II and did not see that nifty cradle shown in the video - only that crummy, too-small trivet used to support the pot. http://www.cpalmermfg.com/categories/Melting-Pots/ I used the Hot Pot II for years but upgraded to Lee's Production Pot IV and find it easier and far safer to use.
-
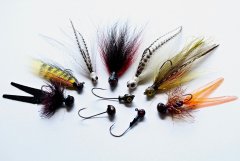
I'm prepping for my annual trip to New York's Salmon River and thought I'd put up some pics of my fly boxes. Left - Right, Top - Bottom: Blood Dots, Glo Bugs, tailed Estaz flies, sucker spawn All are tied on size 10, 2x strong hooks. Frammuses, tailed Estaz flies, Crystal Meth, Bear's Crystal Egg, Steelhead Candy Here's an assortment of Woolly Buggers, Wooly Worms and a few generic nymphs and stone flies. These Buggers are tied on a size 6, 3X long hook, 2X strong, of course, for steelhead. These I present "down and across," swinging above bottom with the current. The egg patterns in the first two pics are bounced along the bottom. (Also called "dead drifting.") If I had to choose one pattern among the many it would be . . . The Frammus. I scaled this down from the original which was designed for king salmon. It's simple to tie - which is important because quite a few are lost to the rocks - and it's very effective.
-
Hello, fellow bait makers. I seek smallies in Massachusetts' Quabbin Reservoir and make a yearly trip to New York's Salmon River for steelhead. Re bait making, my interest falls mainly into the Wire Bait category although I do tie egg pattern flies for steelhead. I'm pleased to become a member of the TU community and welcome you to a tour of my tackle room: This bench and shelf unit has been repurposed from a former hobby, R/C model building and flying. The contents of this steel locker will be familiar to all who cast metal. Fishing in Massachusetts, all jigs and weights must be lead free if under 1 ounce so, since 2012, I've been using bismuth/tin alloys and will be trying pewter which won't be heat-critical to fully curing powder paint. (I won't miss the odor of vinyl paint!) Storage for rods and reels in my current rotation are in the rack on the floor and lots of feathers and other tying materials take up the top half of this shelf unit. Packages of soft plastics in boxes under the staging bench will be sorted into the plastic containers in the middle of the shelving while yet more stuff occupies the lowest levels. Do we ever acquire enough gear? Apparently not. This simple box fan worked well evacuating the fumes from vinyl paint and is still used to get unhealthy stuff out of the room. Here's the main bench where molding, painting, assembling and tying gets done. I forgot to sprinkle a few steelhead flies into this photo, but the baits you see pictured here leave the bench and are, on a good day, found in a smallmouth's jaw. Comments and questions are welcome. Will Wetline