


Bassinman200
-
Posts
17 -
Joined
-
Last visited
Content Type
Profiles
Articles
TU Classifieds
Glossary
Website Links
Forums
Gallery
Store
Everything posted by Bassinman200
-
597010147_Wutizitoriginaldesign.jpg
Bassinman200 commented on Bassinman200's gallery image in Best Wire Bait
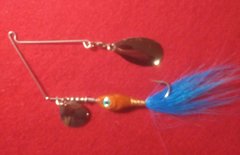 Original Wutizit inline/spinnerbait combo. This one with dies white bucktail, number 2 and 4 nickel Indiana blades, in 1/4oz suze
 -
-
20190207_210313.jpg
Bassinman200 commented on Bassinman200's gallery image in Best Custom Rod or Reel
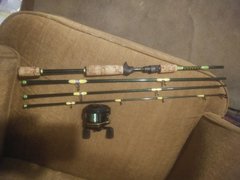 Snyper Custom built 4pc pack rod. Built on four piece 7'3" Matrix woven twill graphite blank by American Tackle in mod-fast action, med-hvy power, 3/8-1 1/2oz lure weight, 10-20lb line weight. Equipped with Americn Tackle guides in a spiral (acid) wrap pattern for 100% use of blank flex and power, cork split grip set up around a Fuji open reel seat. Lime and yellow Pro Wrap thread over silver holographic mylar accents with silver metallic trim bands, with a short diamond butt wrap. Rod is puropsed for flipping, worming, and jigging in heavy cover.
 -
-
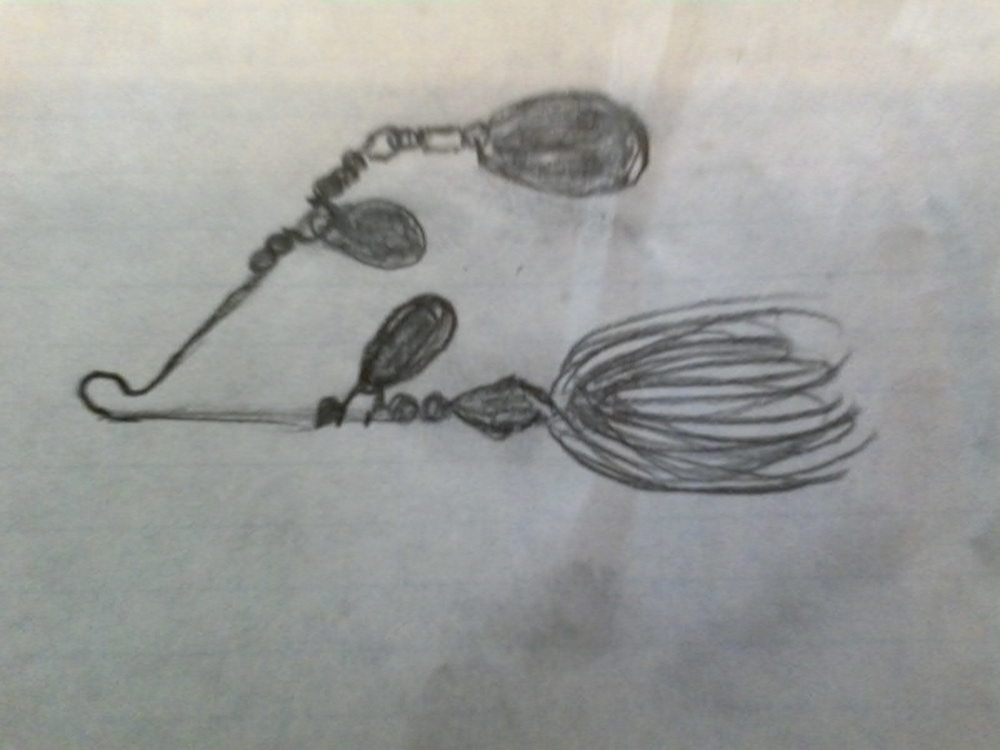
Budman Of course, you are correct. It was my fault for not putting a bend slightly forward of the fartherst front bead in the illustration. I was primarily concerned with the extra blade's position as requested by another member. As you stated, this would roll over itself as is depicted, yet I did say that it worked (performed and caught fish). I do regret not having the actual prototype with me to use as a template, since it does have the bend which we know must be included, and I certainly would have placed this bend in the sketch. another solution, which I also thought plausable, would be to possibly place 1/4 or less of the head weight above the lure center and 3/4 or more of the weight below the lure center. I have never done a mold in that fashion, do you suppose it would work, and even with a straight shaft like depicted above?
-
"Mad Moose Baits", is that the name of your company? Mine is "Snyper Custom Rod & Lure". Building both since 1972. I started with SNIPER with an 'I' as usual, but somebody had a hissy fit so I changed it. Hey, back in '72 we couldn't research such things on the internet, we had to pay attornys and such. Anyway, haven't had any problems since the change in '74. Seems like it was the correct decision since these days the majority don't know proper English anyway - like, "It's importnint", and "He a bad one", etc. Still a one man band here though.
-
Well, it just shows ta go ya that great minds think alike. I (thought) I came up with this back in 2004, but according to my cousin, I didn't. In the 1970's, my Uncle designed a sort of 'reverse bear trap' hooking mechanism that sprung open instead of closed from the rear of a topwater or diving plug. Same cousin researched that one for him and found that the lure never was mass produced, but patent was applied and granted in 1909 and again in 1916 with some improvement or the other. But, whenever I make my own personal spinnerbaits for myself or friends, half of them get the extra blade, usually a Colorado or Indiana because at times it seems to play a role in a larger creel. Of course at other times, nothing in my 6 tackle boxes helps.
-
I have neen building rods since 1972. I started with a Fenwick fibreglass blank (that was all they made at the time, and didn't come out with graphite blanks until 1973). I can only remember that it was deep dark brown, a 6 footer, medium action, and I built it into a casting rod with the then very popular 'pistol' grip. I wrapped it up with chrome plated casting guides, less the white ceramic inserts, they were too costly at the time. It was a favorite casting rod, even though I had purchased a couple of graphite rods by Lake King in late 77. My next build was another Fenwick fiberglass suited for worm fishing in heavy action. It was a honey mustard colored fiberglass blank Model #CA577. I used it with up to 12" Mann's Jelly Worms. I fished it in a new lake built for a power plant that covered several existing farm ponds, one that was well known for having big bass. I was using a 12" Mann's in brush piles that a friend and I had put chained Christmas trees in the cove prior to the official flooding. I hooked up a 10-12lb sow that inhaled the bait. She made a run away, then made a 180 for the boat. She went under the boat just before I got the 4.7:1 Bantam to tighten up the slack. Coming out the other side, she slamed my rod on the gunwale and broke off the tip about 12" down. She came up with a tail walk and shook the hook out. So much for my Fenwick, and so much for my best catch being outdone. Since then, I have built everything from rods for Bluegill to rods for Blue Marlin. I have an extensive collection of combos, and have built the 'Dream Rod' for many an angler for b'day and Christmas gifts, and just because they want it 'Their Way'. Not every off the rack rod is a perfect combination of what you want in any style of rod. You may like the power in the butt section, but the action may be totally wrong (too slow or too fast). If both of those are ok, it may have EVA grips and you want cork. It may have aluminum oxide guide rings but you want silicone carbide, etc. It may be IM6 graphite and you requirements are for IM8. If you want your perfect rod, odds are 99 to 1 that you, or someone else, will have to build it just for you to your specifications. That's why I build most of my own rods, and build for others. When you become dedicated to fishing, what you use is just as important to you as the proper weight and properly drilled bowling ball is to a devout league bowler. Shure, he could use a nicked up alley ball that is 12 pounds when he needs a 16, but his average would greatly increase if he had a custom ball made just for him. Yes, Mud Hole is a great place to get everything needed for building your rods, but there are several others like Angler's Workshop, etc., and prices are competitive. I would suggest BUILD, then after you do, you can decide to continue or NOT TO BUILD. But at least give it a try, I think you'll be surprised at what you made, and proud when you fish with it.
-
Well, I didn't get over to the computer, so I made a 3rd grader type sketch because I'm not an artist. Anyway, here is the concept, and I have used them while fishing and they catch fish. Only thing to advise is to be sure that your lower clevis is far enough away from the head to allow free turning, and so too far from the head that it will strike the upper blade on the upper clivis.
-
JimP, Correct. And as soon as I get to my desktop puter, I will draw it out on the Paint program, download it to flash drive, and post it from this tablet. I don't have a drawing program on this tablet, and I lost internet service at my house, so I come next door to my sister's house to use her's. I was thinking about a patent, but my cousin is an attorney and said it was just a combination of two already patented items and not worth the trouble. Be back at you soon.
-
mtranger. If you are coatin g wraps on a rod turner, try coating under each guide first, then cover the outside of the wraps. Stop the turning motor if you need to, to get the line straitght on double foot guides, then start turning again to do remainder. Continue this on each guide. When the guides are small, like an 8,7,6 or smaller, I sometimes masking tape the blank between the wraps (yes the tape must be cut to width) to insure a straight line. Once turned completely around and well coated, I remove the tape and it leaves a perfectly straight line. Other times, I coat the entire blank beneath the guide, stop and go with the motor, then I go on to the wraps. Even though manufacturers recommend mixing a minimum of 3cc's, I always mix only enough epoxy to coat two guides because anything can happen, and that epoxy sets faster than I like, and takes a lot longer to cure than I like. Mixing cups are cheap compared to removing ugly 'stringy' epoxy.
-
A few years back I was working in my bro-in-law's bait/tacle/gun shop and while buil;ding some bass rods for customers, I got a wild idea, putting a cleviced blade in front of a spinnerbait head to give more flash on an In-Line type scenario. I started by molding a ball jig head with barb, running the wire straight up the pour hole connected to the hook inside the mold. When it came out, It was perfect. All I had to do was snip the sprue cone off the top from around the wire, and feed it off the top of the wire and I had a round head in-line spinner ready for a blade. I painted applied eyes, and epoxy coated the head. When dry, I put on a brass bead, a clevis with a #1 Indiana blade and another bead. I bent the shaft into an R bend, added a tandem Indiana set, a trailer and midget skirt, and had an in-line / spinnerbait in 1/16 oz. Now I am seeing them in cataloges as 'Crappie Spinners' with round heads just like I made in my Do-It 2 cavity mini jig mold 12 years ago, but they still haven't put the spinner at the head.
-
I have made a few specialty molds out of silicone, but they don't last as long as you'd like. They easily handle worm plastics, but you can generally only get a max of 50 or so pours before you have to recast another mold due to flexing the mold to release product unless you are extremely careful. If you don't mind a limited production run, this would be the way to go. As far as the flat spot, I have not found a way to prevent this on any hand pours, but they are still extremely popular with the older fishermen, and two color combos are a breeze. You would have to make a wooden template either carved or turned, and legs, tenticals, curltails, etc., would be added (glued) on. The template would need to be sanded smooth and coated with enamel paint. Get a high temp silicone mold kit, make a dam as per instructions, affix your template on a sheet of glass with Super Glue, spray with silicone mold release, mix the silicone mold components and pour over the template as directed. When dry, remove the silicone's foil dam around the edges and carefully lift the silicone from the template. Turn the mould over, heat your plastic, spray mold release inside the mold, and pour. I have attempted a two sided, and even a closed mold, but the two sided produced extra fat worms and the one piece was impossible to release the product unless it was tapered and had no appendages. I have also combined many creatures into one by cutting and cauterizing them together with a hobby hot knife (actually a soldering pencil with a #11 X-Acto blade on the end), or a battery operated cauterizer made for worms available at some sports shops. Those are the only 'Low Budget' fixes I have come up with without ordering aluminum, drawing blueprints, and having a CNC operator set the program and pay them (quite costly when all is said and done).

