Bentrod425
-
Posts
51 -
Joined
-
Last visited
Content Type
Profiles
Articles
TU Classifieds
Glossary
Website Links
Forums
Gallery
Store
Everything posted by Bentrod425
-
I'm gonna contradict what squarehead just said to a degree...although he's not completely wrong either. I was introduced to an acrylic color shift paint not long ago available at Micheal's craft store. It's called Dragonfly glaze. It goes on clear and actually paints on really well....albeit I do thin and run it through the airbrush, the guy who introduced it to me does not. He just paints it on as a topcoat prior to clear coating his baits. Now, it's acrylic, so RiverSmallieGuy would need to add an additional waterproof coat over the top if he's not using a clear coat already. To the original question regarding the Rustoleum CS paints, I don't have any experienced, but do know the pearlized stuff (especially this dragonfly glaze) will clog the airbrush if I don't use enough air pressure. The dragonfly glaze is especially fun as I think the flakes may be slightly larger than standard pearlized paints, but I make it work. I understand why my friend just paints it on with a brush. FYI to non-airbrush guys, it can be thinned with plain water as it's acrylic water based paint. Dragonfly Glaze
-
Wow, great thread! And kudos to Matt. I've done business with Barlows once. Was fairly happy. Only complaint was that they didn't have the full supply of spinner wire I ordered. They sent me what they had and prorated the charges to reflect the amount. I didn't find out until the order arrived. Would have been nice to told prior, but had enough stuff in the order that I wouldn't have changed it for that little thing. I did not follow up with Barlows about that, but wouldn't hesitate using them again. Getting a small (or inexpensive) items via mail order has always been a challenge. Usually the shipping charge outweighs the actual item cost. I can understand the minimum order request..even if I don't like it. I usually will end up ordering more stuff anyway just to justify the shipping charges!
-
Just water between colors and water or cleaner combined with partial tear down of the brush at the end of the session. Tear down includes pulling the needle and tip and cleaning up any paint residue. I also swab out the bowl with a q-tip.
-
petrolum jelly
-
Round ones. I prefer metal and glass, but plastic works too. Depends on the size/style of spinner.
-
I usually get glass beads from Micheal's or Hobby Lobby.
-
You don't really need to hold down the whole blade as the edge that goes by the clevis really doesn't need to be painted. I use a pair of hemostats to hold on to the tip of the blade near the hole and paint the rest.
-
Looks like lead but doesn't act like it - what is it?
Bentrod425 replied to SWO's topic in Wire Baits
I've had lures/pours crumble if I tried to release them from the mold too early. Think the lead was too cold when poured or not allowed to fully solidify prior to releasing. -
That does look sharp Wally. I bit the bullet and ordered some UV resin. It works wonders and the foil appears not to get damaged or lose any luster. I think the problem is solved!
-
I just bought some UV Resin off Amazon for $20. little to no odor and works great...need a UV light (also about $20) to cure.
-
I'm not having an issue with it being dull, I'm having an issue with it being damaged. learned through a FB group that the UV topcoat doesn't damage the foil, so will try that. Thanks.
-
When I used DWP I was afraid it'd set up too fast....It actually set up too slow for my tastes! Definitely works well though.
-
I did a search and didn't see anything specific, so asking if anyone else has had this issue. First, I'm fairly new to the lure painting side of things, so just now accumulating supplies. Over the holidays I got an airbrush and ordered some various paints and supplies to get started, but have just the basics. I also don't yet have any of the more popular suggested topcoats yet. I do have Alumi UV on order, so if anyone has input on my specific problem described below I'd appreciate it. As a temporary I bought some Minwax Polyacrylic, which seems to work ok on standard acrylic paints I bought some nail foil, which when applied looks really slick, but when I apply a topcoat it dissolves the mirror finish of the metallic foil. Thinking it was a "salon" thing I went and bought some recommended nail finish, Hard as Nails topcoat, but same issue. I tried applying some acrylic clear gloss airbrush paint (Createx) over the top as protection, but even after three layers of clear gloss the Hard as Nails topcoat still does some damage to the foil. I'm hoping the Alumi UV will elevate the problem, but really at a loss how to use the foils, but still retain the reflection. Anyone else have issues with this?
-
I think a dremel is your best bet to modify an aluminum mold.
-
Yes. I've made them out of wood, plaster of Paris (POP), hardware store silicon, and more recently out of Durham's Water Putty (DWP). Each offers pros and cons. I also bought a Do-It aluminum jig mold and if you're doing multiple pours then this is the way to go as the investment will save you lots of time and frustration. If you're only doing a few jigs at at time then a home made mold will be ok.
-
I read that book and tried various options. Can't say I noticed a difference between tape on the inside or outside of the blade.
-
Some good tips. May go the Bondo route at some point. I do need to pick up some clay for a better prepared mold setup.
-
I was taught to put the desired hook in and smack the mold. Seemed like a scary concept to me working with aluminum. However, I've found that I've been able to up the size of the hook in my mold (only have one) by a size or two without issue. There is a enough play to accept a couple different wire sizes.
-
Sewing machine motor...fantastic idea.
-
great idea!
-
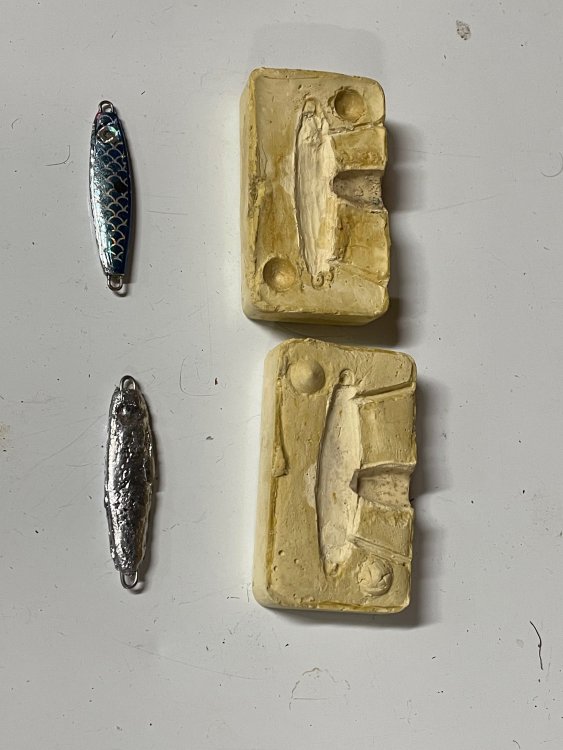
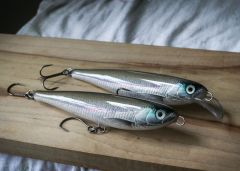
Want to say thanks to everyone on this forum who've posted info on using Durham's Water Putty to make molds. I made my first casting mold with the stuff a couple weeks ago and finally got around to pouring a couple prototypes. Needs a bit of refinement, but was shocked at how well it turned out for the very first attempt and probably a sub-par setup. I did dry the completed mold in the oven at 200 degrees for a couple hours and then just let it sit in there overnight. Prior to pouring I put the mold back in the oven for an hour at 170 degrees to heat up the mold. I'd probably increase the heat a bit next time for that pre-heat process. I did forgot to add any type of release agent to the mold prior to pouring, so thought I'd just made a critical error, but the lead popped out quite easily despite. The result may not be picture perfect, but still usable and I learned a lot for the next mold making attempt. PS - original lure on top in pic and poured lure below it.
-
I think you're gong to find it tough to solder stainless wire to brass. Soldering SS at all is tough. If you drill a hole in the blade and solder the wire at the point where the wire passes through the hole, you could probably get it to stick for a bit, but would bet the wire will break away from the solder eventually. I think your best bet would be to use an epoxy or glue if possible...and even that will be difficult to get the wire to stay put unless the SS wire is roughed up somehow to help bond the glue. Good luck. Hope you figure it out. PS...just thought of a possibility...One could theoretically use a DC current "tack" weld maybe the end of the wire to the brass, but they might not bond due to the significant difference of properties between the brass and SS. I have an idea how to try, but wouldn't be the safest method, so won't put the whole idea in writing. However, maybe it'll plant the seed if you're imaginative.
-
 Wow! Nice work!
 -
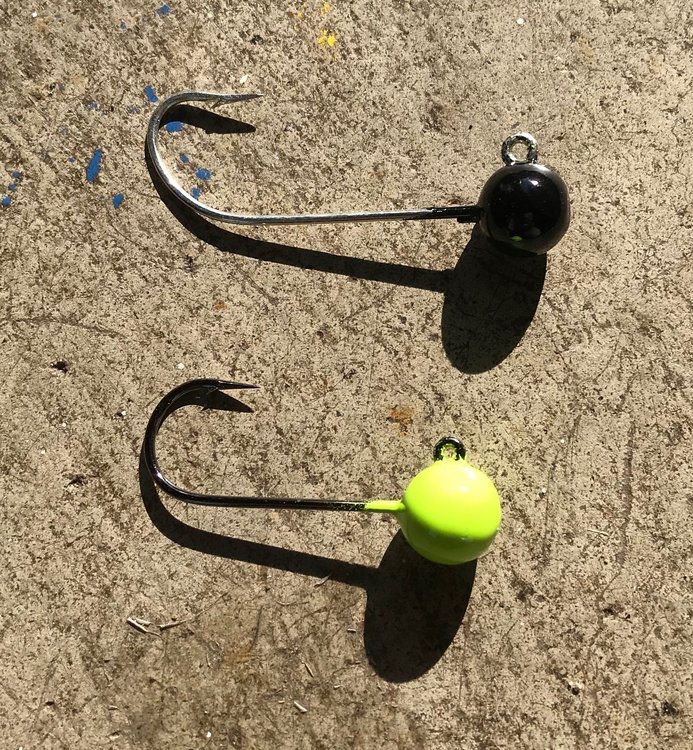
First time poster here. Long time salmon and Steelhead fisherman and have been tying my own jigs for years, but recently wanted to start pouring my own jig heads, primarily for tying Coho twitching jigs (1/4-1/2 oz), and eventually plan to pour Steelhead jigs (1/16-1/4 oz). I'm sure I'm providing way more info here than necessary, but maybe my story will help someone in the future. To get started I ordered a DoIt mold STL-6-A which as one cavity each of 1/32,1/6, 1/8, 1/4, 3/8, and 1/2 oz. I was thinking this would allow me the most options without ordering multiple molds (would need two separate molds to get the 1/4oz and 3/8oz heads I was looking for). I researched here and multiple places about what mold to use and what hooks as I do have my preferences in terms of what type and size of hooks to use for various jigs/presentations, but had a hard time finding any solid info on what alternate hooks might work with this particular mold. I did find a lot of info on various brands of hooks for different applications, how to modify molds, and what hooks might work with other styles of molds, but this mold in particular didn't have much info. My purpose of this posting is to share a bit of info for those who may be looking for it. I do have experience pouring lead for weights, down rigger balls, etc, so already had supplies from that. However, since I'd not done the jig head thing before I ordered the recommended Eagle Claw hooks (635 O'Shaughnessy) in 2/0, 3/0, and 4/0. 2/0 was what I was really after. I was fairly disappointed when the hooks arrived as they have a long shank and being bright finish isn't really what I wanted (prefer black nickel), but to get started they'd do and they're cheap, so won't be too upset about loosing a few to snags. In the meantime I did reach out to a local fishing forum guy I know who I remembered pours his own jigs and I'd not been in touch with for a year or two. Fortunately he was available and gave me some very helpful info. He also thought the Mustad 32833 hook would fit this mold. I immediately ordered some 2/0 Mustads 32833s. In the meantime I cut my teeth with the ECs. I don't have a bottom pour pot, so work old school with a burner, pot, and ladle. I used a candle to blacken the mold cavities before starting. Once the mold was hot I started pouring heads. I used 2/0 hooks and poured a dozen 1/4 and 3/8 oz heads, which worked great. Super easy and very happy with the ease of pouring these heads. I wasted no time in painting and tying up a few twitching jigs since the Coho season is currently under way here. Short story, the jigs were OK, but I still wasn't completely happy with the hooks. The Mustad's came in Friday, so I poured some yesterday. My first concern was that the shorter shank to eye length would not work with the STL-6-A mold or I'd have to modify the mold (didn't really want to do that). However, these seemed to just fit. The other concern was wire diameter, but again, these fit with no problem (2/0 hook for the 1/8, 1/4, 3/8 oz cavities). Pouring went perfectly. These look SO much better to me than the EC O'Shaughnessy hooks for my application. I poured some 1/8, 1/4, and 3/8oz sizes. I haven't had a chance to tye any jigs up yet, but hope to do so and test some jigs out on the water later this week. I think that covers it all, but will add more info if I think of it or if I find out more useful info in regards to this mold in the future. I posted a comparison pic of the 2/0 EC (top) vs the 2/0 Mustad (bottom) from the jigs I poured. Thanks to all for the info posted here. I've enjoyed reading various posts.