exx1976
TU Member-
Posts
212 -
Joined
-
Last visited
-
Days Won
7
Content Type
Profiles
Articles
TU Classifieds
Glossary
Website Links
Forums
Gallery
Store
Everything posted by exx1976
-
Wrong thread?
-
I will fully admit to have to look up the spec for annealing 304. The only metal I have firsthand knowledge of annealing is of brass; more specifically, rifle cartridge cases. I shot competitive long range rifle on the national level for a few years, and annealing helped to control but one more of the teeny tiny variables during the process.
-
Precisely. Everything has a reason. The challenge is figuring out the reason. Once you have accomplished that, replicating it should be relatively easy.
-
For completeness' sake, this is inaccurate. Annealing does not require slow cooling. Further, "heating the crap out of it" is non-specific, whereby annealing actually DOES require specific temps that vary by material. Annealing 304 requires a temp of 1900-2050 degrees F for 60 minutes per inch of thickness. Annealing brass, on the other hand, requires much lower temperatures, for much less time. In either case, a water quench is normally used after the heating in the interest of time.
-
Hrmm... Granted, I have far more experience in work hardening with brass than I do stainless steel, but.. I'd be surprised if only bending it once or twice hardens it as much as you say. I would nearly certainly not expect that simply bending a wire form causes it to automatically toughen up.
-
uhh, no. That is WAY too small.
-
The jig was purposely done as a "hand tool". Clamping a lure to drill one hole is even more time consuming than any other method I've seen/tried, so I ruled that out fairly early. The jig shown above is being used with a drill press. I looked up "center drill" because I was unfamiliar, and that wouldn't address the issue, either. I'd end up just having two jigs then - one to center the center drill on the lure, and then one for the smaller drill bit - which would hide the pilot hole from the center jig anyway, so there wouldn't be much value - unless I got the mini mill table, and clamped each workpiece. Again, time... I'd be spending more time at the drill press than the bandsaw! Once I addressed the issue with that jig as stated in a previous post, it's doing exactly what I wanted it to do. However, you've given me some things to consider for future projects, or "one offs" where significantly more time would be invested. You've also made me realize that I may have been a bit aggressive in my previous wording of what my goals actually are; that is to say that I don't need the lures to be 100% carbon-copy identical in every single physical aspect, dimension, measurement, and hole placement. What my goal is is to have repeatable performance of the lures from example to example. If that means that a variance of +/- .004" for the tow hook hanger, or +/-5g of weight, etc etc. After all, as mentioned by several posted here, 100% repeatability by hand is largely a pipe dream. So I'll settle for repeatable performance, if not identically repeatable production. Hopefully this helps to clarify exactly how far down the rabbit hole I'm wanting to go.
-
You may be able to run the screw eyes into a short section of dowel to serve the purpose of a nut, and epoxy that on, then put that assembly into the mold? I've always thought that through-wire would be best for use during casting process - but I don't use this method, so take that with a grain of salt.
- 6 replies
-
- screw eyes
- lures
-
(and 1 more)
Tagged with:
-
While my lures aren't round, I'm fortunate that I have a saw blade with the exact kerf as the thickness of the lip material that I'm using. So, no need to worry about any of that - just make one single cut into the lure body, and I'm done. If you needed to do multiple cuts to get the lip slot in, your best bet would be to build some type of jig or something I'd think.
-
I'm considering this for future iterations of the lure. It wouldn't be that difficult, I already have a really nice resaw blade for my bandsaw that makes light work of slicing wood. But, since I don't currently have a thickness planer in the shop, getting those two pieces of the lure perfectly flat and mated back up would prove a challenge. Perhaps that will be next winter's project.
-
If you have a demand of 5,000 pieces per week, you can call your lures anything you want! LOL
-
Excellent points, all. I will be certain to re-read this reply if and when the time comes that I sell any. About the only part that gets onto the edge of my own personal ethics is the line of villagers bit. To me, that feels a bit too much like an assembly line, and I don't know as Henry Ford advertised the Model T as being "hand made". LOL Ultimately, you are correct though. Make a quality product, set your price, and either people want it or they don't. I have many more bridges yet to cross before I reach that one, however.
-
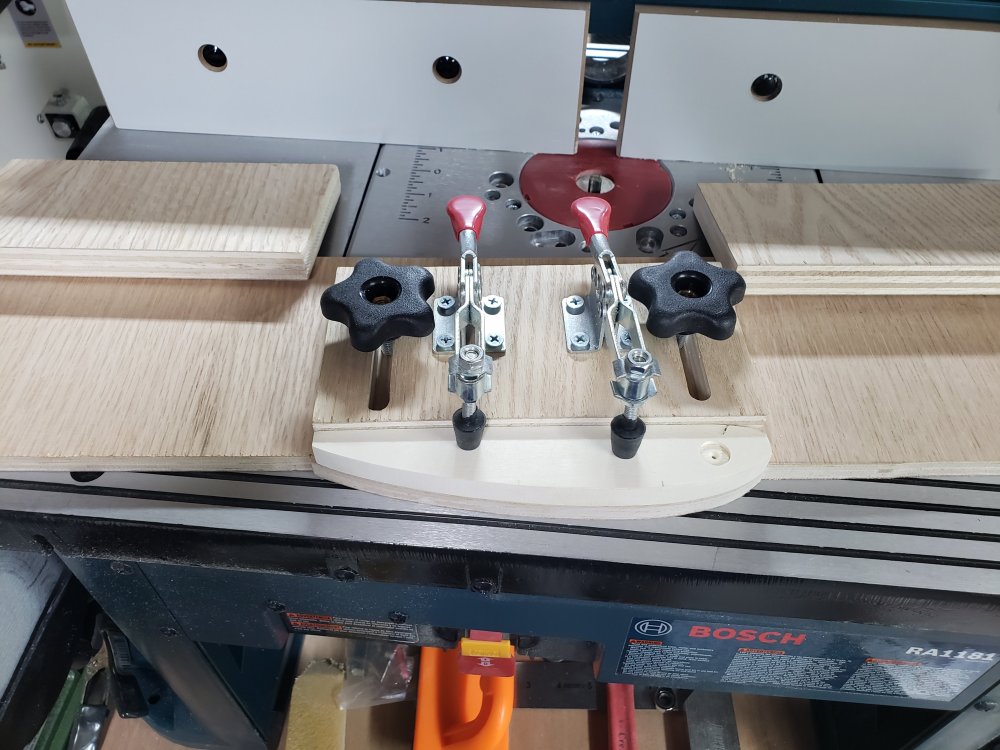
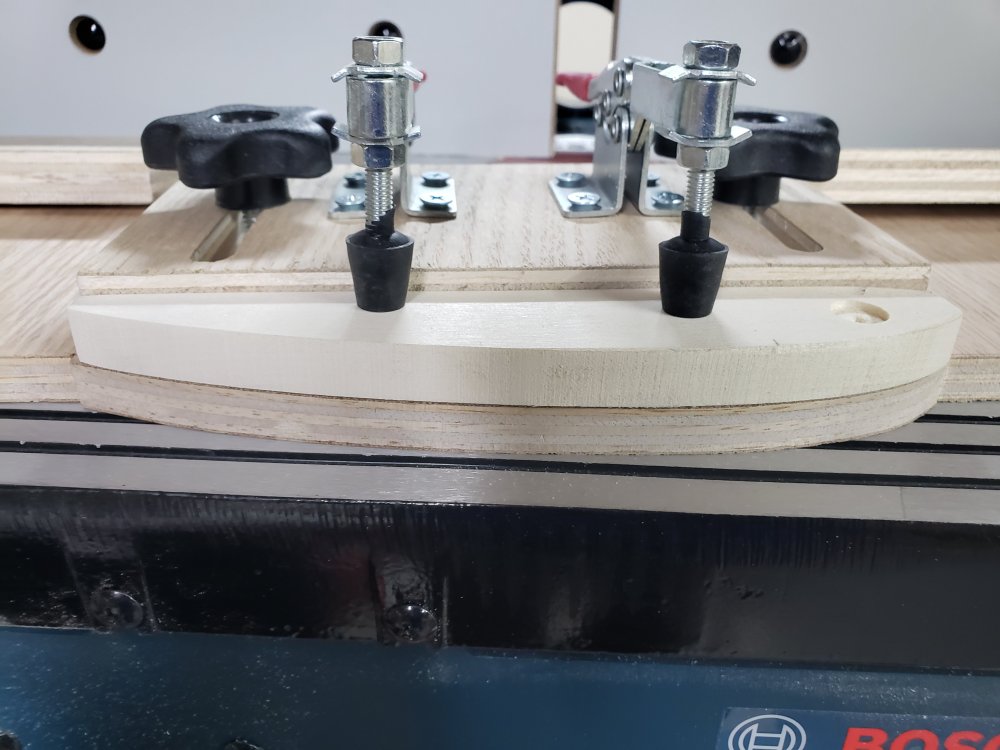
In my post about getting the screw eye holes in the EXACT middle of the lure, I had mentioned a jig I made for use with a flush trim bit on a router table. It occurred to me that some folks might like to see it. So, here it is: Used 1/2" plywood for the base, and did the profile for the back of the lure on the band saw and then the belt sander. Drilled 5/16" holes, then used a forstner bit to recess the heads of the t-bolts so it would sit flat on the router table and the t-bolts wouldn't scratch things up. Used a 3/8" trim bit to route the slots into a piece of 3/4" plywood. Got the t-bolts, the knobs, and the toggles all from Amazon for like $15 or something like that. I can create additional 1/2" plywood templates, and just move the hold down from base to base depending on what lure I want to produce. The base is 24" wide and the back of it is 6" away from the back of the lure (where the router bit would be). The bait this makes is 8" long, so I've got plenty of room to keep my hands away from the router bit. Only change I think I'm going to make it to add some fender washers under the knobs. This particular setup works great for this lure since the belly is flat (all except for by the nose, but that takes 5 seconds on the belt sander to create that small contour). However, if I decide to make one in the future that has a contoured belly, it would be easy to do. I'd just create another base from 1/2" plywood, and if the lure was 8" long again I'd do the back profile maybe 3.5" off one end, and then the belly profile 3.5" off the other end, leaving a 1" gap between the two profiles. Then I would cut another piece of 3/4" plywood, and cut the negative of the back contour into it, then add toggles. I'd use the toggle base shown in these photos with the flat side to get the back profile, and then I'd flip the bait over, move it to the belly profile side of the template, and the back would fit into the toggle base then. Hopefully I explained that well enough. I'll be sure to come back and post pics when I do it. As my buddy says: "I used my tools to make tools to use my tools."
-
Negative. The whole purpose I started on this adventure is because I can buy all the plastic baits I want, but all the good ones, the ones that USED to be wood, are now plastic. So I want to make wooden ones because plastic sucks. LOL
-
True enough, I suppose. But mentally, I am able to tell myself it's "custom" or "handmade" if mine are the only hands making it. If I start hiring the neighborhood kids to run my router table and drill press, it then becomes more of a production endeavor. Again - pedantic, perhaps. I suspect many builders who make custom lures do similar, though. I know of several builders that sell VERY expensive lures (multiple hundreds of dollars each, with only ~500 examples produced annually) that either have YouTube channels, or have been filmed for various outdoors channels. They all used some type of jig to replicate at least portions of their operation. In fact, the flush trim bit/router table/template idea I got from one of their videos. Previously I was rough cutting and then finishing to spec on a belt sander. OYE, what a tedious process, and didn't always produce perfectly square surfaces. The router table will be MUCH better. I'm just waiting on my bottom-bearing flush trim bit to arrive so I can put it to the test.
-
Hrmmm.. At that point, "removing the human", I think is a bridge too far in saying a lure is "hand made" or "custom made". Jigs for repeatability, wielded by humans, are one thing. But to mechanize the entire process, and "remove the human", well to me that's just a "production lure". I may be a bit pedantic, but these personal delineations will become ethics problems for me later should I end up being good at this, and decide to begin selling some. I'm not the type that could take a mass-produced product and sell it as "custom" or "hand made" and not feel dirty or bad. Since I don't enjoy feeling that way.... I have two spinning on the epoxy turner now. They should have the requisite amount of ballast in them based upon VodkaMan's spreadsheet (and I did, in fact, float an example with the same ballast). One has a TINY bit more ballast than the other (.25"x.4" hole), added to the back of the lure, just to see how it affects action (but well within spec on the spreadsheet). Otherwise, they are identical (with the possible exception of screw eyes not being exact - I didn't have my jig yet). I plan to add both of them to my personal collection unless they are so abysmal that they turn into just another lesson. Going to put the final coat of epoxy on them before I go to bed tonight, and hoping to be able to sneak away to a local hotel pool Tuesday morning for a quick test and video - work schedule depending. I did fix the jig, in case anyone is interested. 4 layers of masking tape on one of the pieces of acrylic just to shim it out a tiny bit, and the holes are now so centered that I am unable to discern a difference with a digital caliper and the naked eye.
-
Oh, I'm all about quality and craftsmanship as well. But in my eyes, a BIG part of the "quality" side of the equation is that if one bait I make runs awesome, then the next bait should run equally as awesome, not have variations from example to example. That means either LOTS of time, and actual water testing of every single example; or it means having repeatable ways to accomplish repetitive tasks. My ultimate goal is that the only variation lure-to-lure is the paint job. I want the holes in the same spot, I want the weight in the same spot, I want the same amount of weight, I want the lips all identical and at identical angles, etc. The lures are still hand made, insomuch as my hands touch them at every single step, they aren't being produced by machine in some automated process the way a mass-produced, "modern", injection-molded lure would be. I do not see jigs and router tables as a crutch or as a detractor to custom work, but rather, I see them as tools that enable me to repeatably produce high quality lures as efficiently as possible. Every mistake I can eliminate helps to eliminate waste, which keeps costs down. If this ever becomes more than a hobby, waste is a very important consideration. Every minute(s) I can shave from some monotonous process allows me that much more time to spend on painting, and on getting perfect epoxy. There are only so many hours in a day, and with having a regular full-time day job, there's only so many hours left to go around. Further, this is (planned to be) only a winter hobby for me at this point; I'd like to make as many lures as I can before the ice melts again - when I'd rather be using them than making them.
-
Gotcha. I'm really looking for something that more repeatable, faster, and precise than eyeballing it. I'd like to start MAKING lures, not just "making" them. The immediate goal is to replace all the plastic lures in my boat with wooden ones that I've made, and I have more than a handful. LOL No idea where it will go from there, but this I know for sure - my present processes are much too time consuming for this to ever be more than just a hobby (the amount I'd have to charge as related to the amount of time invested would be something not many people would be interested in), hence the search for repeatability and speed in all aspects of the process.
-
While I appreciate the detail in your answer, it didn't really answer my question. You provided a splendid description of how you drill the hole, but you didn't tell me how you manage to get the hole in the exact center, or how you find the center, for that matter. As for the bit being pulled, the jig would prevent that - or at least, it would only allow it to be pulled up to .003" off-center. The jig clamps onto the flat sides of the bait, not the curved back or belly portions (which would be the only way the lure could "slide"). I'm holding the jig tight, and using it to hold the bait upright, so the jig isn't opening up or coming loose or anything like that.
-
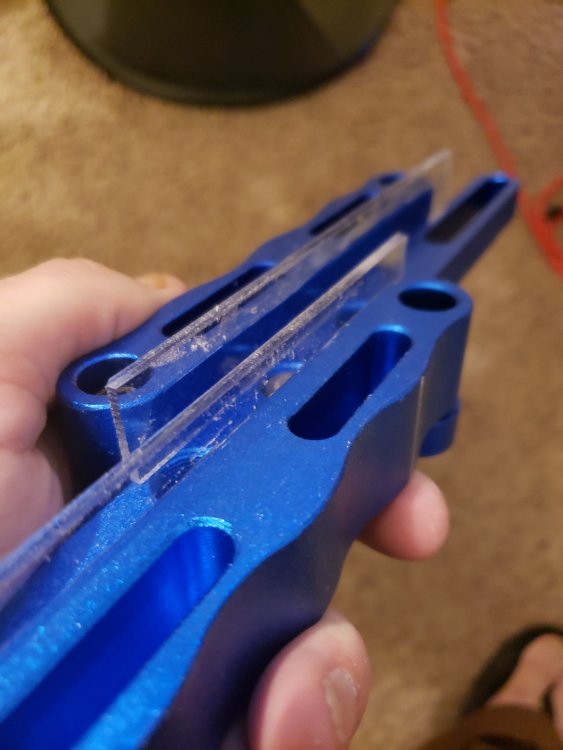
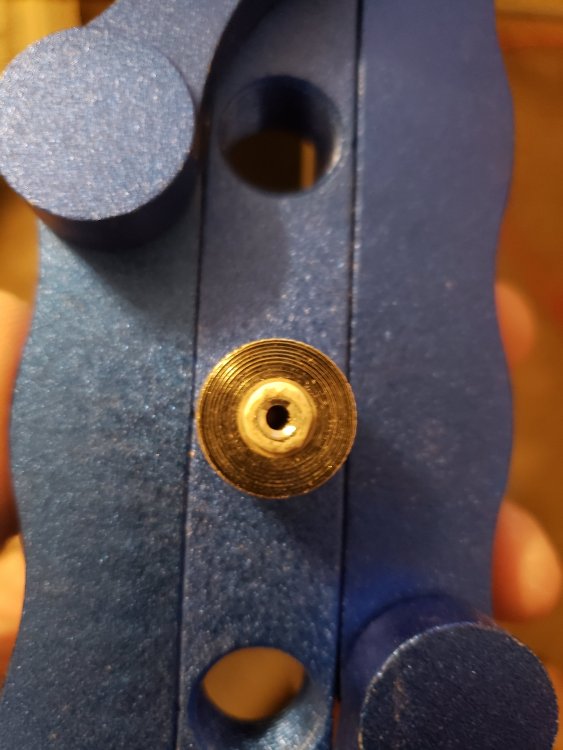
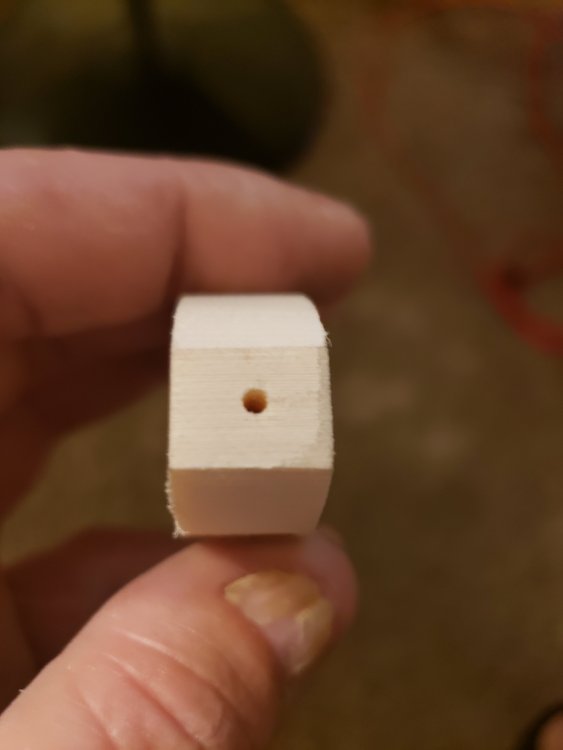
Ok, guys, I'm about at my wit's end with this. I think I've managed to solve for just about everything EXCEPT this problem here. To date, other solutions I've come up with to make this process repeatable are (AKA some lessons I've learned): Created a jig for my router table to hold wood blocks to shape the lures with a flush trim bit after a rough cut on the band saw. Use a roundover bit on the router table so the backs and bellies of the baits are exactly the way I want them (was doing this by hand, but WAY too slow). Drilling the pilot hole for the eye all the way through the lure to ensure the eyes are in the exact same spot on both sides. Setting the stop on the drill press when using the forstner bit to drill the eye sockets and ballast holes. Using a miter attachment on the band saw to get the angle of the lips EXACT every time (bonus that the kerf from one saw cut is the exact width for a snug fit of the lip I'm using). But, there's ONE problem I still can't figure out how to solve, and that is how in the world to get the holes for the screw eyes in the EXACT middle of the bait? When I started, I was drawing lines all the way around the bait, while it was still blocky, to define the exact center, and then I was using the drill press to drill holes on that line. Depending on how many cups of coffee I had that morning, I may have been pretty darn close - or not. So I says to myself I says "Self, there's got to be an easier way". That's when the perfectionist in me took over, and started looking at way to engineer a solution to the problem. So, I bought one of these: https://www.amazon.com/gp/product/B0826YXY39/ref=ppx_yo_dt_b_asin_title_o00_s03?ie=UTF8&psc=1 I also bought some stainless steel tube that was JUST barely big enough for my drill bit to fit in (my math says the tube is about .006" larger than my drill bit). So, the contraption arrived, and it's too wide. I didn't read the description, and it only work on pieces as narrow as like 17mm or something. Mine are about 13mm. Ok, so I'll use some acrylic sheet, CA glued to the "arms", to shim it, like this: Splendid. That appeared to solve that problem. It now closes firmly on my blanks. Now, to craft the pilot for the drill bit! I took the stainless tubing, wrapped masking tape around it until I got a snug fit in one of the guides from that thing, jammed it in TIGHT, then stuck it in the vise, and cut off the excess tubing with a hacksaw, flush to the bottom of the guide. Put the guide in the jig, stuck it in the drill press, and drilled out the flash from the cut. Then I countersunk the top of it to make it a bit easier to guide the drill bit into, like so: Sweet! This should be super easy!!! So I grabbed a blank, stuck the jig on it, stuck it in the drill press, and sunk a hole: In case the photo doesn't CLEARLY show it, the hole is off center by .010". In my head, I know how to fix this, but I'm stuck on the fact that it didn't work correctly the FIRST time. A considerable amount of thought, time, and effort went into all this, and I really thought I had it licked (I'm much more perfectionist than I am engineer). So I ask the group two questions: How important is it that the hole be in the EXACT center? Is .010" off center that big of a deal? I guess I never busted out the calipers and measured any of the baits in my boat. LOL Second, how do YOU get the holes or eyes in the dead center of your baits? Or don't you? Do you just eyeball it and call it good enough? Am I making a mountain out of an ant hill here? HELP!!! Thanks, exx
-
LOL I did that with split rings. Anybody need 998 split rings?
-
Depends on what lengths you actually need, and how many you need to buy. What seems reasonable at first, for a hobby builder, can quickly become unwieldy if there is a lot of waste in there (say you needed 10" pieces, for example), and especially if you start buying a lot of it. All those 6" pieces of waste could easily add up to additional 10" sections if bought by the coil instead of pre-cut.
-
051 is fairly thick, and shouldn't have much memory. You should look to buy it in packaging such that it springs out straight when removed from said packaging. eg, there are places that sell it "coiled", but it's coiled at like a 12 or 14" diameter. Instead of being coiled around the outside of a spool, it's coiled on the inside. When you begin to remove it, it should self-straighten. If anyone is actually wrapping it tight enough that it's holding the shape of the spool you bought it on, I'd look for a different supplier. Way too much of a pain in the ass to deal with that.
-
I suppose that would depend what it's constructed of. Stainless? Likely not. LOL Regardless if you could bend it, you'd better have a REALLY big bait or it's gonna sink like a rock.
-
Whoa. 0.51 is significantly different than .051 is. One is nearly a half inch, the other is 51 thousandths. Hoping this is a typo on your part, or you're in for a VERY bad day. LOL


