Jump to content

Search the Community

Showing results for tags 'diy'.

  • Search By Tags

    Type tags separated by commas.
  • Search By Author

Content Type


Forums

  • TU Club Forums
  • General Discussions
    • TU Site Info & Updates
    • The Docks
  • Public Tackle Making Forums
    • Hard Baits
    • Soft Plastics
    • Wire Baits
    • Fly tying
    • Rod & Reel building & repair
    • Boatbuilding
    • Homebrew Tools
    • Hybrid Tackle
  • The Bait Shop
    • Classified Ads
    • TU Advertiser Forum
  • Knowledge Base
    • Member Submitted Tutorials
  • TU Events and Contests
    • TU Events
    • TU Lure Swap
  • Web Tools
  • News Archive
    • General News

Product Groups

  • TU Premium Membership
  • Advertisements
  • TU Swag

Find results in...

Find results that contain...


Date Created

  • Start

    End


Last Updated

  • Start

    End


Filter by number of...

Joined

  • Start

    End


Group


AIM


MSN


Website URL


ICQ


Yahoo


Jabber


Skype


Location


Interests


Address


City


State/Province


Zip/Postal code


Country

Found 12 results

  1. Guest

    Gelatin Bio Plastic??

    Is any one know things in bio plastic, i have some questions on a easy to make recipe i saw on another forum. I want to know how to make a gelatin based plastic non-soluble in water without the use of gelatinizing oil, I am asking because gelatin is not a true plastic, but rather an organic compound that rearranges a liquid that it is dissolved in, but certain chemicals can prevent it from bonding and forming a gel. If anyone can give some chemicals to harden it, make it insoluble, or make it into a true plastic can you please send some info? Thank for any help . Heres the site http://green-plastics.net/posts/84/qaa-can-i-make-bioplastic-fishing-lures/
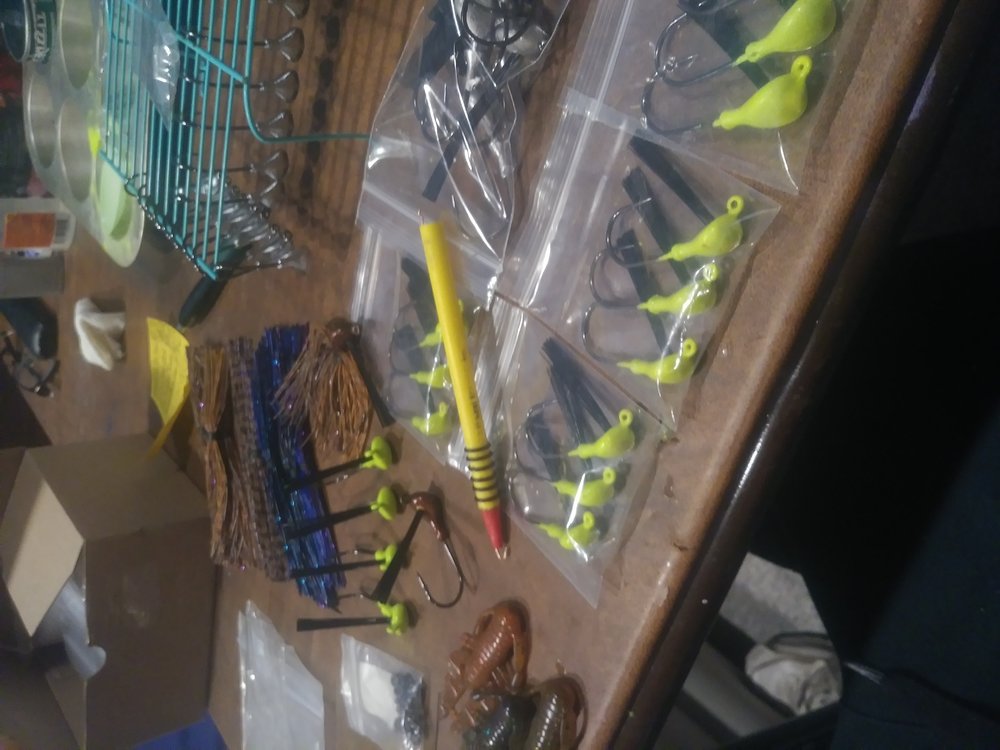
  2. Surely I'm not the first one to think of this. I am new to this site and to lure making in general, and just recently started building bass jigs from scratch and realized I had everything I needed except a skirting tool. So I came up with this simple solution with an ink pen. Used a piece of copper wire to pull the silicone tabs through the pen.
  3. Guest

    #5SM

    Hey community, This week's formula will be a plastisol, I would recommend this recipe for light fresh water fishing, and less rugged underwater terrain. I would say to use dye normally on this recipe since it contains a dye solvent factor now as paraffin oil coating with fish oil. Please feel free to ask questions or point out typos. #5SMs stands for 5th numerical recipe, S for soft/not so durable, M - medium weight. -64% DINP Plastecizer -13% Emulsion PVC paste resin -2% Soybean oil epoxy -2% Paraffin oil with fish oil 1 to 1 ratio -2% Urea -5% Organtin stabalizer (tetramethyltin) -6% Nauguard -6% 6705 Plastic Softener (http://www.lurepartsonline.com/Online-Store/Plastic-and-Additives/Plastic-Softener.html) Thank you for reading this formula.
  4. Guest

    Formula #4SMh

    Hey Community. This week's formula will be a plastisol, I would recommend it to fish in freshwater as this formula might stiffen out in ocean waters or possibly partially dissolve. It would good to sink in in the fresh water and might have a very weighty action in your water so I would recommend it for big worm(hooked"wacky worm"style) or swim baits. #4SMh stands for fourth recipe, Semi-Durable, and Medium-Heavy. (Note: Percentages are by volume). -64% DINP Plastecizer -13% Emulsion PVC paste resin -2% Soybean oil epoxy -5% Organtin stabalizer (tetramethyltin) -6% Nauguard -3% Urea -1% Potassium Acetate (mix with urea) -2% Glycerin (mix with urea) -4% .65 micron Tungsten or .70 micron lead Thank You for reading this formula.
  5. Guest

    Interesting Info.

    This is not a new formula, but does contain different additives for many different applications, (including for flexible plastisols or polysols). Here have the link - http://www.hanserpublications.com/SampleChapters/9781569905432_9781569905449 PVC Additives Schiller SAMPLE PAGES.pdf Also I will be placing New Formulas every Friday, Mostly plastisols, then polysols or organasols, i will try to go by votes it at the end of the next formula to see what the community wants me to formulate next, but if i am unable to to formulate it i will do another i am able to formulate (if you any questions feel free to ask). Please comment for the next formula today and tomorrow.Thank you for reading this post.
  6. Hellow fellow anglers, Been a while since I've been on here. My buddy asked me to make another video I thought I would share this video for creating nightcrawler harnesses. I was thinking about using floats with it but don't have any. I only pull these out when the fish slow down burying themselves in the weeds or hang tight too structure. What are your options for these harnesses in general? What would be a good way to spice them up? I've got hundreds of blades in different colors, sizes, and shapes. When do you use these spinners?
  7. Hey guys, Last weekend I was going through some of my trolling spinners. My buddy has asked me why I had so many of these "harnesses" as he called them. I told him what they are then showed him how to make them. After getting a bunch more questions he asked me to create a basic video to use. I've been building variations of these spinners, strip-ons, and live bait harnesses for years. They work wonders covering lots of water to find active fish. Last summer I had caught walleye, perch, pike, musky, bullheads, different panfish species. I want to see what you guys think about it. Thanks for your time, Scott
  8. Lure turner: build a pegboard L frame on 1-1/2 by 1-1/2 frame. Make it about 30" high on the end and 20" high on the front(pic3). Mount microwave or similar geared motor (plenty in the dump) to work desk about 28" high. Cut a section of swim noodle cut to fit in between motor and end of box. Glue an old bicycle wheel hub with inside end ground down to fit inside noodle to far end of noodle(pic 1). Attach shorter plastic pipe to motor with tape and E6000. Slide pipe into noodle. This gives you a friction fit to the foam. Build up with tape for more grip. I use this method so I can just grab the foam to insert another lure - no need to unplug. Mount the bearing to the far end of pegboard frame. Now you can insert lure holders through the foam. Make the slots miss the pipe on the front side - so they will pass all the way through the noodle. Balance the holes by placing them every 90 degrees. You can see that I mounted over 20 lures on my 2 ft long turner. It turns great, no belts to slip while your back is turned. It is capable of mass production. I think the motor has enough torque to turn one 6 feet long. Lure holders #1(pic2): medium and small size binder clips lined with 1/16" adhesive foam on one or both sides. If you put the foam on the part of the clip next to the stick, it holds the lure at an angle. Attached pic shows how this can maximize room at your bench or on your turner. Tape and glue with e 6000 to ¼” popsicle sticks. These hold most lure lips well enough to turn them. Lure holders #2: cut off end of cheap, or even used, paint brushes and insert into alligator clips. These have some spring in them for stretching out swimbaits. Note: Binder clips (in mini, medium, and large) with 1/16" adhesive foam (but without the sticks) make great scale netting clips which will not scratch lures.
  9. Hey guys, I figured this would be the perfect place for me to reach out to you guys who make soft plastic baits. I am a senior Industrial Design student at Wentworth Institute of Technology in Boston, MA conducting research for my senior thesis project. My goal is to research the methods of the at-home (soft plastic) lure maker in an attempt to make the process safer and more efficient in the home workspace. Aside from being a student, I am also the product designer for Optimum Baits and a freelance designer for several other lure companies. While I do have a prototyping space of my own, all of the actual production of the designs are carried out at a large scale. This does not provide me with much insight for my project. From what I have seen in this group, there are some extremely gifted and creative people in here. Any of your input would be greatly appreciated! Thank you for your time. https://goo.gl/forms/y7DImLhsLPS4pqgV2
  10. Tips for Choosing Spinnerbait Blades Slow Willow Spinnerbait Blades Slow Willow blades are the same length, width and exact oval shape as standard willow blades. All the dimensions of standard Willow and Slow Willow blades are identical - except the Slow Willow has much less concave/convex curvature or cup than the standard Willow. The Slow Willow has a shallow cup and looks flatter compared to the standard Willow. This difference, the shallower degree of cup, makes the Slow Willow start spinning at slower speeds than a standard Willow. When you start to retrieve a standard Willow at a slow speed, you may have to jerk the bait and reel it faster at first in order to get the blade spinning. On the other hand, with the Slow Willow blade, there's not as much of a start-up problem at the beginning of the retrieve. You get smoother, easier, better starts with the Slow Willows during those first few important seconds of the retrieve when aggressive, active fish will rush over eager to strike if the spinnerbait looks appealing. Likewise at the end of a retrieve, as a slow-rolled spinnerbait gets closer to the boat, a standard Willow blade can stop turning during the last leg of the retrieve. If you are tuned in to the blade's vibration up the line, it's pretty apparent when you feel it just go dead and stop rotating as it nears the boat. Unfortunately that's a critical strike point since following fish often react right when a slow-rolled spinnerbait starts rising vertically toward the boat - but that's just when a standard Willow tends to stop turning too. The Slow Willow will continue to spin longer at the end of the retrieve and it starts turning earlier at the start of a retrieve. A few more seconds better performance may not seem like a lot, but those are two high percentage strike moments - the very beginning, and with slow-rolling the very end of a retrieve when the blades are hesitant and having trouble turning. So at the beginning and end of a retrieve, the Slow Willow spins a little better. During the middle of a retrieve, it can be fished a little slower than a standard Willow. The Slow Willow blade also spins at a greater degree of cant or skew from the wire arm axis. In other words, whereas the standard Willow spins quite tightly, the Slow Willow spins in a wider arc. This makes a Slow Willow appear a little bigger, more visible and flashier than a standard Willow. Also more torque and water drag result, which lets you fish the Slow Willow slower than a standard Willow. So that's why I say no two Willow blades work the same. We can see here where only one property - the degree of cup - is different, it causes a dramatic difference in how the Slow Willow fishes compared to the standard Willow. Here are a few (not all) tips for using Slow Willow blades: •First and foremost, think slow-rolling and fishing slowly with the Slow Willow. •Enhanced lift at high speed. This sounds like a contradiction, but since the Slow Willow has more torque, therefore more lift and rise than a standard Willow, it can be used to help keep a speedily retrieved spinnerbait near the surface. The torque that lets you use the Slow Willow more slowly is the same torque that lifts it higher on a fast retrieve. •Size #4, #4-1/2 and #5 are the sizes you see on over 90% of all bass spinnerbaits that have willow blades. Actually, #4 and #5 are by far most common. •Size #4 tends to be used more often on 1/4, 3/8 and some 1/2 ounce spinnerbaits. •Sizes #4-1/2 and #5 tend to be used most often on 1/2 to 1 ounce spinnerbaits. •On double willow spinnerbaits, occasionally (and more often with a pair of #4s), both blades may be the same size. But 90% of the time with double w illows, the front blade tends to be a half or full size smaller than the back blade. •A small, light Colorado blade such as a #2 Colorado makes a great front runner ahead of a Slow Willow. Colorado Spinnerbait Blades Nowadays, Colorado blades are rarely used as much as Willows. That's all the more reason you should use them - because other angler's won't be. Fact is, Colorado blades can work magnificently anytime, anywhere, under any and all conditions, either single or double Colorado blade configurations excel. Yet most anglers will not use Colorado blades except at night, in dark-colored or cold water when the thumping vibration and slower speed retrieve required with Colorado blades are known advantages. Most anglers don't realize that the heavy thump and vibration of the Colorado blade also helps fish hone in on Colorado blades around dense grass beds where visibility is limited in thick vegetation. Bottom line, if you want to be all you can be with spinnerbaits, you've got to try tossing the Colorado’s under a wide variety of conditions. At times, and often for no explainable reason, bass will belt Colorado’s better than any other blade styles. A few (not all) tips for trying different sizes of Colorado blades are: •Size #2. Tends to make a small flash spot in front of any other style of bigger back blade. •Size #3. For slow-rolling a 1/2 to 1 oz spinnerbait, I tend to use this blade as the front runner ahead of a #4-1/2 or #5 Willow or Slow Willow •Size #4. Tends to be the size used more often on 1/4 and 3/8 ounce spinnerbaits. •Sizes #5. Tends to be the size used most often on 1/2 ounce and up. •For fishing around thick grass, try double #4 Colorado’s on a 1/2 oz spinnerbait, or a #3 front and #4 back on a 3/8 oz bait. Fish will hear the vibrations and barrel out of the grass to grab it. Indiana Spinnerbait Blades Along with Colorado and Willow blades, Indiana blades are well over 100 years old. Nowadays, they are hardly used as much as Willows or even Colorado’s. That's all the more reason for you to use them. Indiana blades can work well anytime, anywhere under any and all conditions. Indiana blades are similar to the proverbial glass that is half full, or would you say, half empty? Indiana’s do not flash as much as Willows and do not vibrate as much as Colorado’s. That's the half-empty attitude. On the other hand, Indiana’s flash more than Colorado’s and vibrate more than Willows. That's the half-full optimism. If you need a little incentive or more confidence to make you try them, keep in mind that a double Indiana blade spinnerbait won back-to-back-to-back Bassmaster Classic world championship tournaments in 1974, 1975 and 1976. That's quite a testimonial for Indiana blades. So why don't you see them on the market anymore? Well, you see them here, don't you? So why not pick up a few today. A few (not all) tips for trying different sizes of Indiana blades are: •Size #2 and #3. These small sizes are deeply-cupped so they tend to spin tight and fast as front blades on small spinnerbaits. I often like them in front of a back Willow to make a small, fast spinnerbait. •Also on small spinnerbaits, I like a #5 Indiana in back of a #3 Colorado blade. •Try twin Indiana blades: 1) a pair of #5 on small to medium size spinnerbaits, or a pair of #6 (or a #5 in front of a #6) on larger spinnerbaits •Additionally, they can be used in combination with other blade styles, either ahead of or behind Colorado, Oklahoma and other blade types. Two of my favorite configurations involve an Indiana with a Willow. •Willow/Indiana Combo. A #4 Willow placed on a 1/2 oz spinnerbait well in front of a #6 Indiana presents a very smooth, fluid look. The blades achieve a harmonious blended appearance. There's a lot of see-through the blades effect on both blades. Overall, it's a non-intrusive, non-alarming look that excels in clear or stained water with a moderate to fast speed retrieve. •Indiana/Willow Combo. A #5 Indiana on a 1/2 to 1 oz spinnerbait placed well ahead of a #5 Willow lets the front Indiana blade spin in a wide arc and steady rotation. Yet the back Willow blade gets lost in the Indiana's wake. The Willow doesn't get a good water flow. It lollygags and bumbles along in a more lifelike manner than displayed during the normal steady rotation of Willow blade. The effect looks best at slow speeds, but moderate to fast retrieves will give the same but lesser effect. Fluted Spinnerbait Blades Usually not used for bass, Fluted blades are arguably the most popular and productive blade worldwide for pike and musky spinners. It gets its name from the Fluted tail which gives a fish tail or fish fin look, reflects light in varied directions, and causes rippled turbulence not found in perfectly smooth blades. Since most of a Fluted blade is smooth, you still get a larger flash off it, but many smaller flashes off the fluted tail. Keep in mind, there are also Willow and other blades that have this fluted tail stamped on them, but those are not the classic "Fluted blade" as we talk about it here. One can see where the Fluted blade may have shared its early origins with an Indiana blade, but it's not correct to call the Fluted blade a sub-variety of an Indiana blade. The Indiana blade is over 100 years old, and has changed very little over the years. The Fluted blade is almost equally as old to begin with, and there isn't one dimension or property of a Fluted blade that hasn't been optimized into the oversized pike and musky blade it was way back when - and still is today. For bass anglers wanting to gauge size comparisons, a #2 Fluted equates to a #4 Indiana, and number #4, #5 and #6 Fluted blades equate to #6, #7 and #8 Indiana blades respectively. These sizes of Fluted make great bass spinnerbait blades. A few (not all) tips for trying different sizes of Fluted blades are: •The #2 Fluted blade makes a great front runner ahead of the #4 or #5 Fluted or ahead of other blade styles. •The #4 Fluted can be used in pairs (two #4) or combine a #4 in front of a #5 or #6. •A single #6 Fluted blade makes a great night fishing blade or use the single #6 any time you want to get the biggest trophy bass. Oklahoma Spinnerbait Blades Oklahoma blades run a little heavier, a little thicker than your other standard bass blades. They have a tight, rapid vibration too. They're mainly used in Northwest Pacific and Alaskan ocean salmon fishing, and also on pike and musky spinners. They're big blades with a lot of vibration, thump and flash. Bass love them! These Oklahoma blades have a creased centerline. This makes two sides to the blade. Without the creased centerline, a comparable blade would really only have one smooth side and one flash. But these Oklahoma blades emit separate flashes off both sides and a third flash emitted by the centerline crease itself. Oklahoma blades are a great shape match for young-of-year shad species, sunfish and crappie fry. They also present a rapid, tight spinning motion that matches the tight vibrating swimming movement of these deep-bodied bait species. My favorite times to "match the hatch" with Oklahoma’s are late spring through late summer. Starting in late spring, dense sheets of newly-hatched sunfish, crappie and other panfish fry are a phenomena that helps lure bass away from the spawning shallows and out towards the post-spawn outer weed beds. During that time of year, look for butterbean-sized sunfish and crappie fry that seem to infest the offshore grass beds. You'll know the bass are keying on them when you see sheets of sunfish and crappie fry sprinkling out of the surface of the offshore grass beds by the hundreds and thousands in unison. A passing shadow or lunging bass may spook them. This happens especially on overcast days, low falling barometers, and in the late afternoon and early evening hours when the dense sheets of fry are more inclined to rise toward the surface. Other times, the fry masses may be laying low to the bottom, and slow-rolling an Oklahoma blade spinnerbait pays off handsomely. But whether on the surface, suspended or deep, the shape and flutter of an Oklahoma blade mimics sunfish and crappie fry. By late summer into fall, mixed sizes of shad become a reason to use Oklahoma blades too. There can often be several mixed sizes of shad layered together in schools. Under ideal conditions, some adult shad can spawn every month during summer, and that leads to mixed size schools of small shad. When you see these mixed size schools or pods of small shad, they are often layered. The smallest shad will be a few inches above the mid-sized shad, and the largest shad will be on the lowest level of the school - just like a spinnerbait! So 2 different, graduated sizes of Oklahoma blades on a spinnerbait can mimic these mixed size schools of shad. Here are a few more (not all) tips for Oklahoma Blades: •Double Oklahoma Blades. Any time of year, a #3 Oklahoma spaced well ahead of another #3 or #4 Oklahoma gives a spinnerbait the appearance of a pod of small deep-bodied baitfish. The same baitfish pod effect is achieved with a #4 spaced well ahead of a #4-1/2 Oklahoma on larger 3/4 to 1 oz size spinnerbaits. •Single Oklahoma Blades. A single #4 or #4-1/2 Oklahoma (without any front runner blade) is awesome used on the drop. Just let it helicopter down next to some form of cover, a ledge or bluff wall, and pop the rod tip occasionally. Bass will belt it on the fall or as it lays on the bottom, bass will scoop it up. •A #2 Oklahoma can be quite useful as a front runner ahead of most any other blade type. You'll typically see a small Colorado used this way, but the #2 Oklahoma makes a great alternative instead of the customary small Colorado front runner. •Oklahoma/ Royal Blade Combos. Oklahoma and Royal blades go great together. I tend to like a wider spacing if a smaller Oklahoma is used in front of a relatively bigger Royal. I tend to like a moderate spacing when a smaller Royal is used in front of an Oklahoma. Either way, Royal and Oklahoma blades go great together. Whiptail Spinnerbait Blades Brand new design for 2008. The Whiptail blade is sculpted with baitfish details, a scaled back, smooth belly, and engraved jawbone, eye, gill and fin. When used together in pairs, spaced wide apart, there's a swimming baitfish school resemblance. Due to the uniquely hooked blades as they rotate, it may appear at times as there's more than two baitfish (although what a fish sees is anyone's guess), but the rotation casts off a lot of images on both sides of the wire arm remindful of a movement of several baitfish in concert. Probably the most important aspect of the blade design is the vibration created by its aggressive tail cupping and unique curvature. The Whiptail has a tight rotation and a distinct thumping vibration. When the blades slow down, the curvature creates a left hook or kick out move to the side, and a singular thump can sometimes be felt in the rod tip when the spinnerbait is close enough to watch and feel that happen. Because one edge of the blade is scaled and the other edge is smooth, there is a dual visual dimension to the spinning blade flash. This dual dimension adds something that's just not possible with either an entirely smooth or an entirely scaled finish blade. Even using one smooth and one scaled finish blade won’t achieve the same effect combined in the Whiptails. The asymmetrical curved or hooked tail creates the flickering illusion at times of a swimming, jumping or flexing baitfish movement that's just not possible with most other symmetrical straight blades like Willows, Indiana’s, etc. Serrated Spinnerbait Blades Another brand new design for 2008. The Serrated blade may be described as a Willow blade that's enhanced with a bit of a turbo charge in it. The manufacturer sculpted an aggressive notched outside edge to add more turbulence as it slices through the water. The cupping on the blade in conjunction with the notched edges gives the serrated blade a very tight rotation and distinctive vibration as the blade cuts through the water. Chartreuse White Willow Spinnerbait Blades Two-tone chartreuse white spinnerbait skirts just can't be beat, and are generally agreed to be the most popular and most productive spinnerbait skirt color in history and worldwide. Very often, painted chartreuse and white blades are paired with chartreuse white skirts, almost always painted double Willows The next photo is unique since these blades are two-tone chartreuse white spinnerbait blades with laminated blades. One side of each blade is painted white. The other side of each blade is painted chartreuse. The two different color sides blink on and off chartreuse-white-chartreuse-white as they rotate. This causes a lot of color flutter and color flicker not possible with a solid white or solid chartreuse blade. Size #4 is white on the outside, chartreuse on the inside. Size #5 is chartreuse on the outside, white on the inside. These go great used in pairs with the #4 white chartreuse as the front blade and the #5 chartreuse white as back blade. The #4/#5 Willow combo is especially popular on spinnerbaits in the 1/2 up to 1 ounce range. Metallic Chartreuse Spinnerbait Blades Another great color for painted blades are these translucent metallic chartreuse blades. They're painted the same see-through chartreuse color on both sides, over nickel-plated blades. In this way, the metallic shine of the nickel-plating flashes through from underneath the translucent chartreuse. These metallic chartreuse blades pair well with either nickel and/or gold blades. So either use two metallic chartreuse blades together - but don't hesitate to pair one metallic chartreuse blades with one nickel and/or gold blade too. A translucent metallic chartreuse blade also pairs well with a black nickel blade. Size - What size of spinnerbait to use will be determined by water color and the depth where bass are located. 3/4 to 1 ounce and larger •stained or muddy water •fishing deep, 10-15' or greater •fishing at night 3/8 ounce and smaller •clear water in daylight •shallow clear water during night •clear nights with bright moon Color - should be decided based on water color and whether daytime or nightime fishing •clear water use blades - nickel or silver metal finish •skirt - white, white with some chartreuse, silver with metal flake •muddy or stained water •blades - painted white with some metal flake for accent, gold or copper metal finish •skirt - chartreuse with white, some orange or red Blade Style - also decided based on water color, depth and whether daytime or nightime fishing •clear, shallow water use nickel or silver metal willowleaf blades, single or tandem •muddy or stained water use gold, copper or brightly painted Colorado or Indiana blades, single or tandem Blade number - determined by amount of cover •desired depth •Blade style - whether Colorado blades, Willow Leaf blades, Indiana blades or Oklahoma, determined by desired liftretrieve speedwater clarity Blade size - controls speed and flash •smaller moves "less" water, retrieves shallow, good in clear water •larger moves more water, retrieves deeper, good in dark water Blade finish and color- determined by water clarity •clear water calls for nickel, smooth or stamped •dark water needs gold or copper, smooth or stamped Techniques 1. Buzz: Retrieve the bait with your rod tip high, keeping the blades on the surface the entire time. Bend a willowleaf blade to increase the commotion it causes on the surface. Curl the blade around your forefinger, or put two kinks in it to create triangular panels, or just bend the back part of the blade. Experiment with angles to get the drag, flutter, and action you like. 2. Bulge: Swim the bait just below the surface so that it produces a bulge and wake. Allow the blade to break the surface every now and then like a skittering shad being chased by a predator. 3. Burn: Clip on undersized blades and retrieving the lure a foot or so deep at an extremely high rate of speed. For lakes with Kentucky bass, this is particularly effective. I recommend a 5/16-ounce Quickstrike with a couple of #3 willowleaf blades for spots. 4. Rip: Sweep your rod tip to the side to create a burst of speed, and then slow it down as you reel to take up slack and rotate the rod back toward the lure. 5. Steady: Crank the spinnerbait in at a steady rate in the "twilight zone," keeping the lure just within sight during the entire retrieve. A variation on this is to every now and then twitch your rod tip during the retrieve. This causes the skirt to flare and the blades to flutter erratically, which can trigger strikes from following bass. 6. Troll: Anglers usually use their reel and rod to swim the spinnerbait, but don't overlook this lure when trolling. The vibrating, flashing blades and pulsing skirt attract hits as the bait passes ambush points, and the spinnerbaits' ability to bump across the bottom and crash through vegetation without hanging up is an advantage over crankbaits, especially for trolling shallow, weedy areas. To maintain depth at trolling speeds, clip on smaller, narrower spinner blades, or increase weight by clamping a rubber-core, lead sinker onto the frame (in front of the head) or to the hook shank under the skirt. 7. Bottom-bump: Count the lure down or retrieve slowly until you feel it strike something. Keep it just off the bottom, but make it bounce on submerged brush, rocks, and vegetation throughout the retrieve. 8. Slow-roll: Keep the bait in contact with the bottom most of the retrieve. Especially if you use superlines, you'll feel your bait scrape across gravel, sticks, and rocks. Keep it moving just fast enough to feel the "lub-lub-lub" or a big Colorado blade. In-line blade attachments spin at slower speeds and impart clearer vibration up your line than do swivel-mounted blades. 1 9. Drag: Particularly effective as a cold-water technique around ambush points, I drop the bait just beyond ambush points (cypress trees, standing timber, brush piles, dock pilings), let it settle to the bottom, and then pull it slowly along the bottom like a scuttling crayfish with plenty of pauses. Use a short-arm spinnerbait like a Sidearm rigged with a single Colorado or turtleback blade. 10. Drop: On bluffs and channel ledges, cast your spinnerbait close to the vertical face or slope. Lift or gently pop your rod tip so the lure clears the bottom, and then allow it to flutter down. Stair-step the bait all the way down the slope. Secret Weapon spinnerbaits are particularly effective as a drop bait because the free-floating inline blade assemblies swing upward and all blades rotate freely while the sinking lure remains horizontal so the hook is properly positioned for the hook-set. 11. Bump: Any time you are able to guide your retrieve so it brushes against pilings, standing timber, stumps, boulders, brush piles and other structures or cover, kill the retrieve as the lure contacts the ambush point. Allow it to drop on a semi-slack line for a second or two. Blade vibration alerts predators to the approaching meal, and the erratic flutter of the "dying" bait launches the attack. 12. Flip or Pitch: Swing the bait up against bridge pilings, dock structures, brush piles, grass lines, and into pockets in floating vegetation mats. Pitch or flip it to the trunk of standing timber or cypress trees and shake your rod tip to make the bait flutter down through the branches. If there's a bass there, you'll know it. If you reach the bottom without a pickup, then carefully work your lure back up through the branches, and then repeat the process one time. This, too, is best with short-arm spinnerbaits like the Sidearm. Caution: This is a high-risk but potentially high-reward presentation. If you don't feel like losing a few spinnerbaits, switch to a flipping jig with a brush guard, and clip a spinner blade attachment to the hook. You'll still get the fluttering blade action, lose fewer baits, and the ones you break off won't leave such a dent in your wallet. 13. Yo-yo: Similar to stair-stepping your lure down a bluff or slope, but with more of a lift between each drop. Start with your bait on or near the bottom (or at the maximum depth you prefer in open water) and point your rod tip almost directly at the bait. Lift the bait with your rod tip and then start lowering your rod tip, letting the spinnerbait flutter back down on a semi-limp line as you take in slack with your reel. Another yo-yo presentation can be used with horizontal branches or the near edge of a hole in a vegetation mat. Bring the lure up to the branch or obstruction and then raise and lower it eight or ten times by lifting and dropping your rod tip. Secret Weapon's Sidearm with a single CO blade on the compact frame is ideal for these methods. 14. Doodle: Cast across a branch above the water, and then pull the line up until the lure is right on the surface, and then start shaking and vibrating it to create splash and flash right at the surface. Not as good as a baby bottle nipple with a treble hook, maybe, but a lot less embarrassing to fish. Good luck retrieving that bass!
  11. Has anyone made their own Alabama rigs? If so, could you add a picture of your DIY Alabama Rig(s) and tell how and why did you do to make your own Alabama rig the way that it is. I'm personally making concepts of a possible DIY Alabama rigs, and I was looking if anyone else in TU has made ones. Keep on Fishin'.
  12. There are flutter spoons from companies like lake fork and Strike King that cost a hefty $7-$10 for a piece of shiny metal with a possible paint job on it that can snag quite easily....Is there a way to make these huge spoons without the huge dent in the wallet?? What I am wanting to do is to make one of these not from a lead or brass....and I thought of using aluminum, but wouldn't that "rust" and I know stainless steel is a xxxxx to form with a hammer, a vise, and pliers...furthermore, there is a way to make spoons well with metal kitchen spoons, but the desire length is not there...so What should I do?
×
×
  • Create New...
Top