CrawChuck Posted February 22, 2006 Report Share Posted February 22, 2006 I'm wondering if something like this will work for plastisol. http://www.popeilfamilystore.com/setftv.html I have a chance to get one cheap at a yard sale. There's a spigot on the side there at the bottom but I would rather have it on bottom. Does anyone use this sort of thing? I have no experience with pots. Do you want something with the heating element enclosed or visible? Quote Link to comment Share on other sites More sharing options...
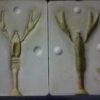
CrawChuck Posted February 22, 2006 Author Report Share Posted February 22, 2006 Well it's not a turkey fryer but I coaxed the secretary at work to donate this old Presto Deep Fryer for the cause, LOL! It works pretty darn good. Here's a few baits poured with it using a mixture of old used baits in an old craw prototype mold. Im building a table out of an old cable spool which will serve as both a moldmaking station and for pouring. The pot will be at a fixed location and the outer tabletop ring will rotate to bring the molds into pouring position. These are the first baits I've poured in a very long time...Almost cried Quote Link to comment Share on other sites More sharing options...
lure_learning Posted February 22, 2006 Report Share Posted February 22, 2006 Nicely done! and that is one of your custom molds? welcome back to the plastics fun! Quote Link to comment Share on other sites More sharing options...
ominousone Posted February 23, 2006 Report Share Posted February 23, 2006 If you don't mind sharing, what did you use to make the spout? It looks like you can control the flow to a real slow drip which I would think would be ideal for some tougher pours. I would love any info you would be willing to share. Thanks, mat Quote Link to comment Share on other sites More sharing options...
millsryno Posted February 23, 2006 Report Share Posted February 23, 2006 I thought about doing one of these a long time ago but was sceptical that the heating element would be inconsistant. Any info on how well it handles heat? Did you tap the spigot yourself? Quote Link to comment Share on other sites More sharing options...
millsryno Posted February 23, 2006 Report Share Posted February 23, 2006 I thought about doing one of these a long time ago but was sceptical that the heating element would be inconsistant. Any info on how well it handles heat? Did you tap the spigot yourself? Quote Link to comment Share on other sites More sharing options...
CrawChuck Posted February 23, 2006 Author Report Share Posted February 23, 2006 See if I can answer everybody... lure_learning...thanks, yes that is one of the old molds I used to make. The poor thing was in a milk crate at a friends house. Had to blow the dust off. Being one of the prototypes it lacks the detail I really like but was unable to locate any of the good ones. Received a 50 pound bucket of material today so some new ones are soon to come! ominousone...that is a brass 1/4" ball valve on a 1/4" x 1/2" long brass nipple and a 3/!6" brass air hose fitting with threads to fit the valve. The hole was drilled and tapped and some teflon tape was used to seal the threads. It is a very easy valve and flow is very adjustable. millsryno...I started with the temperature at 300 on the knob which started melting the old worms almost immediately. Adjusted slowly upwards while stirring ocassionally to about 365 on the knob to get the consistency needed. This was some pretty hard plastic I had to work with so I'm thinking some good plastisol will be much better. As for holding the heat it seems to do ok but I think it will improve if wrapped with some insulation on the outside. I would also like to extend the valve handle out some and wrap the valve. This particular fryer has the element exposed on the bottom, kinda laying in a groove molded in. I'm not sure if I ought to mess with that area. Figure it's not bad for starters and I already like it more than cups in the microwave. At one time we had three microwaves running non stop. Did not give much thought to smoke or fumes. I started having constant nosebleeds among other things. This time there will be a vent hood! Quote Link to comment Share on other sites More sharing options...
jmik26 Posted February 23, 2006 Report Share Posted February 23, 2006 Looks great crawwchuck - Does the shutoff valve get hot? Is it a pain to take the valve apart and clean? Great ideas, I had my eyes on this puppy for the longest wondering if it would work???? http://www.northerntool.com/webapp/wcs/stores/servlet/ProductDisplay?storeId=6970&langId=-1&productId=42673&R=42673&issearch=1595690 Quote Link to comment Share on other sites More sharing options...
millsryno Posted February 23, 2006 Report Share Posted February 23, 2006 I'm not positive, but i think that is similar to what lurecraft uses. I think they put a wrap around heating element around it. Not sure, though. I, too, have thought about making one with this, but they are not made to be heated and I didn't think it would be safe. On eBay do a search for "presto pot" and you can get what Craw has there already made for $49.99. Quote Link to comment Share on other sites More sharing options...
CrawChuck Posted February 23, 2006 Author Report Share Posted February 23, 2006 Looks great crawwchuck - Does the shutoff valve get hot? Is it a pain to take the valve apart and clean? Great ideas' date=' I had my eyes on this puppy for the longest wondering if it would work????[/quote'] Had it on for about two hours and the valve handle was warm but never got hot. I shortened the bottom part of the air hose fitting by about 3/4 of an inch. The plastic runs out of it after a pour pretty cleanly. The plug in the top part of the valve after turning off and cooling comes right out with the leftover plastic. The little bit stuck in the ball poked out with a punch real easy. Also shortened the nipple where it screws up into the pot so all the plastic would get out but find it easier to peel out if a little is left in the pot. I see where a stirrer would be good as alot of the flake ends up in the bottom. I had an idea to make a pot out of two pots and a heating element like on the turkey fryer. The element could be situated between the pots, one pot being smaller to fit inside the other. Some kind of oil or something that could take the temperature could fill the space between the pots. I do alot of metal fabrication in my job and am thinking of a pot with sloping bottom toward the front. An oil filled void might heat the whole pot evenly but I don't know what kind of oil or otherwise liquid would take the heat without evaporating. Any ideas? Quote Link to comment Share on other sites More sharing options...
Angler310 Posted February 23, 2006 Report Share Posted February 23, 2006 Hey Craw, Consider peanut oil, I read an article that the Gov. used this to keep plane and jet engines lubed during ww2. It takes a lot of heat without breaking down and its cheap. would like to see your proto type when you get it figured out. Mike Quote Link to comment Share on other sites More sharing options...
jmik26 Posted February 23, 2006 Report Share Posted February 23, 2006 Thanks crawchuck and millsryno, I just bought my presto pot off ebay, just like you said 49.99. Can't wait to get it, here is the link incase anyone else is interested. http://cgi.ebay.com/ws/eBayISAPI.dll?ViewItem&ssPageName=ADME:B:EOIBSAA:US:11&Item=8255515325 Quote Link to comment Share on other sites More sharing options...
jmik26 Posted February 23, 2006 Report Share Posted February 23, 2006 Thanks crawchuck and millsryno, I just bought my presto pot off ebay, just like you said 49.99. Can't wait to get it, here is the link incase anyone else is interested. http://cgi.ebay.com/ws/eBayISAPI.dll?ViewItem&ssPageName=ADME:B:EOIBSAA:US:11&Item=8255515325 Quote Link to comment Share on other sites More sharing options...
CrawChuck Posted February 24, 2006 Author Report Share Posted February 24, 2006 Well that looks much nicer than my old pot! Looks like the valve turns out horizontal...might be a problem removing cooled plastic from the 90 bend. About refined peanut oil...looks promising with a flashpoint of 540 degrees F. Quote Link to comment Share on other sites More sharing options...
Predator Bass Baits Posted February 24, 2006 Report Share Posted February 24, 2006 Thanks for the link, I just snatched one up. Quote Link to comment Share on other sites More sharing options...
CrawChuck Posted February 24, 2006 Author Report Share Posted February 24, 2006 It will be interesting to hear everybody's results using these cheap pots! Quote Link to comment Share on other sites More sharing options...
millsryno Posted February 24, 2006 Report Share Posted February 24, 2006 I went to Wal-mart today to purchase the pot and found one I liked better. It is called a Fry Daddy by Presto. It looks to be a 2 quart size, which is perfect. It does not have a thermostat like the other Presto, it is automatic. I decided to call Presto for the temperature range it operates on. The lady told me that it cooks up to 400 degrees and then shuts off. When it cools to 375, it turns back on again and repeats this process. Hmm, that is too hot. The pot was only $19.99, so I decided to try it out anyway. I stopped by Home Depot and got all the items I need for a spigot and while I was there decided to look at the drill presses. BINGO. They have a Ryobi 10" model for $99 that this pot works absolutely perfect with. I bought that stuff and headed home. I decided to try the pot and the mixer together before I did the spigot. My logic was that it would not heat the plastic to 400 degrees because there is no lid and the heating element is only on the bottom. If the drill mixed it, it would constantly be mixing in cooler plastic with the hotter plastic. Hopefully it would shut off when the heating element hits 400 degrees and ideally the plastic would be below 350. Well, I was close. The plastic heats up to abot 380 degrees. Everything works perfectly except for the high temperature. The drill press is tits and the plastic is nice and uniform heat and consistancy. I have already drilled and tapped a spigot and it looks great. I know the high heat can be worked around. Maybe you guys can help me out. I was thinking there must be some type of dimmer switch or voltage regulator I can splice into the power cord. If I can do this, I can control the heat. Any ideas? Quote Link to comment Share on other sites More sharing options...
CrawChuck Posted February 24, 2006 Author Report Share Posted February 24, 2006 millsryno, I'm not electrically inclined so no help on the question but am curious about the drill and what type of bit/paddle??? do you use to stir with and how is it set up to pour? Are you pouring one sided molds? I'm trying to vision how I'm going to set my table up with room to stir with a drill and have room for stand up full body molds. Quote Link to comment Share on other sites More sharing options...
millsryno Posted February 24, 2006 Report Share Posted February 24, 2006 Craw, I will post some pics when I get this all figured out. the fry daddy I am using is smaller than the kitchen kettle you are using. The fry daddy actually fits on the drill press platform perfectly and you can adjust it up and down with a lever. I am experimenting with bits but am thinking a 2" or wider spade bit (drill bit for wood) would work perfectly. I will probably try a 3" one and see how that works next. When I figure out which size is best I will grind off the pointed tip so that I don't accidently drill through my pot. I am setting this up to pour 2 peice molds. I generally pour sticks. With this pot I should be able to pour about 150-200 5" sticks. Anybody good with electricity?? If I can learn how to restirict the voltage I think I may have a pot/drill combo for under $200 that rocks. Quote Link to comment Share on other sites More sharing options...
Delw Posted February 24, 2006 Report Share Posted February 24, 2006 Ryan You might want to try a dimmer switch. ( like the use on ceiling fans) the only problem I can see you haveing is drawing to many amps and burning the dimmer switch out. Basically the dimmer switch is a reostat. That would be interesting if it worked. but again you might have a problem with over amping as I am not sure what the frydaddy draws for amperage. one other thing you could do is take a lee pot thermostat control( same thing as a dimmer switch) it will handle more amps Quote Link to comment Share on other sites More sharing options...
millsryno Posted February 24, 2006 Report Share Posted February 24, 2006 Thanks Del. A dimmer switch type thing is exactly what I was thinking. The only ones I saw at Home Depot were for wall outlets, though, for lights. I did nto think something like that would work. I am more envisioning a dimmer box where my power cord plugs into the dimmer box and the dimmer box plugs into the wall. When I was a kid we had a train set and you would control the train with a box like this. You would just turn the nob and the train went faster or slower. Any ideas?? Quote Link to comment Share on other sites More sharing options...
Delw Posted February 24, 2006 Report Share Posted February 24, 2006 its basically the same thing. just get a little outdoor electrical box that will hold the dimmer switch. Delw Quote Link to comment Share on other sites More sharing options...
Predator Bass Baits Posted February 24, 2006 Report Share Posted February 24, 2006 I know the plug in dial controll dimmer your speaking of, I looked at it and it is rated for 300 watts, were a dimmer for lights is rated for 600 watts. here is one place that carries them. http://www.beanfarm.com/cgi-bin/store/agora.cgi?cart_id=8908509.12845*hr4O10&next=8&ppinc=temp&exact_match=off&user4=Temperature Quote Link to comment Share on other sites More sharing options...
Predator Bass Baits Posted February 24, 2006 Report Share Posted February 24, 2006 Being a new bee, I do not want to pour a qt or more of plastic at one sitting especially one color Is it ok to heat a qt of plastic in the presto pot and take say 4 oz out and then mix my colors, will probably have to re-heat in a micro, main question is the remains in the pot, is it ok if you do not use all of it and let it cool to re heat later without dis colering ? Does this sound resonable or does someone have a better idea ? I will have to do some searching but if you know the link, or does anyone have listed the ratio for color to a qt of plastic ? Quote Link to comment Share on other sites More sharing options...
Monty Posted February 24, 2006 Report Share Posted February 24, 2006 do a search on the net on wood wooding tools. they make a power dial that your router table, or drill plugs into. and when you turn it up the more power and the faster it goes. you turn the switch down the slower it goes. that switch can handle more amps that a wall dimmer switch can. i will try to find one and post a link with a pic. Monty Quote Link to comment Share on other sites More sharing options...